 How you doin’? It’s Friday… and almost time for Happy Hour! There are some memories I retreat to in the back of my mind when I find I can’t have a proper Happy Hour. Let me tell you a little story…
Wendel was his name and Wendelizing was his game. Wendel was the barkeep at a local dive bar across the street from USC. After some really rough days matriculating at the castle of higher learning a bunch of us would visit Wendel. Wendel would entice us to drink Singapore Slings—many of them. For the uninitiated you should know a Singapore Sling goes down really easily. Before long and after two or 3 of them it was time to go back to the dorm. So, what is a Singapore Sling you ask? According to the historian for Raffles Hotel, the intent was to produce a cocktail that looked like fruit juice and had a rosy color that would appeal to women. It was, as the hotel notes, "a socially acceptable punch for the ladies." The Singapore Sling is a classic gin-based cocktail that every cocktail connoisseur needs to taste. The story goes that it was developed by a guy by the name of Ngiam Tong Boon at the Raffles Hotel in Singapore sometime around 1915. It is a smooth, slow, and semi-sweet cocktail with a complex flavor that has remained a favorite for over 100 years—yes, people still drink them. The original recipe may be lost to the ages and few people can agree on the “right” recipe. The disparities seem to have begun as early as the drink's first decade and they've only grown over the years. This recipe is the one we served at Fanny’s Fish Market (a chain of seafood joints I owned up in the SFO Bay area) and is a more contemporary variation. Some versions include anything from pineapple to grenadine or liqueurs like Cointreau. A couple of today's top cocktail historians have also dug up older recipes which are worthy of discussion and a taste or two, or three. No matter how you end up taking your Singapore Sling, it is a fascinating cocktail that is well worth your time to explore. Take 3-minutes to “Wendelize” your friends with Fanny’s version of a Singapore Sling. Ingredients 1-1/2 ounces gin 1-ounce [1]Benedictine 1-ounce lime juice 1/4-ounce simple syrup 2-ounces club soda 1/2-ounce cherry brandy (or kirsch or Cherry Heering) Garnish: lemon slice and a stem-on maraschino cherry Directions
ChefSecret: Did you notice the lack of pineapple juice? This was the "key" ingredient in Raffles' Cricket Club recipe, so that may have been how Ngiam improved on his original cocktail that was so popular throughout Singapore at the time. If you want to try another popular Singapore Sling—call it No. 2—pineapple juice is used at a full 2-ounce pour, equaling that of Beefeater Gin. It also adds 1/2 ounce each Cherry Heering and Triple Sec with 1/4-ounce Benedictine and 3/4-ounce lime juice. It's topped with Angostura bitters and club soda. This was the recipe found on a Raffles coaster, though it lacked the measurements, so experienced bartenders had to wing it on their own. [1] What is Benedictine liqueur? In 1510, the Benedictine monk Don Bernardo Vincelli created the recipe for this French liqueur, which calls for 27 plants and spices. The three main ingredients are Angelica, Hyssop and Lemon Balm. It has the flavor of sweet honey accented with holiday spices, stone fruits, and an herbal nuance. Do you have a question or comment? Do you want to share a favorite recipe or pictures with our readers? Click here to send your thoughts. Please remember when making purchases—Give our American farmers and ranchers the business—source local foods, shop small (neighborhood owned stores) and buy when you see Made in the USA on the label. To you and everyone dear to you, be strong, be positive, stay well, stay safe and be kind. Thanks for reading! #SingaporeSling #Gin #Singapore #RafflesHotel #HappyHour #Cocktails #PerspectivesTheConsultingGroup #QuarantineKitchen #Covid19
0 Comments
 How you doin’? If you have been homeschooling and babysitting your kids all day every day it probably seems like the pandemic will never come to an end.
Yes, you love them. You often felt guilty before that you weren’t spending enough time with your kids and now you realize, absence makes the heart grow fonder. It’s tough being a teacher, entertainer-in-chief and mom or dad all at the same time. So maybe it’s time to do a craft or baking project as a change of pace. Let me offer you the simplest starter baking recipe project (along with a brief history lesson), which I know is suitable for all ages for both cooking and eating. Take notes—there will be a pop quiz shortly. First, for the history lesson… Shortbread evolved from a medieval biscuit bread into a buttery cookie. Some versions are rustic, some are quite elegant. Shortbread may have been made as early as the 12th century, but its invention (or at least, the refinement to its current form) is often attributed to Mary, Queen of Scots (1542-1587) in the 16th century. She had a team of French chefs who had the time, labor and ingredients to perfect the recipes. Shortbread recipes first appear in cookbooks of the time, although origination often precedes the first reference in print by a significant number of years. Alas, Queen Mary didn’t enjoy her shortbread with tea before her head was separated from her body, nor did her cousin Queen Elizabeth I [1533-1603]—tea didn’t arrive in England until September of 1658. It may be difficult for us to imagine a world without a comforting hot cup of coffee, tea or hot chocolate. Why “Short” Bread? There are two different explanations for the name of this cookie. Some sources cite the crumbly or “short” texture of the biscuit. Others attribute the name to its high percentage of shortening, or butter (the word “shortening” refers to any fat). Butteriness is an important quality in shortbread—so much so that in 1921 the British government legislated that a product called shortbread must get at least 51% of its fat from real butter. This is the most basic cookie recipe there is. There are only three ingredients—real butter and brown sugar give it an irresistible flavor and all-purpose flour gives it the signature texture (the extracts are optional). Quick preparation and baking time will give you and your kids a quick reward. Prep time: 10 minutes Bake time: 20 to 25 minutes Yield: about 48 “biscuits” (24 servings) Ingredients 2 cups salted butter, room temperature 1 cup packed golden brown sugar 4-1/2 cups all-purpose flour 2 teaspoons pure vanilla extract or 1 teaspoon almond extract (optional) Directions
ChefSecret: Use a low-water content, European-style butter—I prefer Plugra for best results. The secret to Plugra European-Style Butter is a slow churn process that creates less moisture and a creamier texture when compared to ordinary American table butters. This secret becomes yours for higher, fluffier cakes, flakier pastries, unbelievably creamy sauces, rich enviable risottos, sizzling sautés and extraordinary flavored compound butters. #Dessert #Shortbread #KidsBaking #PerspectivesTheConsultingGroup #QuarantineKitchen #Covid19 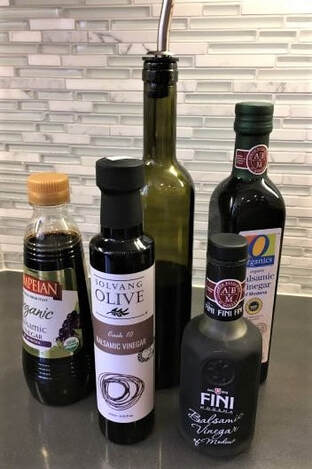 Balsamic Vinegars Balsamic Vinegars How you doin’? Here’s what I’m planning today. I’m going to grill steaks for dinner. I picked up a couple of bone-in rib-eye steaks at Huntington Meats yesterday and I lightly marinated them in what I thought to be expensive balsamic vinegar. It comes from a canister-like dispenser at Gelson’s markets and it costs about $35 bucks for a small bottle when they have it in stock. They make all kinds of claims they I never really paid much attention to; I just love the flavor of this brand of balsamic vinegar and use it on a lot of different things… I add it to salads and dressings, to sous vide chicken breasts, over-ripe strawberries, I even use it to add a punch to my Italian sauces and Bloody Mary Mix.
I was a happy “balsamic camper” until I heard from George—George Salmas, The Food Lawyer. George exclusively represents food and beverage companies. The Food Lawyers have been in the biz for over 30 years advising and protecting food industry clients. We (Perspectives and The Food Lawyers) have common clients but do different things. Let me tell you a little bit about George… first of all, he is an attorney (that’s not all bad) with a quirky sense of humor and often writes about some of the really stupid things that people sue food people over. In California there are lots of litigious crackpots who will sue anyone at any time for anything… but I digress. So last week I receive a new article from George, Drop the Vinegar and Come Out With Your Hands Up! He goes on to tell us—well, I’ll let you read it in George’s own words (be sure to scroll down to the recipes below). Drop the Vinegar and Come Out With Your Hands Up! One of the great scams that has gone on for years, and still goes on today, is counterfeit balsamic vinegar. Most of it in stores is bogus. Real, traditional, authentic balsamic vinegar comes from two regions in Italy and starts with specific strains of white wine grapes that are crushed into juice with the skins, seeds and stems. This concoction is cooked down to about 50% volume into a concentrated syrup and then aged in a progression of barrels made from chestnut, cherry, oak, mulberry, ash or juniper for at least 12 years. Some of the premium products are aged for as many as 50 to 100 years. Well, this is all very expensive—and this is where the con-game begins. But this one is doubly tricky because it can be a double-con—one of which is actually legal. All crooks have two things in common. 1) They want to make as much money as possible with as little work as possible. 2) They are smarter than everybody else. So, they do things like rob banks, print counterfeit money and smuggle drugs. Some of them even go into politics. But those chumps are all pikers compared to the real gravy train: Food fraud. If you can take cheap food and palm it off as something exclusive, you can run that scam over, and over and over to the same people—forever (or until you get caught). Even when you catch them red handed, they act surprised and try to keep it going. One of the really great scams that has gone on for years and still goes on today, is counterfeit balsamic vinegar. Most of it in stores is bogus. Real, traditional, authentic balsamic vinegar comes from two regions in Italy and starts with specific strains of white wine grapes that are crushed into juice with the skins, seeds and stems. This concoction is cooked down to about 50% volume into a concentrated syrup and then aged in a progression of barrels made from chestnut, cherry, oak, mulberry, ash or juniper for at least 12 years. Some of the premium products are aged for as many as 50 to 100 years. Well, this is all very expensive—and this is where the con-game begins. But this one is doubly tricky because it can be a double-con—one of which is actually legal. The illegal con: Mostly originating in Italy, counterfeit balsamic starts out as “plonk” (cheap generic table wine grapes) that is palmed off as the expensive varieties. Then, it might be aged for a couple of years (or less) and then diluted with cheap white vinegar and pumped up with thickeners and coloring agents. The product is then labeled “balsamic vinegar” and sold without disclosing its sordid past. 3.38 oz of real 25-year-old balsamic vinegar can cost more than $150, and a bottle of 50-year-old can be $300. Even a bottle of 12-year-old (the minimum allowed) can go for $75. So, when it costs $10 or so to make a fake, that’s some serious profit. Last year, the Italian police conducted a sting and seized over 9 tons of bogus balsamic stock. And no one thinks they got all of it. The legal con: It’s OK to label something “balsamic vinegar” and put a bunch of bogus junk in it, so long as you list the bogus junk in the little ingredient statement on the back. Common additives are white vinegar, GMO brown sugar and caramel coloring. So here is a little advice from The Food Lawyers:
But there’s another alternative: If you like the cheap, watered-down stuff that’s normally served in Italian restaurants (it can actually taste pretty good), go ahead and use it. Just don’t pay $300 for 4 ounces. If you’ve got a problem and need legal food advice, call or email George Salmas, Phone: 310-556-0721 or email george.salmas@thefoodlawyers.com. So, now that you know all the interesting “cons” relating to balsamic vinegar, here a couple of recipes you can make with it. For these two recipes you can use the “cheap” stuff. Inexpensive Balsamic Vinaigrette This is a great tasting balsamic vinaigrette that does not require the expensive, aged vinegar. It is simple and works well as a dressing or marinade. Prep time: 10 minutes Ingredients 1/2 cup olive oil 1/4 cup balsamic vinegar 1 teaspoon honey 1 teaspoon Dijon mustard 1 tablespoon shallot, minced 1 tablespoon garlic, minced salt and ground freshly-ground black pepper to taste Directions Combine the olive oil, balsamic vinegar, honey, Dijon mustard, shallot, garlic, salt and black pepper together in a glass jar with a lid. Shake vigorously until thoroughly combined. Boneless Balsamic Italian Beef Ingredients 1-3/4-pound boneless roast beef (chuck or round roast) 1 cup beef broth 1/2 cup balsamic vinegar 1 tablespoon Worcestershire sauce 1 tablespoon soy sauce 1 tablespoon honey 1/2 teaspoon red pepper flakes 4 cloves garlic, chopped Directions
ChefSecret: I keep any leftover cooking liquid in a Food Saver bag in the freezer and use it as a cooking starter for the next braised beef dish I make. Do you have a question or comment? Do you want to share a favorite recipe or pictures with our readers? Click here to send your thoughts. Please remember when making purchases—Give our American farmers and ranchers the business—source local foods, shop small (neighborhood owned stores) and buy when you see Made in the USA on the label. To you and everyone dear to you, be strong, be positive, stay well, stay safe and be kind. Thanks for reading! #BalsamicVinegar #BalsamicVinaigrette #ItalianBeef #Beef #Entrees #PerspectivesTheConsultingGroup #QuarantineKitchen #Covid19 #InstantPot #ComfortFoods #HuntingtonMeats #TheFoodLawyers  Batter up! Batter up! How you doin’? I don’t know about you, but I am missing Dodger baseball. We came so close to getting into the World Series last year that I thought we would be on a tear this season. Alas, it looks like this season is going to start late if it starts at all.
What do you think of when you think about baseball? I think summer, I think of the diamond and the stadium, and then I think of caramelly, crisp Cracker Jacks. Well to be perfectly honest, it doesn’t have to be summer for me to devour a whole bag of caramel corn. The original Cracker Jack caramel popcorn had a most compelling, come-back flavor. Once you started eating them you couldn’t put the box down. For me, the reward wasn’t the cheap little prize found in each box, but the caramel coated peanuts—they were the best part of this all-American classic snack. I would set prize aside, dig down to the bottom of the box for the caramel coated peanuts (that’s where they always migrated to) and then, and only then, I would munch on the caramel corn. This Cracker Jack hack is very close to the original, but I did take a few liberties. You will find it’s a little darker because I used brown sugar and dark corn syrup. It’s best for munching right away but is also the perfect buttery toffee popcorn recipe for gifting, snacking, or bringing to any sports event or concert! Prep time: 15 minutes Bake time: 1 hour 30 minutes (approximate time depending on the oven) Cooling time: 30 minutes Total time: 1 hour 55 minutes Yield: 8 servings Ingredients For the popcorn 1/3 cup coconut oil 3 cups popping corn kernels (mushroom popcorn—see ChefSecret below) This will make about 12 cups of popped popcorn. 1 teaspoon fine salt For the caramel corn 12 cups plain freshly popped popcorn (from above) 10 tablespoons unsalted butter 1 cup granulated sugar 1/2 cup dark brown sugar, packed 1/2 cup dark corn syrup (Karo Syrup) 1/2 teaspoon fine salt (often sold as popcorn salt) 1-1/2 teaspoons pure vanilla extract 1/2 teaspoon baking soda 2 cups salted Spanish red peanuts, skin on Directions
ChefSecrets:
#Snacks #CrackerJack #CrackerJacks #CrackerJackHack #CaramelCorn #Dodgers #Baseball #PerspectivesTheConsultingGroup #QuarantineKitchen #Covid19 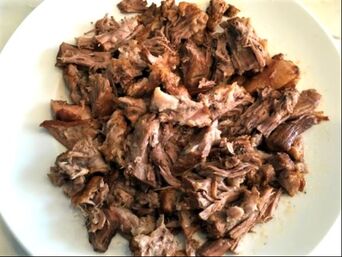 Root Beer BBQ Pulled Pork Root Beer BBQ Pulled Pork How you doin’? Do you know who Leonard Heuberger was? He was a very important man. No, he’s not the inventor of the hamburger—the name is spelled differently. Well, according to barbecue historians in the know, old Len founded a barbecue restaurant in Memphis named Leonard's in 1922. Leonard was the inventor of the classic Memphis pulled pork barbecue sandwich. This sandwich was prepared on a bun with pulled pork, a tomato-based barbecue sauce and coleslaw. If you love original barbecued pulled pork sandwiches as much as I do, you’ll love this simple recipe that takes just over an hour to prepare—most of that time is watching the “pot boil”. Root Beer BBQ Pulled Pork is easy to make, juicy and fall-apart tender. The secret is in the second Instant Pot cook after you pull the pork apart. Please read below and check out my ChefSecret on making a great recipe even greater. Prep time: 10 minutes Cooking time: 1 hour 30 minutes Yield: 6 servings Ingredients 2 tablespoons olive oil 3- to 4-pound pork shoulder cut into 4 to 6 large chunks 1 can root beer soda 2-1/2 cups barbecue sauce (I use KC Masterpiece Original) 1/2 cup brown sugar 5 tablespoons apple cider vinegar 2 teaspoons garlic powder 1 teaspoon onion powder 6 toasted over-sized hamburger buns for serving 1 cup coleslaw Directions
ChefSecret: I leave the shredded pork in the cooking liquid and chill it down for a couple of hours and then refrigerate it overnight. Before using the pork, I lift off and discard the layer of fat. I reheat the amount of shredded pork needed in the microwave and serve on a burger bun topped with chopped coleslaw. Do you have a question or comment? Do you want to share a favorite recipe or pictures with our readers? Click here to send your thoughts. Please remember when making purchases—Give our American farmers and ranchers the business—source local foods, shop small (neighborhood owned stores) and buy when you see Made in the USA on the label. To you and everyone dear to you, be strong, be positive, stay well, stay safe and be kind. Thanks for reading! #PulledPork #RootBeer #BBQPulledPork #Entrees #PerspectivesTheConsultingGroup #QuarantineKitchen #Covid19 #InstantPot #ComfortFoods #KCMasterpiece |

For over 4 decades collaboration and vision have been the cornerstones of our approach to developing innovative solutions. We fuel innovation, uncover opportunities, discover trends and embrace sustainability, turning imaginative ideas into profitable realities. Categories
All
Archives
April 2024
|
 RSS Feed
www.perspectives-la.com
Copyright © 2021 Perspectives/The Consulting Group, LLC | Henderson, NV 89052 | 310-477-8877
Copyright © 2021 Perspectives/The Consulting Group, LLC | Henderson, NV 89052 | 310-477-8877