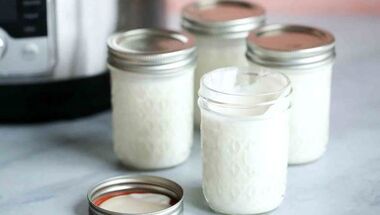
 Instant Pot Yogurt Instant Pot Yogurt How you doin’? Do you have a lot of time on your hands? (Warning: If you are working from home or home schooling the kiddies, this may be too much for you to handle—Ben & Jerry’s Frozen Yogurt may be a better option and more rewarding.)
Do you want to feel that you really accomplished something beyond just pushing buttons on your Instant Pot? Well, here’s the 2020 Quarantine Kitchen Challenge—making yogurt from scratch in your Instant Pot. As fair warning there are other, simpler ways to get your daily dose of yogurt. If you don’t mind all the sugar and additives there are plenty of brands at your local grocer. Check the labels… some may be cleaner than others. Or, you can always purchase a single use appliance—a yogurt maker. They cost between $27.99 to a couple a hundred bucks. They are not very complicated to use. They are fairly automatic but take up a lot of room on your kitchen counters or cupboard and will eventually wind up in the same place as your juicer, automatic bread maker and slow cooker. Let’s face it, you already have an Instant Pot that you are using for everything else, why not take a flier and make some yogurt in your trusty Instant Pot? Here are some tips for making homemade yogurt. I do guarantee—homemade yogurt tastes so much better than the store-bought stuff. Now that you have plenty of time on your hands, give it a try. Yogurt Making Tips For your yogurt culture, you can use either store-bought plain yogurt with active cultures, a freeze-dried heirloom starter, or yogurt from a previous batch of homemade yogurt. A yogurt starter culture contains live bacteria that convert milk into yogurt—that’s a good thing. The bacteria feed on the lactose and convert it into lactic acid. This ferments the milk, making it thicker and giving it that tart flavor associated with yogurt. Every starter culture has its own blend of bacteria which gives the yogurt a specific taste and texture—it’s alive. Check out the internet to find the style of yogurt you prefer. If you are using freeze-dried heirloom starter for the first time, read the directions that come with it. Instead of adding 2 tablespoons of yogurt, you’ll add the entire packet of freeze-dried starter in step 3. Smell your Instant Pot gasket before you begin. If it carries a strong aroma of chili or curried lamb, you may want to order an extra gasket, as the yogurt can absorb those smells. Reserve the neutral gasket for making yogurt only. Prep time: 5 minutes Total time: 4 to 12 hours, plus chilling time (most good things take time) Yield: about 6-1/2 cups of homemade yogurt Ingredients 1/2-gallon pasteurized milk (we like organic, whole cow’s milk) 2 tablespoons yogurt culture Directions
Hey, you did it! You made homemade yogurt for the first time in your Instant Pot. Isn’t that rewarding? I am so proud of you! ChefSecrets:
#InstantPot #Yogurt #HomemadeYogurt #PerspectivesTheConsultingGroup #QuarantineKitchen #Covid19
0 Comments
 How you doin’? Over the last several weeks, have you been doing the grocery shopping or has someone else done it for you? Many people really don’t like to go grocery shopping. I can give you various reasons why, but the fact is, people have better things to do—that is up until recently. With the quarantine orders in place, except for going out for groceries and to the drug store, there hasn’t been many places to go. 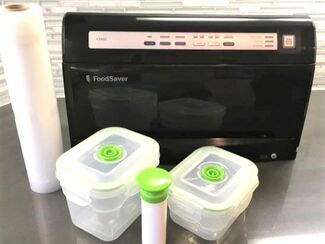 Before we found ourselves in the middle of a global pandemic, most of us thought nothing of grocery shopping. We didn’t just stop at one store… we shopped around to different stores. If I wanted snacks from Trader Joe’s and meat from Huntington Meats, it was no big deal. We didn’t worry about what time or even which day we went shopping. We just went whenever and wherever we wanted.
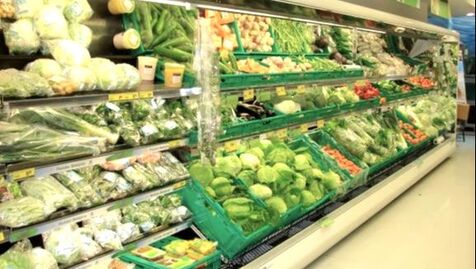
Today, going to a grocery store is a potential health risk (for myself, my family, and the store workers. I’ve learned that running out for a few extra potatoes isn’t just inefficient—it’s also irresponsible and downright wasteful. We’ve had to change the way we approach meal planning and shopping. It’s been a period of adjustment. Below are several ways the quarantine and ongoing social distancing might change your approach to shopping—some habit changes you might want to consider for the future. Before you even go to the store, be sure to check to see what you have in your own pantry. Rather than starting with a craving, coming up with a recipe, and then making a special shopping trip—cook what you have on hand. Be creative with what you have. Pretend every day is a new episode of Chopped. Now that you’ve got the time, take inventory of all the foods in the pantry, fridge and freezers and plug all the information into a spreadsheet. You’ll find there is so much more “stuff” that you’ve had forgotten about—lentils, beans, noodles, canned goods, and more. You also might want to add a column for “best buy” so that you can keep track of what’s in and out of code. Now you can browse through the list and come up with meal ideas instead of mindlessly running to the store despite having full cupboards. You can also go online and type in the ingredients you have and see what recipes pop up. Finally, if you have to go out grocery shopping, be sure to write a detailed shopping list—try to do it in the order that you shop, i.e. meat and poultry first, center of the store (cans and bottles), produce and then frozen foods. That will get you in and out of the store as quickly as possible. Please, please don’t over-buy, leave something for the next family We are all watching small businesses struggling to survive amid mass closures. It has been painful to watch. I’ve always liked shopping local, bringing money back to the local economy. I also like small farmers, ranchers and producers. I look for the Made in America on the label. Every dollar counts to these independent, local businesses now more than ever. I also realized I’m not spending more money than usual; I am, however, wasting less of what I buy. When I put my dollars toward quality instead of quantity, there is more incentive to use up everything I buy. You might also consider investing in one of those vacuum-sealing storage systems. They really do help to keep things fresher longer and you can save space in your refrigerator or freezer by stacking bags instead of containers. I use the FoodSaver system and find it works pretty well for bagged storage and when you are using your sous vide system (Lesson #8). When a container is needed, I prefer the Lasting Freshness Vacuum Seal Food Storage containers. I’ve tried a few different brands and have had the best success in drawing and keeping a vacuum to extend shelf life a few days. They also stack pretty well in cabinets and the refrigerator. In the last couple of weeks, proteins have been harder to find, so I’m using less by supplementing meals with more vegetables, beans, and grains. This strategy is better for our budget, health, and the environment. When eating less meat or chicken, you will appreciate the fresh produce more than ever before. Your quarantine salads made with greens from local farms will taste amazingly better. You’ll find that greens purchased locally will still be vibrant and fresh long after the pre-washed packaged stuff which can go limp pretty quickly. You may have never known how incredibly delicious truly fresh produce can be. If you have kids in the house you already know that “food” to them means snacks. If there aren’t any chips, crackers, or granola bars in the house, You’re out of food. In this current environment try cutting back on processed snacks; try making treats from scratch instead. Experiment with Instant Pot yogurt (see recipe in the Instant Pot section of the blog), freshly baked breads, muffins, cookies and crackers. Homemade ice cream and sorbet are the very best and fun to make. You will feel so much better cooking from scratch, not to mention most items are less expensive to make and better quality than store-bought, processed foods. Let us know how is the quarantine changing the way you grocery shop and prepare food for your family? #Grocery #Supermarket #PerspectivesTheConsultingGroup #QuarantineKitchen #Covid19  How you doin’? As businesses are starting to open up we are beginning to feel a little better about things. So, while it may not yet be time to celebrate with a bottle of Dom P Champagne, we can still enjoy a nice chilled glass of Sangria for Happy Hour.
The origins of Sangria are from Spain—it is an enhanced alcohol-wine punch. Sangria traditionally consists of an inexpensive red wine and fresh fruit, often with other spirits. Sangria is one of the most popular drinks in Spanish cuisine. It is commonly served in bars, restaurants, chiringuitos and at festivities throughout Spain. Traditionally, Barcelona Sangria is simple to make with a minimal amount of fresh ingredients. It is the perfect fruity summer beverage that's adaptable and delicious! Prep time: 10 Minutes Yield: 4 servings Store: 48 Hours Ingredients 1/2 medium tart apple, cored, skin on, chopped in 1-inch cubes 1/2 medium orange, rind on, sliced into rounds, large seeds removed, plus more for garnish 3 tablespoons granulated sugar 3/4 cup orange juice plus more to taste 1/3 cup brandy, plus more to taste 750 ml bottle dry Spanish red wine (Tempranillo if available) 1 cup ice to chill Mint sprigs Options: I like to use what’s leftover in my produce drawer to make Sangaria—I sometimes add a sliced lemon or lime or both. I also like to add fresh chopped plums and peaches to the glass and then pour the Sangria over. The peaches and plums really add another level of flavor. Directions
ChefSecret:
#Sangria #Brandy #Barcelona #Margaritas #HappyHour #Cocktails #PerspectivesTheConsultingGroup #QuarantineKitchen #Covid19  The Nut Tree Logo The Nut Tree Logo The first year my brother enrolled at the University of California, Davis campus my dad treated our family to dinner at the Nut Tree Restaurant, Vacaville. It was a magically wonderful experience… including the small gauge train that circled the property, and the general aviation airport (that later in life I used to fly in for a weekend brunch). Over the years the Nut Tree became one of my favorite places to stop when visiting Davis and later when driving along the heavily traveled corridor of Interstate 80 between San Francisco and Sacramento.  The Nut Tree Restaurant was an early pioneer of, what is now known as, California Cuisine, with fresh fruits and vegetables featured in their recipes. By 1978, the Nut Tree was identified as "the region's most characteristic and influential restaurant." A notable feature of the restaurant was its large indoor aviary that had glass walls extending from floor to ceiling. Nut Tree knives and cutting boards, as well as books on aviation, were sold in the gift shop.
The restaurant attracted many notable visitors including Ronald Reagan, Richard Nixon, Danny Kaye, Shirley Temple Black, Chuck Yeager, Peter Marino, and Bing Crosby, among others. In 1983, the Nut Tree catered a luncheon hosted by (California) Governor George Deukmejian for Queen Elizabeth II and Prince Philip at the State capitol. Don Birrell was design director for the Nut Tree from 1953 until 1990. The Nut Tree's outdoor patio area was designed to loosely resemble Tivoli Gardens, in Copenhagen with unique its lighting and kiosks, and every plate was a food stylist’s dream. The Nut Tree had a number of wonderful signature menu items… Whole Pineapple With Marshmallow Sauce, Seasonable Fruit & Sorbet Fruit Salad, Chicken Almond, Fried Shrimp, Freshly Baked White and Wheat Mini Loafs and, most memorable, Orange Nut Bread. Because of changing times, rising property values and family squabbles the restaurant closed in in 1996. Fortunately, I managed to save one of the best recipes—The Nut Tree Orange Nut Bread. Prep time: 40 minutes Bake time: 45 to 60 minutes Yield: 1 large loaf or 2 mini loafs Ingredients For the orange rind prep 1 cup, orange rind, ground (from about 2-3 medium oranges) 1/2 cup water 4 tablespoons granulated sugar For the cake batter 2-1/4 cups all-purpose flour 1 cup, plus 2 tablespoons granulated sugar 1 tablespoon baking powder 3/4 teaspoon salt 1 cup whole milk 3 tablespoons unsalted butter, oil or melted shortening 2 large eggs, unbeaten 1 teaspoon orange extract 1/2 teaspoon vanilla 1/4 teaspoon almond extract 1/4 teaspoon lemon extract 3/4 cup walnuts, coarsely chopped, roasted 1/2 teaspoon cinnamon 2 tablespoon raw sugar Directions To prepare the orange rind
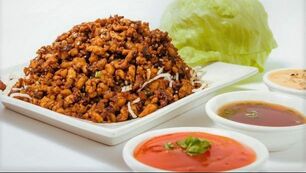 Gai Soong Gai Soong How you doin’? Do you find that you have more time to test new recipes these days? Here’s one of my favorite lighter recipes from China Rose my Arlington, Texas restaurant—made with fresh American produce.
I love minced chicken lettuce wraps. They are low in carbs and I can stuff my face without any guilt whatsoever. This is the easiest, quickest, healthiest meal you could ever make. If you have good moves in the kitchen, you can easily get this on your dinner table in less than 15 minutes. Plus, it’s budget friendly, too! You can easily double or triple this recipe as needed. Prep time: 9 minutes Cook time: 6 minutes Yield: 4 servings Ingredients For the lettuce cups 1/2 head of iceberg lettuce, leaves separated into cups and washed For the Gai Soong stir-fry sauce 1 tablespoon sherry wine 2 tablespoons oyster sauce 1 teaspoon sesame oil 1/2 teaspoon sugar 2 teaspoons low sodium soy sauce 1/8 teaspoon white pepper 1 teaspoon corn starch 1/2 teaspoon chili oil For the chicken filling 2 tablespoons peanut oil 3/4 cup chicken, uncooked, minced (thigh meat recommended; see ChefSecret) 1 teaspoon fresh garlic, minced 1 teaspoon fresh ginger, minced 1/3 cup fresh oyster or brown mushrooms, minced 2/3 cup bamboo shoots, minced 2/3 cup water chestnuts, minced 2/3 cup celery, minced 1 teaspoon red jalapeño peppers, minced 1/3 cup green onions, minced (tops and bottoms) Directions
#LettuceWraps #Chicken #GaiSoong #PerspectivesTheConsultingGroup #QuarantineKitchen |

For over 4 decades collaboration and vision have been the cornerstones of our approach to developing innovative solutions. We fuel innovation, uncover opportunities, discover trends and embrace sustainability, turning imaginative ideas into profitable realities. Categories
All
Archives
April 2024
|
 RSS Feed
www.perspectives-la.com
Copyright © 2021 Perspectives/The Consulting Group, LLC | Henderson, NV 89052 | 310-477-8877
Copyright © 2021 Perspectives/The Consulting Group, LLC | Henderson, NV 89052 | 310-477-8877