…from the California Kitchen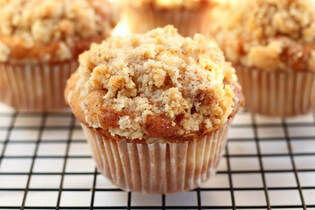 How you doin’? Are you a Seinfeld fan? I’ve seen some shows so often I can recite the lines. Do you remember the one where Elaine's former boss steals her million-dollar muffin tops idea, while Kramer promotes a bus tour trying to give away all the leftover bottoms without much success?
Well you can ask anyone and they’ll tell you, the best part of any muffin, arguably, is the top inch or so. Just pop the top where a heaping forkful will get you both the tender cake and the crunchy streusel topping. It’s always tempting to save that part for last giving you time to savor the texture. With this recipe we have some of the top in the middle where the streusel is baked all the way through the muffin, so every bite is the best bite. The batter is made with sour cream or plain yogurt, so it has a nice moist crumb and a natural tanginess that complements the sweet cinnamon-brown sugar crunch of the streusel. The muffins are rich, moist and flavorful… they’re the perfect last-minute brunch treat, coffee companion, afternoon snack, or after dinner treat. Prep time: 10 minutes Bake time: 25 minutes Yield: 12 muffins Ingredients For the streusel 1/2 cup all-purpose flour 1/2 cup packed dark brown sugar 4 tablespoons unsalted butter, room temperature 1 teaspoon ground cinnamon For the muffins 2-1/4 cups all-purpose flour 2 teaspoons baking powder 1/2 teaspoon baking soda Pinch kosher salt 5 tablespoons unsalted butter, room temperature 1/3 cup vegetable oil 1 cup granulated sugar 2 large eggs 1 cup sour cream (or substitute plain yogurt) 1 teaspoon pure vanilla extract Directions Getting started
ChefSecret: Dress your muffins up a bit… toss in some pecan pieces into the streusel or add some fresh blueberries or chocolate chips to the batter. Quip of the Day: “Silly you! You thought dogs were hard to train? Just look at all the humans who can’t sit, stay or remember to wear their friggin’ face coverings” ------------------------------------------- Do you have a question or comment? Do you want to share a favorite recipe or pictures with our readers? Send your thoughts to ed@perspectives-la.com. All recipes and cooking tips are posted on our website https://www.perspectives-la.com/covid-19-survival-guide. ------------------------------------------- To you and everyone dear to you, be strong and positive, stay well and safe and be kind to others. If you have a little extra in your pockets to share with others at this difficult time, please consider donating to Feeding America. Thanks for reading. #Baking #Muffins #Seinfeld #MuffinTops #Streusel #CoffeeCake #ElaineBenes #QuarantineKitchen #Covid19 #FeedingAmerica #PerspectivesTheConsultingGroup ©Perspectives/The Consulting Group, Inc., 2021
0 Comments
…from the Happy Hour Bar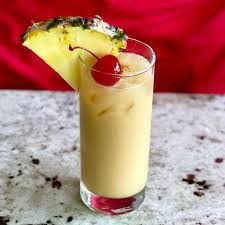 How you doin’? It’s that wonderful day of the week—Friday. And it’s Happy Hour at the Perspectives’ Bar. Have you ever wondered where Happy Hours originated? Although the exact origin of the happy hour is unknown, it may be traced back to the United States Navy back in the early 20th century—1913 to be exact. It was then that a weekly entertainment and semi-weekly smokers program called “Happy Hours” was created aboard the USS Arkansas to help relieve the boredom of being at sea. There were a variety of activities during this time, including boxing and wrestling matches, music and dancing—but not alcohol-based libation.
These programs grew more and more popular and by the end of World War I, “Happy Hours” were being held throughout the entire Navy. Over the next several years, the term became more about drinking than entertaining, according to a 1959 Saturday Evening Post article about bringing Happy Hours landside and detailed the lives and loves of government contractors and military personnel in the Caribbean. Al Capone starting cashing on Happy Hours in the illegal gin mills of Chicago. For those law-breakers who wanted to imbibe rot-gut hooch in secrecy, a kind of a 20th century pre-dinner tradition became popular. Friends would meet at speakeasies or even in someone's home before going out for supper, thus creating the cocktail hour. Eventually, civilians adopted "Happy Hour" as a euphemism for that secret and festive, lawbreaking behavior. Happy Hours became synonyms for a term used in my restaurants for discounted afternoon drinks in our bars—1 buck well drinks, $1.25 call drinks, $1.50 premium drinks and 99¢ draft beers were served every weekday from 4pm to 6pm. We also served free appetizers along with some modest entertainment. Our fancier mixed drinks included cocktails like this Caribbean Pain Killer. Create your own Happy Hour for friends and family with this great tasting, pain-killing beverage. Prep Time: 5 minutes Yield: 1 cocktail Ingredients 1/2 ounce gold tequila 1/2 ounce vodka 1/2 ounce light rum 1 ounce canned pineapple juice 1/2 ounce orange juice 2 tablespoons cream of coconut, “Coco Lopez” Directions
ChefSecret: You do not need to use top drawer liquors when making this cocktail. Well-quality liquor is certainly in order. Quip of the Day: “Cash, check or charge? the salesclerk asked after folding items the woman wished to purchase. As she fumbled for her wallet, the clerk noticed a remote control for a television set in her purse. She asked, do you always carry your TV remote with you? No, she replied, but my husband refused to come shopping with me, and I figured this was the evilest thing I could do to him legally.” ------------------------------------------- Do you have a question or comment? Send your thoughts to ed@perspectives-la.com. All recipes and cooking tips are posted on our website https://www.perspectives-la.com/covid-19-survival-guide. ------------------------------------------- To you and everyone dear to you, be strong and positive, stay well and safe and be kind to others. If you have a little extra in your pockets to share with others at this difficult time, please consider donating to Feeding America. Thanks for reading. #Cocktail #CaribbeanPainKiller #Rum #Vodka #Tequila #Coconut #Cheers# QuarantineKitchen #Covid19 #FeedingAmerica #PerspectivesTheConsultingGroup ©Perspectives/The Consulting Group, Inc., 2021 … from the California Kitchen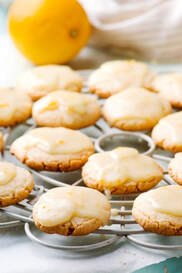 How you doin’? When you are in a “lemony” mood, here is the perfect melt-in-your-mouth Lemon Cookie. If you love the freshness of tart lemons, then you’re going to love these cookies. They’re light and easy to make. With or without a tasty lemon glaze, they are sure to satisfy any lemon lover!
This cookie is very close to the original Girl Scout cookie from nearly 80 years ago. In 2020, Savannah Smiles, the powder sugar-dusted lemon cookies that were brought back in 2012, were retired by Girl Scouts of America and replaced by a new lemon cookie—Lemon-Ups. The Girl Scouts organization works closely with its licensed bakers to replace cookies and bring new ones on to the market based on sales, flavor trends, and consumer preferences. Now you can try the lemon cookie that started all the fuss. Prep time: 15 minutes Bake time: 10 minutes Added time: 5 minutes Yield: 24 cookies Ingredients For the cookies 1 cup all-purpose flour 1/4 teaspoon baking soda 1/4 teaspoon salt 6 tablespoons unsalted butter, softened 1/2 cup granulated sugar 1/2 cup sour cream 2 teaspoons grated lemon zest 1 teaspoon vanilla extract 1/2 teaspoon lemon extract For the lemon glaze 3 tablespoons fresh lemon juice (strained) 1-1/2 cups powdered sugar 1-1/2 tablespoons lemon zest Directions To make the lemon cookies
Chefs Secret: For best results, when making the cookie dough, add the granulated sugar after you’ve already creamed the butter. Quip of the Day: “You know you’re getting old when you go to bed at about the same time you used to get dressed up to go out.” ------------------------------------------- Do you have a question or comment? Send your thoughts to ed@perspectives-la.com. All recipes and cooking tips are posted on our website https://www.perspectives-la.com/covid-19-survival-guide. ------------------------------------------- To you and everyone dear to you, be strong and positive, stay well and safe and be kind to others. If you have a little extra in your pockets to share with others at this difficult time, please consider donating to Feeding America. Thanks for reading. #Desserts #Baking #Cookies #LemonCookies #IcedLemonCookies #GlazedLemonCookies #GirlScouts #QuarantineKitchen #Covid19 #FeedingAmerica #PerspectivesTheConsultingGroup ©Perspectives/The Consulting Group, Inc., 2021 … from the California Kitchen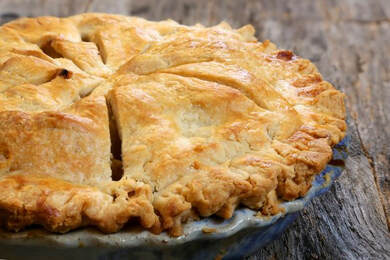 How you doin’? Fasten your seat belt… this is going to a long blog—but one that will make you a “perfect” pie maker. Did you know that pies are an All-American dessert? Pies are not difficult to make if you start with a well-prepared crust. Of course, you can use a store-bought frozen crust or a refrigerated roll-out crust, but it just isn’t the same. Why bother? Making a pie crust is a cinch. The following is trouble shooting guide to perfect pie crust and my famous Palm Grill Apple Pie. Let’s get going!
Do you have overcooked and cracked crusts, soggy bottoms, are they stogy with burnt edges and fruit slush inside the crust? Do your pie crusts poop-out at parties? You’re not the only one. These are the things that drive pie makers crazy, and it happens to even the most experienced pros. If you don’t bake pies on a regular basis, you can easily forget some of the most common solutions. Want the perfect pie that everyone’s talking about?... then continuing reading. If not go to the frozen pie section of your local supermarket or skip down to Granny Fanny’s recipe below. Do you have a soggy bottom? Is your undercooked pie crust stuck to the bottom of the pie pan? This is horrible and unacceptable. Your top crust is beautiful and golden brown, your filling has achieved that perfect, firm yet a little gooey delicious texture. But when you attempt to serve a slice, your pie server only picks up the filling and top crust. I hate when that happens!
Are your pies, soupy, sloppy and wet? You’ve got all these perfect, fresh ingredients and you’ve been peeling fruit all day. You’ve baked, what appears to be, the perfect apple pie for an hour or so and you come up with apple cider pie—wet, slushy and disgusting.
Are your pies suffering from ‘gap-osis’? I prefer my fruit pies to be brim high, right up to the top crust—no gaps.
If you’re baking a pie a day you can master pieology in a week. If you are only baking pies once a year, there’s a lot to remember so keep this valuable cheat sheet holiday handy. Ed’s Perfect Pie Crust Prep Time: 30 minutes Cool Time: 1 hour Freeze Time: 30 minutes Blind Baking Time: 12 to 15 minutes Yield: 2 9-inch Single-Crust pies or 1 9-Inch Double-Crust Pie Ingredients: 2-1/2 cups all-purpose flour 3 tablespoons granulated sugar 1/2 teaspoon salt 8 tablespoons (1 stick) cold unsalted butter, cut in 1/2-inch pieces 1/4 cup cold lard cut into 1/2-inch pieces 2 tablespoons fresh lemon juice 1/4 cup plus 2 tablespoons ice-cold water Directions:
ChefSecret: If only making a single crust you can freeze the second dough disk wrapped in food film for up to 3 months. Granny Fanny’s Deep-Dish Apple Pie Filling Prep Time: 30 minutes Inactive Time: 30 minutes Bake Time: 1 to 1-1/4 hours Yield: 1 (9-or 10-inch) double-crusted pie Ingredients 4 or 5 pounds Granny Smith apples, peeled, quartered, and cored, soaked in lemon water 1 lemon, zested 1 orange, zested 2 tablespoons freshly squeezed lemon juice 1 tablespoon freshly squeezed orange juice 1 teaspoon pure vanilla extract 1 tablespoon rum 1/2 cup granulated sugar, plus 1 teaspoon to sprinkle on top 1/4 cup all-purpose flour (or 3 tablespoons of corn starch or other starch) 1 teaspoon kosher salt 3 teaspoon ground cinnamon 1 teaspoon ground nutmeg 1/8 teaspoon ground allspice 1 egg beaten with 1 tablespoon water, for egg wash Directions
Quip of the Day: “Some of us are very fearful of Alexa listening in on all our conversations; now Amazon is making a male version which won’t listen to anything.” ------------------------------------------- Do you have a question or comment? Send your thoughts to ed@perspectives-la.com. All recipes and cooking tips are posted on our website https://www.perspectives-la.com/covid-19-survival-guide. ------------------------------------------- To you and everyone dear to you, be strong and positive, stay well and safe and be kind to others. If you have a little extra in your pockets to share with others at this difficult time, please consider donating to Feeding America. Thanks for reading. #Desserts #PerfectPies #ApplePie #PerfectPieCrust #DeepDishPie #QuarantineKitchen #Covid19 #FeedingAmerica #PerspectivesTheConsultingGroup ©Perspectives/The Consulting Group, Inc., 2021 …from the Happy Hour Bar 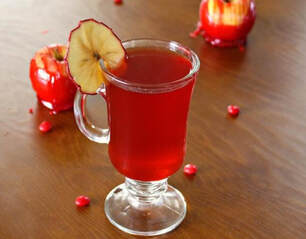 credit: Imperial Sugar credit: Imperial Sugar How you doin’? If you like the spicy red candies known as Red Hots® or Imperials, then this recipe is for you. It is sinfully hot cinnamon. A powerful cinnamon kaboom in an itty-bitty bite. Originally called cinnamon imperials, these hot candies hit you from your nose to your toes. Small, hot and oh-so-good. If your eyes water, it just means you love them. Whether you eat them by the handful, put them on birthday cakes or use them as a decorative touch to your gingerbread house, there are a million fiery ways to spice up your life with Red Hots!
In the grammar school we used to go to Marty’s Bike Shop and buy a couple of boxes of Red Hots and compete to see who could get the most on their tongue at one time. What did the winner get? A very red tongue! I don’t hang around the candy aisle much these days but was inspired to write up this hot toddy when I saw them on Amazon. This cocktail recipe takes a few minutes to make but is well worth the effort and brings back lots of memories of Marty’s Red Hots and Hard Candy Cinnamon Apples found at the Los Angeles County Fair. Prep Time: 10 minutes Yield: 8 cocktails Ingredients 3/4 cup Red Hots candies 1 cup light brown sugar 1 bottle (64 ounces) apple cider 16 ounces Good Old American Whiskey, divided Freshly Squeezed lime juice Directions 1. Combine the Red Hots, sugar and cider in a large pot and simmer until the candy is completely dissolved. 2. In a 10-ounce mug, combine 2 oz of the whiskey with the apple cider mixture. Add a squeeze of lime and serve hot. 3. You can also make these fun drinks for by leaving out the whisky and adding a bit more cider or make it cold with some sparkling seltzer. 4. Any way you make it, it’s a hot blast from the past. ChefSecret: I use brown sugar a lot. Light brown sugar (made from sugar cane) is a non-GMO pure cane sugar known for its rich aroma, soft and fluffy crystals, light molasses flavor and a hint of moisture. It is ideal for recipes that showcase its warm and nutty flavor profile such as spice cakes or crumbles. It is the secret ingredient in southern family-favorite recipes handed down from one generation to the next. Memories are made when you bake with love and tradition. Always store brown sugars in an airtight container in a cool, dry place. Quip of the Day: “Individuals who think their talents can be developed (through hard work, good strategies and learning from the input of others) have a growth mindset. They tend to achieve more than those with a more fixed mindset (those who believe that their talents are derived as innate gifts from God).” ------------------------------------------- Do you have a question or comment? Send your thoughts to ed@perspectives-la.com. All recipes and cooking tips are posted on our website https://www.perspectives-la.com/covid-19-survival-guide. ------------------------------------------- To you and everyone dear to you, be strong and positive, stay well and safe and be kind to others. If you have a little extra in your pockets to share with others at this difficult time, please consider donating to Feeding America. Thanks for reading. #Cocktail #FallAppleCocktails #RedHots #CinnamonCandy #Whiskey #HotToddy #Cheers# QuarantineKitchen #Covid19 #FeedingAmerica #PerspectivesTheConsultingGroup ©Perspectives/The Consulting Group, Inc., 2021 |

For over 4 decades collaboration and vision have been the cornerstones of our approach to developing innovative solutions. We fuel innovation, uncover opportunities, discover trends and embrace sustainability, turning imaginative ideas into profitable realities. Categories
All
Archives
April 2024
|
 RSS Feed
www.perspectives-la.com
Copyright © 2021 Perspectives/The Consulting Group, LLC | Henderson, NV 89052 | 310-477-8877
Copyright © 2021 Perspectives/The Consulting Group, LLC | Henderson, NV 89052 | 310-477-8877