…from the Perspectives’ Kitchen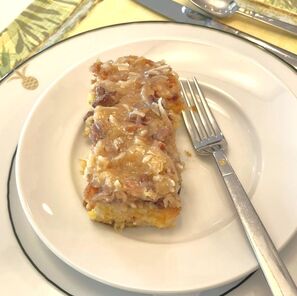 How you doin’? It’s Sunday morning and I have a bunch of people coming over for Brunch. I have about a million things spinning in my head. What kind of morning cake can I make in a hurry?
I went to my standby database of Perspectives’ recipes and pulled up My Palm Grill favorites Brunch Bakes. The first thing I clicked on was Ed’s Easy, Lazy-Man’s Cake—OH YEEEAAAH… that’s it! This is old southern, baking soda family cake is so good, and the best part about it is that it’s so easy to make and it’s packed with loads of Southern pecan flavor. It’s customizable (see ChefSecret) and is easier and better than a store-bought boxed cake! Prep time: 10 minutes Bake time: 35 to 45 minutes Yield: 16 servings Ingredients For the cake 2 cups all-purpose flour 2 cups granulated sugar 2 slightly beaten eggs, 2 teaspoons pure vanilla extract 1 teaspoon baking soda 16 ounces canned crushed pineapple with juice For the frosting 1 stick (1/2 cup) unsalted butter 1 cup granulated sugar 3/4 cup evaporated milk 1 cup toasted chopped pecans 1 cup lightly toasted shredded coconut 1 teaspoon pure vanilla extract Directions To make the cake
ChefSecret: I like to add a couple of tablespoons of crushed pineapple to the frosting mixture. I also sometimes switch out the vanilla extract in the frosting for almond extract. You can enhance the flavor by adding in some blueberries to the cake batter. Quip of the Day: Don’t get mad at lazy people; they didn’t do anything. ------------------------------------------- Do you have a question or comment? Send your thoughts to ed@perspectives-la.com. All recipes and cooking tips are posted on our website https://www.perspectives-la.com/covid-19-survival-guide. ------------------------------------------- To you and everyone dear to you, be strong, positive, stay well, stay safe and be kind. Take a breath and count your blessings, and if you have a little extra to share with others, please consider donating to Feeding America, Tunnel to Towers, Union Rescue Mission and/or American Red Cross. #Baking #Cake #Treat #Dessert #Brunch #Breakfast #Pineapple #Coconut #BrunchCake #2024Recipes #URM #T2T #FeedingAmerica #RedCross #PerspectivesTheConsultingGroup ©PERSPECTIVES/The Consulting Group, LLC, 2024
0 Comments
…from the Perspectives’ Kitchen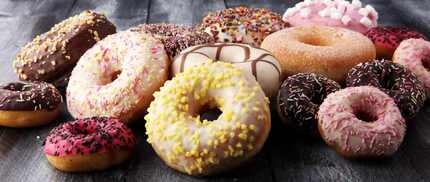 ow you doin’? Buckle your seatbelt, this is going to be a long one. Anybody that knows me, knows my love for doughnuts.
It all started when I would collect on my paper route. There was a Winchell’s Doughnuts on Pico and La Cienega Boulevards in Los Angeles. That’s where I first met Vern Winchell who treated me to a box of a baker’s dozen. I think the intention was for me to take them home and I’m ashamed to say they never got there—I ate them all while pedaling my bike back home. The fact is I just love good doughnuts—there really is no such thing as bad doughnuts… some are just better than others. A few years back, Joan found donut pans on Amazon and gifted them to me. Since we both love doughnuts, we had a couple of sets delivered to the test kitchen. We set out to make all types of doughnuts and over the years, we have made some really good ones—all kinds of both plain and exotic flavors. I bake a batch of bran muffins weekly but realized I hadn’t made donuts for some time. I decided to make vanilla frosted cake doughnuts since they’re Joan’s favorite. I had them ready for the oven in no time and once baked, the donuts were incredibly moist and glazed to perfection. I only baked off half of the batter and had enough batter left to bake off the next morning. See the recipe toward the end of this post. But where did all these delicious pastries come from and why do some people consider them the best breakfast treat available? Well, here is the rest of the story I found in Eater Magazine authored by Claudia Geib. As she explained it, even during the worst of war, the ring-shaped confections offered a bite of joy and a much-needed morale boost to weary soldiers during World War I. Dough fried in oil is a delicacy found worldwide… in Italy it’s zeppole, from Greek loukoumades to Moroccan sfenj to jalebi in India and Pakistan. But in North America at the start of the 1900s, fried dough balls were a regional specialty mostly confined to New England, New York and a few places in the Midwest. Just 50 years later, doughnuts would be Americans’ treat of choice—ubiquitous in break rooms, beloved of cops and, more recently, made fancy by hipsters. But few people know that the doughnut might never have made it big without a world war or two. In a new episode of Gastropod, “Raised and Glazed,” co-hosts Cynthia Graber and Nicola Twilley explore the evolution of the doughnut… where the name comes from, how it got a hole and how it became ubiquitous across the United States thanks to the efforts of a few female volunteers working on the front lines of global conflict. When the United States joined World War I, the Salvation Army sent women to the front in France with a few simple instructions: Lead the men in prayers; play music; comfort the wounded and the dying; and, most importantly, do whatever they could to keep up morale. Conditions on the Western Front were grim. As Salvation Army leader Evangeline Booth recalled in her memoirs of the war, the rain had combined with heavy bombing to turn the entire landscape into a swamp, and “depression like a great heavy blanket hung over the whole area.” The women made cocoa, fudge, and apple pies to lift men’s spirits. But pies were difficult to make — achieving a flaky crust was tricky in the trenches — and sometime in late September 1917, Salvation Army volunteer Helen Purviance suggested focusing on a simpler treat. She and her colleagues could combine flour, sugar, baking powder, salt, eggs, and milk to make doughnut dough. Then they could fry their creations in a steel soldier’s helmet filled with boiling lard. The front cover of the songbook for “My Doughnut Girl” displays a girl who appears to be in her mid-teens carrying the doughnuts that rose to fame during the war effort were originally made with one goal in mind: Maintaining morale. New York: The Salvation Army National Headquarters, [1919] /Library of Congress, Music Division. The women rolled the doughnuts out with a grape juice bottle, cut them out with a baking powder can, and poked a hole in the middle using a funnel. Dusted with powdered sugar and handed out hot by the thousands, the treats produced by the “doughnut Sallies,” as the women soon became known, instantly became a hit among the men. Even for men who hadn’t come from a doughnut-loving region of the States, the fried rings came to symbolize everything good and comforting. “Newspapers would describe the soldiers looking through the hole in the donut and seeing their mother on the other side,” Michael Krondl, author of The Donut, told Gastropod. “It was a beautiful thing.” Though the Salvation Army only sent 250 volunteers to the front, these women had a disproportionate impact on the soldier’s psyche; the treats “put pep in every doughboy,” Salvation Army Colonel William Barker told a reporter from the Boston Daily Globe. “Every doughboy felt his mother was somewhere just back of the lines in the midnight mists and damps, frying doughnuts for him just as she used to do.” (Incidentally, the “doughboy” moniker originated from the Mexican-American War, and it had nothing to do with doughnut consumption at all.) It got to the point that military command would pull strings to ensure that donut-making supplies made it through, despite the fact that the French were surviving on black bread. “The American soldiers take their hats off to the Salvation Army,” wrote a New York Times correspondent in 1918, “and when the memoirs of this war come to be written the doughnuts and apple pies of the Salvation Army are going to take their place in history.” Even men who didn’t come from doughnut-loving regions of the United States were willing to sing the praises of doughnut girls and their creations. Popular culture brought this newfound love of doughnuts back home. Songs like “My Doughnut Girl” and films like Fires of Faith, which featured scenes of a Salvation Army Sally distributing doughnuts to bedridden men, helped cement the doughnut’s new status as an American icon. Doughnut entrepreneurs popped up, ready to supply a nation suddenly hungry for the treats feeding the troops, and companies advertised mixes that allowed the home baker to make doughnuts themselves. When fighting ended, the Salvation Army continued to sell doughnuts to raise money through the 1920s and the Great Depression; and when war broke out again in Europe, volunteers from both the Salvation Army and the Red Cross once again brought doughnuts to the front. They were assisted by a newfangled invention: an automatic doughnut-making machine, which allowed doughnuts to be made faster and in greater quantities than ever before. Post-war, doughnuts continued their spread across the country, fitting perfectly with the newly industrialized landscape, the rise of the automobile, and the growth of women in the workforce. For a whole new class of car-based commuters, a doughnut shop became the perfect place to stop for coffee and a sweet circular cake for breakfast. If you like donuts as much as I do, try my recipe out. If you don’t have a donut pan, I highly recommend getting one, but you can also pipe the batter into circles on a sheet pan as a less-expensive substitute. Ingredients For the doughnuts 1 cup all-purpose flour 1/2 cup granulated sugar 1/4 cup unsweetened cocoa powder 1/2 teaspoon baking soda 2 teaspoons pure vanilla extract 1 large egg 6 tablespoons sour cream 1/4 cup whole milk 1/4 cup vegetable oil For the vanilla glaze 2 cups confectioners’ sugar 6 tablespoons whole milk 1 teaspoon pure vanilla extract Directions To make the doughnuts
To make the glaze
ChefSecret: If you find yourself in the Las Vegas area the best and most creative doughnuts can be found at Pink Box. Be creative as they are and decorate your doughnuts with all kinds of goodies. Quip of the Day: Knock Knock. Who’s there? Donut. Donut who? Donut ask, it’s a secret! ------------------------------------------- Do you have a question or comment? Send your thoughts to ed@perspectives-la.com. All recipes and cooking tips are posted on our website https://www.perspectives-la.com/covid-19-survival-guide. ------------------------------------------- To you and everyone dear to you, be strong, positive, stay well, stay safe and be kind. Take a breath and count your blessings, and if you have a little extra to share with others, please consider donating to Feeding America, Tunnel to Towers, Union Rescue Mission and/or American Red Cross. #Baking #Treat #Dessert #Donut #PinkBox #BakedDonuts #FriedDonuts #GlazedDonuts #ChocolateDonuts #2024Recipes #URM #T2T #FeedingAmerica #RedCross #PerspectivesTheConsultingGroup ©PERSPECTIVES/The Consulting Group, LLC, 2024 …from the Perspectives’ Happy Hour Bar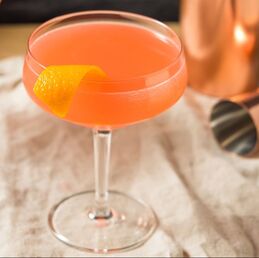 How you doin’? Here’s a strange Happy Hour cocktail dating back to Prohibition. I selected the Monkey Gland because it's a great drink, but I also chose it for its back story. Consider serving this one up at your next party, just so you can entertain your guests with a funny historical anecdote.
The Monkey Gland is a Prohibition classic, devised at Harry's New York Bar in Paris in the 1920s. The name is a reference to a surgical procedure by Dr. Serge Voronoff. For men with performance issues, Dr. Voronoff offered to implant in them the testicle of a monkey, for "rejuvenation," as he called it. That would make your George very curious indeed. In 2024, if you're an adult male who feels the need for a little, um, assistance in the intimacy department, you reach for one of the blue pill pharmaceuticals you see advertised during football games. In 1928, if you needed a little vavoom in the bedroom, you went to see Dr. Voronoff. So popular was Voronoff's vitality procedure in the 1920s that it inspired the creation of the Monkey Gland, a cocktail named for the rather sensitive part of an unfortunate simian's anatomy that Voronoff surgically implanted into his eager patients. This is a drink where purchasing the right ingredients makes all the difference. Fresh-squeezed orange juice is essential and a quality grenadine—Stirrings makes a decent one and an authentic absinthe really make the cocktail come together (though a substitute such as Herbsaint, Pernod or Ricard will also suffice). Did Voronoff's treatment work? No, not really—and one doesn’t have to guess how the castrated monkeys felt about the whole thing. One picture above is worth a thousand words. Fortunately, the cocktail still does the trick and you don’t need to de-ball any monkeys in the making of this cocktail. Prep time: 3 minutes Yield: 1 cocktail Ingredients 1-1/2 ounces gin 1-1/2 ounces freshly squeezed orange juice 1 teaspoon grenadine 1 teaspoon absinthe Directions
ChefSecret: Can’t find a good absinthe? You can use Herbsaint, Pernod or Ricard as a substitute. Quip of the Day: Life is like the monkey bars… you have to let go to move forward. ------------------------------------------ Do you have a question or comment? Send your thoughts to ed@perspectives-la.com. All recipes and cooking tips are posted on our website https://www.perspectives-la.com/covid-19-survival-guide. ------------------------------------------- To you and everyone dear to you, be strong, positive, stay well, stay safe and be kind. Take a breath and count your blessings, and if you have a little extra to share with others, please consider donating to Feeding America, Tunnel to Towers, Union Rescue Mission and/or American Red Cross. #Cocktail #MonkeyGlandCocktail #Gin #OJ #OrangeJuice #Grenadine #Absinthe #MarchMadness #Cheers #HappyHour #2024 #T2T #URM #FeedingAmerica #RedCross #PerspectivesTheConsultingGroup ©PERSPECTIVES/The Consulting Group, LLC, 2024 …from the Perspectives’ Kitchen How you doin’? Get ready to wow your Valentine’s taste buds with this delicious Red Velvet Cake Roll!
In the 19th century, "velvet" cake, a soft and velvety crumb cake, was introduced and served as a fancy dessert. Up to that point a coarser-crumbly cake was a much more common dessert. Around the turn of the 20th century, Devil's Food Cake was introduced, which some believe is how the Red Velvet Cake came about. The key difference between the two cakes is that Devil's Food Cake uses real chocolate and Red Velvet Cake uses less expensive cocoa. Adams Extract Co. is credited with bringing the Red Velvet Cake to kitchens across America during the Great Depression, by being one of the first to sell red food coloring and other flavor extracts. They advertised by using point-of-sale posters and tear-off recipe cards. When food ingredients were rationed in the US during World War II, bakers used boiled red beet juices to enhance the color of their cakes. Even today, I often use minced red beets in my chocolate cakes for the red hue and to retain moisture. The cake was originally made famous at New York City's famous Waldorf-Astoria Hotel, known as the Waldorf-Astoria Cake, however, it is widely considered a Southern recipe. Red Velvet Cake may also have roots in black culture and is sometimes considered to be a soul food in the South. The cake is often used in Juneteenth celebrations to honor the fight against slavery. Traditionally, Red Velvet Cake is iced with a French-style butter ermine icing which is very light and fluffy, but time-consuming to prepare. Cream cheese or buttercream frostings are variations that have increased in popularity and complement the cake. Similar to Hershey’s Red Velvet Cake, this cake roll recipe also calls for cocoa powder to produce a moist, chocolaty flavored cake tightly rolled into a Swiss log with rich cream cheese filling. Follow my easy step-by-step instructions below on how to make a perfect Red Velvet Cake roll from scratch to impress your friends, family, or maybe even that very special person. Prep time: 30 minutes Bake time: 12 minutes Cool time: 1 hour 30 minutes Chill time: 1 hour Yield: 1 cake (10 to 12 servings Ingredients 1/4 cup powdered sugar 4 large eggs, separated 1/2 cup granulated sugar plus 1/3 cup, divided 1 teaspoon pure vanilla extract 2 tablespoons red food color (1-ounce bottle) 1/4 cup water 2/3 cup all-purpose flour 1/4 cup unsweetened cocoa powder 1/2 teaspoon baking powder 1/4 teaspoon baking soda 1/8 teaspoon kosher salt 2 teaspoon powdered sugar (for dusting) 1/2 cup chocolate syrup (optional) raspberries or strawberries for garnish (optional) Directions
ChefSecret: To make the Cream Cheese Filling, beat the following ingredients together:
Quip of the Day: My relationship status? In a committed relationship with red velvet cake! ------------------------------------------- Do you have a question or comment? Send your thoughts to ed@perspectives-la.com. All recipes and cooking tips are posted on our website https://www.perspectives-la.com/covid-19-survival-guide. ------------------------------------------- To you and everyone dear to you, be strong, positive, stay well, stay safe and be kind. Take a breath and count your blessings, and if you have a little extra to share with others, please consider donating to Feeding America, Tunnel to Towers, Union Rescue Mission and/or American Red Cross. #Dessert #ValentinesDayDessert #Valentine #RedVelvetCakeRoll #RedVelvetCake #RedVelvet #Hersheys #Cocoa #JellyRollCake #JellyRollPan #2024 #T2T #URM #FeedingAmerica #RedCross #PerspectivesTheConsultingGroup ©PERSPECTIVES/The Consulting Group, LLC, 2024 …from the Perspectives’ Kitchen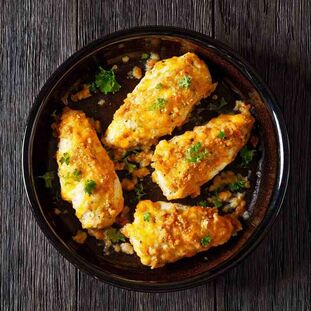 How you doin’? Growing up in my house my mother seldom fried any food. She just didn’t think the prolonged “aroma” of the grease and the waste of oil was worth it. So, we would go out to a restaurant or would order Chicken Delight for delivery or send my dad out to pick-up a box of Pioneer Crunch or a bucket of the Colonel’s best—KFC.
The fact of the matter is, I’m not that squeamish about frying food in my kitchen and I do love my fried foods—French fries, fish and chips and definitely fried chicken. It’s not so much the flavor but I love the crunchy texture—flavor is 50% and texture is the other 50%. So, when I find a simple new recipe for crunchy chicken that doesn’t have to be fried, I get all excited. A few weeks ago, I found a recipe in Allrecipes that made me stop and focus on this neat dish. There are few things more thrilling than finding out a secret ingredient that will make your oven-roasted chicken taste more like fried. If you’re like me and want to create a little magic, take a load off because this chicken dish has two special tricks that will make it one the most popular dinner recipes for your family. Abracadabra Encrusted Crunchy Chicken is always incredibly juicy, flavorful, crunchy and picky-kid eater pleasing. It takes just six ingredients to create a little Penn and Teller chicken magic and they are probably in your snack cupboard right now, but just two important secret components are the key to crunchy breading and tender, juicy chicken breasts. The ingredients include mayonnaise and Cheez-It crackers. I’ve talked about using mayo on oven roasted potatoes before, so it should come as no surprise that mayonnaise is more than just a binder for tuna salad. The mayo holds the breading on the chicken without the gummy interface you usually get with a coating of flour. The remainder of my secret ingredients are the chicken breasts, of course, which are coated in a thin layer of mayo dredged in breading mixture, which is a combination of Cheez-It crackers, canned French-fried onions, Italian breadcrumbs and toasted sesame seeds. The mayo not only helps hold the breading in place, so you won’t lose it on the sheet pan in the oven, but it also keeps the chicken moist and tender. The Cheez–It crackers, French-fried onions, and Italian breadcrumbs together pack a flavorful punch and will create a crunchy breading when baked, not fried. Together, the breading creates a unique flavor that everyone will love. Prep time: 25 minutes Cook time: 35 minutes Yield: 4-8 servings Ingredients 2 cups crushed cheese flavored crackers (I prefer Cheez-It) 1 cup crushed canned French-fried onions 1/2 cup seasoned Italian breadcrumbs 1 tablespoon toasted sesame seeds 1 teaspoon kosher salt 1/2 teaspoon freshly- ground black pepper to taste 4 skinless, boneless chicken breast halves, cut in half 4 tablespoons mayonnaise Directions
ChefSecret: If you prefer dark meat use 8 boneless skin-on thighs. Quip of the Day: Q: What do chicken families do on the weekends? A: They have peck-nics! Have you ever wondered what the big 11-spice secret is to making KFC fried chicken? It is a combination of salt, thyme, basil, oregano, celery salt, ground black pepper, dried mustard, garlic salt, paprika powder, ground ginger and white pepper. ------------------------------------------- Do you have a question or comment? Send your favorite recipes, pictures or thoughts to ed@perspectives-la.com. Recipes and cooking tips are posted on our website https://www.perspectives-la.com/covid-19-survival-guide. ------------------------------------------- To you and everyone dear to you, be strong, positive, stay well, stay safe and be kind. Take a breath and count your blessings, and if you have a little extra to share with others, please consider donating to Feeding America and/or American Red Cross. #ChristmasRecipes #Entrees #CrunchyChicken #OvenFriedChicken #Cheez-It #Mayonnaise #Chicken #Holidays2023 #QuarantineKitchen #Covid19 #RedCross #FeedingAmerica #PerspectivesTheConsultingGroup ©PERSPECTIVES/The Consulting Group, LLC, 2023 |

For over 4 decades collaboration and vision have been the cornerstones of our approach to developing innovative solutions. We fuel innovation, uncover opportunities, discover trends and embrace sustainability, turning imaginative ideas into profitable realities. Categories
All
Archives
April 2024
|
 RSS Feed
www.perspectives-la.com
Copyright © 2021 Perspectives/The Consulting Group, LLC | Henderson, NV 89052 | 310-477-8877
Copyright © 2021 Perspectives/The Consulting Group, LLC | Henderson, NV 89052 | 310-477-8877