… from the Perspectives’ Kitchen  How you doin’? These simple pork chops are cooked to perfection in a cast iron or heavy bottom pan. Make sure you get the best quality pork chops. You will only need a handful of simple ingredients to create restaurant-quality pork chops.
With the skyrocketing cost of beef, seafood and chicken, I still find pork to be the best bargain protein. Prep time: 5 minutes Cook time: 10 to 15 minutes Stand Time: 3-5 minutes Yield: 4 servings Ingredients 4 bone-in pork chops (1-1/2-inch thick / 6 to 8 ounces each) 1/2 teaspoon kosher salt 1/2 teaspoon freshly cracked black pepper 2 tablespoons vegetable oil 1 tablespoon unsalted butter 2 thinly cloves garlic, sliced 4 sprigs fresh rosemary, 1 tablespoon plus chopped fresh rosemary for garnish Directions
ChefSecret: For most pork chop preparations, look for bone-in pork chops about 1.5-inches thick. The bone actually slows the cooking time and adds flavor. We're not talking long, just a few minutes. But even a few minutes can spell the difference between moist, tender pork chops with tasty sear marks and dry, tight-textured chops. Look for center-cut loin chops with a T-shaped bone; the loin is on one side of the bone, the tenderloin on the other. Quip of the Day: As a butcher is shooing away a dog from his shop, he sees a $25 bill and a note in his mouth, reading: “10 pork chops, please.” Amazed, he takes the money, puts a bag of pork chops in the dog’s mouth, and quickly closes the shop. He follows the dog and watches him wait for a green light, look both ways, and trot across the road to a bus stop. The dog checks the timetable and sits on the bench. When a bus arrives, he walks around to the front and looks at the number, then boards the bus. The butcher follows, dumbstruck. As the bus travels out into the suburbs, the dog takes in the scenery. After a while he stands on his back paws to push the “stop” bell, then the butcher follows him off. The dog runs up to a house and drops his bag on the step. He goes back down the path, takes a big run, and throws himself -WHAP!- against the door. He does this again and again. No answer. So, he jumps on a wall, walks around the garden, beats his head against a window, jumps off, and waits at the front door. A big guy opens it and starts cursing and shouting at the dog. The butcher runs up and screams at the guy: “What in hell are you doing? This dog’s a genius!” The owner responds, “Genius, my ass… It’s the second time this week he’s forgotten his keys!” ------------------------------------------- Do you have a question or comment? Send your favorite recipes, pictures or thoughts to ed@perspectives-la.com. Recipes and cooking tips are posted on our website https://www.perspectives-la.com/covid-19-survival-guide. ------------------------------------------- To you and everyone dear to you, be strong, positive, stay well, stay safe and be kind. Take a breath and count your blessings, and if you have a little extra to share with others, please consider donating to Feeding America, Tunnel to Towers, Union Rescue Mission and/or American Red Cross. #Entree #BestPorkChops #Dinner #2024Recipes #URM #T2T #FeedingAmerica #RedCross #PerspectivesTheConsultingGroup ©PERSPECTIVES/The Consulting Group, LLC, 2024
0 Comments
…from the Perspectives’ Happy Hour Bar 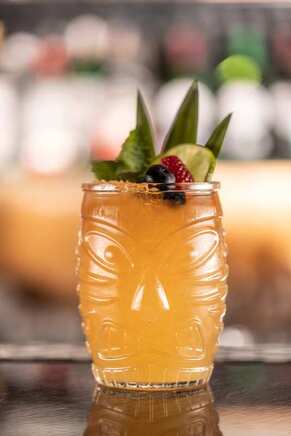 How you doin’? It’s Spring!... and time for spring break on a lovely island. So I offer A Lonely Island Lost in the Middle of a Foggy Sea cocktail served in a Collins glass, with foamy top, garnished with coffee beans and pineapple fronds.
The best cocktails taste good and look pleasing to the eye, but a well-conceived name can be the difference between a drink that fades into the night and one with centuries of staying power. It’s yet to be determined whether we’ll still be drinking the 11-word cocktail decades into the future, but with a memorable name and tasty blend of ingredients, it could happen. This cocktail combines three types of rum (I love rum) with pineapple and lime juices, demerara syrup and cold brew coffee. The first rum is an unaged rhum Agricole, which is distilled from fresh sugarcane juice rather than the more common molasses, and sports a grassy, earthy flavor. Then there’s Blackstrap rum which is characterized more by its dark color than by any actual regulations. The category often features young distillates that get their inky hue from caramel coloring, not lengthy barrel aging. But those rums can be intensely flavorful and fun to work with, and blackstrap rums are used in cocktails like the Jungle Bird and Corn ’n’ Oil. Lastly, the recipe calls for Old Port Deluxe rum, which is made in Bangalore, India, using 100% local sugarcane. The rums are sweetened with demerara syrup, a type of simple syrup made with demerara sugar, which has a coarse grain and light tan color. With notes of molasses, toffee and coffee, it provides a richer, deeper flavor than traditional simple syrup, so it pairs well with dark spirits and is a staple in many Tiki-style cocktails. Pineapple lends sweet, tropical notes, while fresh lime juice provides citrusy/acidy balance. Finally, the cocktail is topped with a small pour of cold brew coffee before it’s garnished with coffee beans and pineapple leaves. A Lonely Island Lost in the Middle of a Foggy Sea may sound weird, but with a trio of rums, bright fruits and coffee, it’s a fun, complex cocktail to be enjoyed on spring break or whenever the mood strikes. Ingredients 1-1/2 ounces Rhum J.M Agricole Blanc 1/2 ounce Cruzan blackstrap rum 1/2 ounce Old Port Deluxe matured rum 1 ounce pineapple juice 3/4 ounce demerara syrup (1 part demerara sugar, 1 part water/boiled) 3/4 ounce lime juice, freshly squeezed 1/4 ounce La Colombe cold brew coffee Garnish: roasted coffee beans Garnish: pineapple fronds Directions
ChefSecret: Inventing a cocktail is like having a kid. Conceiving it is the easy part. The challenges come later. And many bartenders will attest that one of the hardest parts of cocktail creation is conjuring the right name. This is, after all, the first interaction drinkers will have with the cocktail, and can impact whether or not the drink will sell well. Quip of the Day: Q: What do you call it when it rains chickens and ducks during spring break? A: FOUL weather. ------------------------------------------ Do you have a question or comment? Send your thoughts to ed@perspectives-la.com. All recipes and cooking tips are posted on our website https://www.perspectives-la.com/covid-19-survival-guide. ------------------------------------------- To you and everyone dear to you, be strong, positive, stay well, stay safe and be kind. Take a breath and count your blessings, and if you have a little extra to share with others, please consider donating to Feeding America, Tunnel to Towers, Union Rescue Mission and/or American Red Cross. #Cocktail #FoggySeaCocktail #Rum #Coffee #CruzanRum #Rhum #Cheers #HappyHour #2024 #T2T #URM #FeedingAmerica #RedCross #PerspectivesTheConsultingGroup ©PERSPECTIVES/The Consulting Group, LLC, 2024 …from the Perspectives’ Kitchen 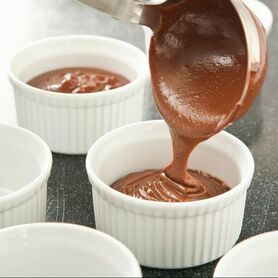 How you doin’? If you’re a chocoholic here’s a treat to keep your craving at bay. Deep, dark, chocolate infused with liqueur and whipped into a mousse that is at once lush and decadent and unbelievably light. And it is ready to serve in about 2-1/2 hours!
Chocolate Pots are one of life’s sublime delights and though you may choose not to share it—it is the perfect dessert for celebrating the people you love because it looks just as fancy and splendid as it tastes—but it’s very easy to make. We serve ours with a little pile of raspberries on the top. They provide a fresh sweet-tart note to complement all that dreamy creaminess and they look so pretty on top of the chocolate. Prep time: 10 minutes Cook time: 10 minutes Chill time: 2+ hours Yield: 4 servings Ingredients 6 ounces semisweet chocolate, chopped (I prefer Guittard chocolate) 1 large egg 2 tablespoons granulated sugar 2 teaspoons Chambord Black Raspberry Liqueur 3/4 cup nonfat milk 1 pint fresh raspberries Directions
ChefSecret: This simple chocolate pot can be made with boysenberries, strawberries or even pitted cherries. Quip of the Day: All you need is love. But a little chocolate now and then doesn't hurt. ------------------------------------------- Do you have a question or comment? Send your thoughts to ed@perspectives-la.com. All recipes and cooking tips are posted on our website https://www.perspectives-la.com/covid-19-survival-guide. ------------------------------------------- To you and everyone dear to you, be strong, positive, stay well, stay safe and be kind. Take a breath and count your blessings, and if you have a little extra to share with others, please consider donating to Feeding America, Tunnel to Towers, Union Rescue Mission and/or American Red Cross. #Dessert #RaspberryChocolatePots #GuittardChocolate #ChambordBlackRaspberryLiqueur #ChocolateDessert #2024 #T2T #URM #FeedingAmerica #RedCross #PerspectivesTheConsultingGroup ©PERSPECTIVES/The Consulting Group, LLC, 2024 …from the Perspectives’ Kitchen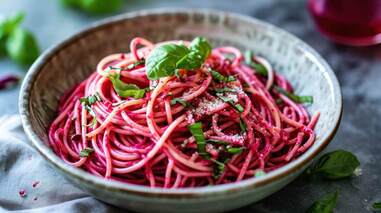 How you doin’? You’ll be shocked by the color and the bold flavor of this dish. The best part is that it’s a simple weeknight-easy recipe—it takes just 20 minutes and a handful of steps.
The crimson noodles are cooked in a concoction of aromatics, merlot and fresh herbs, giving them a crimson color and an unexpected depth of flavor. When served, they look like a simple, colorful, nest of noodles with Parmesan and parsley, but they have a lively flavor—garlicky, rich and herbaceous with a pleasing flavor thrill of heat. Crimson Spaghetti is the perfect last-minute date night fare. You can make it with a cup and a half of leftover wine and just a few at home staples and the beautiful crimson noodles and wonderful flavor will surprise and delight every time. Prep time: 15 minutes Cook time: 20 minutes Yield: 4 Servings Ingredients 1 tablespoon extra-virgin olive oil, plus more for topping 4 teaspoons minced garlic 1 teaspoon medium crushed red pepper flakes 5 tablespoons unsalted butter, cut into 1" pieces, divided 1-1/2 cups Merlot wine 4 fresh thyme sprigs 2 fresh rosemary sprigs 2 fresh sage sprigs Kosher salt, to taste 8 ounces spaghetti, dry 1/4 cup finely grated Parmesan cheese, for serving 2 tablespoons chopped fresh parsley, for garnish Directions
ChefSecret: You can also use an Italian Chianti instead of Merlot. Quip of the Day: Never underestimate the power of well-cooked spaghetti. It can really noodle its way into your heart.” ------------------------------------------- Do you have a question or comment? Send your thoughts to ed@perspectives-la.com. All recipes and cooking tips are posted on our website https://www.perspectives-la.com/covid-19-survival-guide. ------------------------------------------- To you and everyone dear to you, be strong, positive, stay well, stay safe and be kind. Take a breath and count your blessings, and if you have a little extra to share with others, please consider donating to Feeding America, Tunnel to Towers, Union Rescue Mission and/or American Red Cross. #Entree #CrimsonMerlotSpaghetti #Spaghetti #Merlot #Parmesan #Dinner #2024Recipes #URM #T2T #FeedingAmerica #RedCross #PerspectivesTheConsultingGroup ©PERSPECTIVES/The Consulting Group, LLC, 2024 … from the Perspectives Happy Hour Bar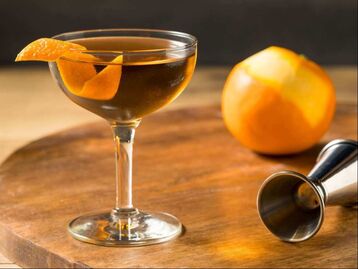 How you doin’? One thing I love about some of the older cocktail recipes is that they have great names. For example, The Hanky Panky Cocktail which has a great story, as well. It was invented by one of the few women known to have tended bar, pre-Prohibition, Ada Coleman, then at the American Bar at the Savoy Hotel in London.
Be careful with this one, but not too careful. It calls for Fernet Branca, which of course isn't to everyone's taste. Here, though, it's used in such small quantities that its sharper elements are tamed. Hanky Panky matches the distinctive character of Fernet Branca with the botanicals found in gin and sweet vermouth to create a rich blend of flavors—a blend that lets the pushy liqueur remind you of its better side. Let's talk about that bitter Italian liqueur, a beneficent bully. Formulated as a digestivo in the mid-19th century, Fernet Branca has a blend of botanicals, including cardamom, chamomile, saffron and rhubarb, that together work some sort of gastronomic magic to dispel the discomfort of overindulging at mealtime. And the bully part? This same mix of ingredients has a flavor so bracingly bitter and complex that a first encounter is usually seared into a drinker's memory. This powerful flavor makes Fernet Branca tricky to work with as a cocktail ingredient. Not content to play a supporting role, Fernet Branca has a knack for taking over any drink that incorporates it as an ingredient. Fortunately, there are a few cocktails that play to Fernet Branca's strengths. Note: Some bartenders adjust the drink's proportions to create a drier cocktail; for that version, try 2 ounces of gin, 1 ounce of sweet vermouth and 1/4 ounce of Fernet Branca. Both versions are worth a try. Prep time: 3 minutes Yield: 1 cocktail Ingredients 1-1/2 ounces gin 1-1/2 ounces sweet vermouth 2 dashes (1/4 ounce) Fernet Branca Directions
Chefs Secrets: The Savoy has always been my place to stay in London until… well, I was tossed out. I was drinking at the American Bar with Master Christie (first officer on the original Pacific Princess and a real troublemaker). Without going into too much detail—there were girls involved, tossing food at guests and lots of Hanky Panky. Keep this a secret, please. Quip of the Day: Q. How do you make your hanky dance? A. Put a little boogie in it. ------------------------------------------- Do you have a question or comment? Send your thoughts to ed@perspectives-la.com. All recipes and cooking tips are posted on our website https://www.perspectives-la.com/covid-19-survival-guide. ------------------------------------------- To you and everyone dear to you, be strong, positive, stay well, stay safe and be kind. Take a breath and count your blessings, and if you have a little extra to share with others, please consider donating to Feeding America, Tunnel to Towers, Union Rescue Mission and/or American Red Cross. #Cocktail #HankyPankyCocktail #FernetBranca #Gin #Vermouth #Cheers #HappyHour #2024 #T2T #URM #FeedingAmerica #RedCross #PerspectivesTheConsultingGroup ©PERSPECTIVES/The Consulting Group, LLC, 2024 |

For over 4 decades collaboration and vision have been the cornerstones of our approach to developing innovative solutions. We fuel innovation, uncover opportunities, discover trends and embrace sustainability, turning imaginative ideas into profitable realities. Categories
All
Archives
April 2024
|
 RSS Feed
www.perspectives-la.com
Copyright © 2021 Perspectives/The Consulting Group, LLC | Henderson, NV 89052 | 310-477-8877
Copyright © 2021 Perspectives/The Consulting Group, LLC | Henderson, NV 89052 | 310-477-8877