…from the Perspectives’ Kitchen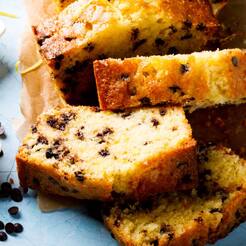 How you doin’? Two of my favorite things in life are really good bread and really great ice cream. I am especially partial to Ben & Jerry’s brand. Years ago, they were acquired by one of the giant international food companies, but they have kept up the quality of the ice cream and the inventiveness of the flavors and are still spot on. A while back I was hearing things about this new, easy-to-make Ice Cream Bread, and I needed to try it out.
At first, I thought it was just a joke, but I kept on reading more and more about it. I started asking all the important questions. Does it need any yeast or baking powder to rise? Does it have to be just plain vanilla ice cream? Can I use any mix-ins? I decided to give it a try. The first time I made it, I had an unopened pint of B & J’s Cherry Garcia (cherry ice cream with cherries & fudge flakes) in the freezer. I quickly whipped up the batter and to my surprise, the bread actually turned out well! It was moist, yet fluffy. All of the ice cream flavors came through. And in future tests I discovered you shouldn’t use yeast or other leavening agents. You can use most flavors of ice cream and you can add mix-ins in moderation in addition to those already in the ice cream such as fruit, chocolate chips and nuts. This is one of the easiest, most rewarding, fool-proof recipes I’ve come across, and it's fun for the kids, too! I hope you enjoy it as much as I did. Ingredients 1 pint ice cream—flavor of your choice 1-1/2 cups Self-Rising Flour 1/2 cup Chocolate Chips (any complimentary chip flavor, dark, milk or white chocolate) Directions 1. Preheat an oven to 350º F. 2. Spray a loaf pan with cooking spray. 3. In the bowl of an electric mixer, mix the ice cream and flour until combined. 4. Scoop batter into the loaf pan. 5. Bake for 40-45 minutes or until it springs back to the touch. 6. Let the bread cool on a rack, slice and enjoy! ChefSecret: For best results, use a premium grade of ice cream. I prefer Ben & Jerry’s; Häagen-Dazs also works well in this recipe. Non-premium ice cream brands have much more air whipped into them and don’t deliver enough structure or flavor. Quip of the Day: “If ever I am on life support, unplug me and plug me back in… see if that works.” ------------------------------------------- Do you have a question or comment? Send your thoughts to ed@perspectives-la.com. All recipes and cooking tips are posted on our website https://www.perspectives-la.com/covid-19-survival-guide. ------------------------------------------- To you and everyone dear to you, be strong, be positive, stay well, stay safe and be kind. Take a breath and count your blessings, and if you have a little extra to share with others, please consider donating to Feeding America and/or American Red Cross. #Baking #Breakfast #Snack #Dessert #Kids #IceCreamBread #Ben&Jerrys #HaagenDazs #2023Recipes #QuarantineKitchen #Covid19 #FeedingAmerica #RedCross #PerspectivesTheConsultingGroup ©Perspectives/The Consulting Group, LLC, 2023
0 Comments
…from the Perspectives’ Kitchen  How you doin’? They say the best things in life find you when you’re not looking for them—love, dream jobs and desserts. Hopefully this Brookie recipe finds you in a receptive mood.
I’m a lover of all things baked—cakes, cookies, pies, brownies and cupcakes. A brookie is everything you love about a brownie plus everything you love about a cookie… this creates a dessert you’ll love more than either a brownie or a cookie. Got it? Who invented this delicious treat? Bertha Palmer, a prominent Chicago socialite whose husband owned the Palmer House Hotel asked a pastry chef for a dessert suitable for ladies attending the Chicago World's Exposition. He came up with the brownie. Later on Toll House Cookies, the most popular cookie in America, was invented by Ruth Wakefield at the Toll House Inn in Whitman, Massachusetts, during the 1930’s. Somewhere down the line someone wanted to throw a party and only had one 9 x 13-inch baking pan and put the two together, thus The Brookie was created. Prep time: 20 minutes Bake time: 20 minutes Cool time: 20 minutes Yield: 20 servings Ingredients For the chocolate chip cookie layer 1/2 cup unsalted butter, softened 1/2 cup light brown sugar 1/4 cup granulated sugar 1 teaspoon pure vanilla extract 1 large egg 1-1/4 cups all-purpose flour 1/2 teaspoon kosher salt 1/2 teaspoon baking soda 1 cup semisweet chocolate chips For the chocolate brownie layer 1 cup granulated sugar 1/2 cup unsalted butter, melted 1 teaspoon pure vanilla extract 2 large eggs 1/3 cup cocoa powder, sifted 1/2 cup all-purpose flour 1/4 teaspoon baking powder 1/8 teaspoon kosher salt Directions
ChefSecret: On some occasions you might choose to gild the lily by adding a third layer of frosting on top of the brownie. Here is a simple recipe for the frosting layer
Quip of the Day: “It’s my friend’s wife’s birthday tomorrow. She has been leaving hints with jewelry catalogues all over the house. He asked me what he should buy her for her 40th and I suggested a magazine rack.” ------------------------------------------- Do you have a question or comment? Send your thoughts to ed@perspectives-la.com. All recipes and cooking tips are posted on our website https://www.perspectives-la.com/covid-19-survival-guide. ------------------------------------------- To you and everyone dear to you, be strong, be positive, stay well, stay safe and be kind. Take a breath and count your blessings, and if you have a little extra to share with others, please consider donating to Feeding America and/or American Red Cross. #Baking #Desserts #Brookies #Brownies #Cookies #ChocolateChips #PalmerHouse #TollHouse #Covid19 #2023 #QuarantineKitchen #Covid19 #FeedingAmerica #RedCross #PerspectivesTheConsultingGroup ©Perspectives/The Consulting Group, LLC, 2023 …from the Perspectives’ Kitchen 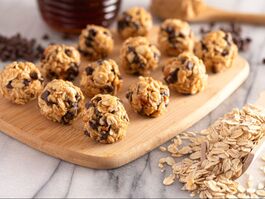 How you doin’? I’m not bashful about my love of anything peanut butter including these No-Bake Healthy Peanut Butter Energy Balls. They are the perfect quick and easy snack!
This recipe is made with only 5 ingredients (probably in your pantry), and they are not baked. They can be ready in less than 30-minutes and they are so delicious, too. And they're fun for the kids to make, too! This healthy snack recipe can be easily customized too—feel free to add in chocolate, raisins, and chopped peanuts. Peanut butter is the main ingredient in this recipe. Use a smooth and runny peanut butter like Crazy Richard’s brand which only contains peanuts and salt as ingredients. Use honey or agave syrup as the sweetener of choice. Remember, it is still a refined sugar that has the same calories as granulated white sugar. Use old fashioned or quick-cooked oats. Cinnamon and peanut butter is a great flavor thrill and gives my peanut butter balls the best flavor. Add a touch of pure vanilla extract and a pinch of salt for take-it-over-the top flavors. Prep time: 15 minutes Yield: 12–15 peanut balls Ingredients 1 cup peanut butter, natural and runny 1/4 cup honey 1 teaspoon vanilla extract 1-1/2 cup oats 1-1/2 teaspoons cinnamon pinch of salt Directions
ChefSecret: There are a whole host of other ingredients you can add to my energy balls—white, milk, or dark chocolate chips. You could even add in chopped dates, raisins or craisins, shredded coconut or other crushed nuts. Or, you can dip them in chocolate coating … basically anything you like! Quip of the Day: “I was going to cook alligator for dinner tonight, but realized I only had a crock-pot.” ------------------------------------------- Do you have a question or comment? Send your thoughts to ed@perspectives-la.com. All recipes and cooking tips are posted on our website https://www.perspectives-la.com/covid-19-survival-guide. ------------------------------------------- To you and everyone dear to you, be strong, be positive, stay well, stay safe and be kind. Take a breath and count your blessings, and if you have a little extra to share with others, please consider donating to Feeding America and/or American Red Cross. #Snacks #NoBakeSnack #PeanutButter #PeanutButterBall #Oats #Honey #CrazyRichards #2023Recipes #QuarantineKitchen #Covid19 #FeedingAmerica #RedCross #PerspectivesTheConsultingGroup ©Perspectives/The Consulting Group, LLC, 2023 …from the Perspectives’ Holiday Kitchen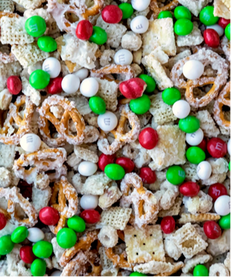 credit: ihearteating.com credit: ihearteating.com How you doin’? This easy Santa’s Helper’s Reindeer Food snack mix recipe is fun to make. Really, it couldn't be simpler: just pour melted white chocolate over the other ingredients and toss to coat! My Reindeer Food" recipe is sweet, salty, and impossible to resist. You can choose a holiday mix of M&M's so the colors shine through to make it extra festive! I even add in mini salted corn nuts for an extra loud crunch. Play your cards right and you might even get an extra treat in your stocking by making this snack for Santa and his reindeer.
Santa’s Helper’s Reindeer Food is great for gift-giving not only for feeding Dancer, Prancer and the rest of the herd—including Rudolph—but for friends and family, too. For a simple and festive presentation, throw it into mason jars and decorate with patterned fabric and a festive ribbon. You can also use cookie tins, gift bags, or basic storage containers. Prep time: 15 minutes Cook time: 5 minutes Cool Time: 30 minutes Yield: 24 servings Ingredients 1 (20 ounce) package miniature pretzels 1 (17.5 ounce) package crispy corn cereal squares (I prefer any of the Chex cereals) 1 (16 ounce) jar salted dry-roasted peanuts (I also like to use crispy honey coated peanut, almonds, or cashews) 1 (14 ounce) package candy-coated milk chocolate pieces (I prefer M&M's) 24 ounces chopped white chocolate (I prefer Guittard chocolate), 6-ounces mini salted corn nuts (optional) Directions
ChefSecret: Store Reindeer Food in an airtight container at room temperature for up to four days or in the fridge for up to one week. Here is my elfin Quip of the Day: If athletes get athlete’s foot, what do Santa’s elves get? Mistle-toe, silly! ------------------------------------------- Do you have a question or comment? Send your thoughts to ed@perspectives-la.com. All recipes and cooking tips are posted on our website https://www.perspectives-la.com/covid-19-survival-guide. We have added a new search feature to make it easier to navigate through our blogs. ------------------------------------------- To you and everyone dear to you, be strong, be positive, stay well, stay safe and be kind. Take a breath and count your blessings, and if you have a little extra to share with others, please consider donating to Feeding America and/or American Red Cross. #Snacks #ReindeerFood #SantasReindeer #Pretzels #Nuts #WhiteChocolate #CornNuts #M&Ms #Guittard #Christmas #Holidays2022 #HolidayRecipes #QuarantineKitchen #Covid19 #FeedingAmerica #RedCross #PerspectivesTheConsultingGroup ©Perspectives/The Consulting Group, LLC, 2022 …from the Perspectives’ Holiday Kitchen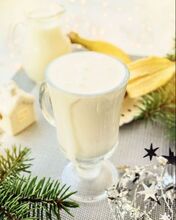 How you doin’? Who doesn’t love smoothies?… fruity, healthy and delicious… right? But I’ve seen nutritional facts on smoothies from some of the juice stores that will blow your mind! My Holiday Breakfast Smoothie recipe has a scaled down calorie count but is not scaled down in flavor.
Where did Smoothies originate? It appears that health food stores on the West Coast of the United States began selling smoothies in the 1930s associated with invention of the electric blender. The actual term "smoothie" was being used in recipes and trademarks by the mid-1980s. The earliest fruit smoothies were thick, frozen drinks made from orange juice, strawberries, and ice, and although they shared the electric blender in common with the long-standing milkshake, smoothies were a completely different drink aimed at cooling and refreshing beach-goers. Different flavored smoothies are part of Indian, Mediterranean and Middle Eastern cuisines. Fruit Sharbat (a popular Persian and South Asian drink) sometimes include yogurt and honey, too. In India, the Lassi is a smoothie or milkshake comprising crushed ice, yogurt, sugar, and mango; in the south, pineapple smoothies made with crushed ice, sugar and no yogurt are common. Prep time: 10 minutes Yield: 4 servings Ingredients 2 cups low-fat eggnog 2 large, sliced bananas 1 cup nonfat vanilla yogurt 1 cup fat-free milk 2 cups crushed or chipped ice 1/4 teaspoon ground cinnamon 1/4 teaspoon nutmeg Optional fruit or vegetable of your choice (see ChefSecret) Directions
Nutrition Facts Serving Size 1/4 of recipe Calories 240 Cal from Fat 25 Total Fat 3 g Saturated Fat 0 g Cholesterol 0 mg Sodium 150 mg Total Carb 47 g Dietary Fiber 2 g Sugars 40 g Proteins 9 g Vitamin A 4% DV Vitamin C 15% DV Calcium 20% DV Iron 6% DV Percent Daily Values (DV) are based on a 2,000 calorie diet. ChefSecret: While this is a great basic smoothie and really watches the calories, you may choose to add some fresh berries for a sweeter, fruity flavor. Any additional ingredients you add will increase the calories—yes, even fresh berries will add a few calories to the basic smoothie. Quip of the Day: “I think I should work at a smoothie shop. I feel like I would blend in.” ------------------------------------------- Do you have a question or comment? Send your thoughts to ed@perspectives-la.com. All recipes and cooking tips are posted on our website https://www.perspectives-la.com/covid-19-survival-guide. ------------------------------------------- To you and everyone dear to you, be strong, be positive, stay well, stay safe and be kind. #Beverage #Smoothie #HolidaySmoothie #BreakfastSmoothie #EggNog #Nutmeg #Christmas #Holidays2022 #HolidayRecipes #QuarantineKitchen #Covid19 #FeedingAmerica #RedCross #PerspectivesTheConsultingGroup ©Perspectives/The Consulting Group, LLC, 2022 |

For over 4 decades collaboration and vision have been the cornerstones of our approach to developing innovative solutions. We fuel innovation, uncover opportunities, discover trends and embrace sustainability, turning imaginative ideas into profitable realities. Categories
All
Archives
April 2024
|
 RSS Feed
www.perspectives-la.com
Copyright © 2021 Perspectives/The Consulting Group, LLC | Henderson, NV 89052 | 310-477-8877
Copyright © 2021 Perspectives/The Consulting Group, LLC | Henderson, NV 89052 | 310-477-8877