PERSPECTIVES/ THE CONSULTING GROUP, LLC
  • Home
    • Who We Serve
    • How We Work
    • Services >
      • Concept Development
      • Strategic Planning
      • Brand Development
      • Operations
      • HACCP / Food Safety
      • Menu / Product Development
      • Marketing / Research
      • Design
      • Market Planning / Site Analysis
  • Why Perspectives?
    • About Us
    • Principals
    • Mission Statement
    • Code of Ethics
  • Clients
    • Testimonials
    • Client List
  • Contact Us
    • Phone, Address & Contact
  • Covid-19 Survival Guide
  • Perspectives On Food

Cooking Lesson #696EX: Perfect Turkey Gravy

11/21/2023

0 Comments


…from the Perspectives’ Kitchen

Perfect Turkey Gravy
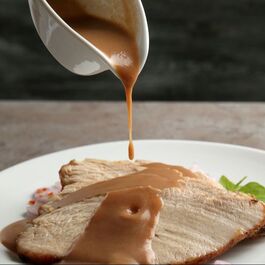
How you doin’? Just two more sleeps ‘till Turkey Day. Many people leave the turkey gray to the very last minute. Please don’t do that. Afterall, aren’t all those Thanksgiving dishes you’ve work so hard to make really just carriers for savory turkey gravy?
 
This year plan ahead and don't let those drippings in the bottom of the roasting pan go to waste. Use them to make an easy and flavorful turkey gravy from scratch for your holiday feast. Here's how to make delicious turkey gravy from drippings.
 
Ingredients 
4 cups of turkey broth or chicken broth
1/4 cup of reserved turkey fat from the bottom of the roasting pan
1/2 cup of white wine
1/4 cup of all-purpose flour
Kosher salt and pepper to taste
1 teaspoon freshly chopped sage
1/2 teaspoon Kitchen Bouquet or soy sauce (for added color and umami flavor)
 
Directions
  1. Heat 4 cups of the broth in a saucepan until hot but not boiling. This will be used as the base of the gravy; you'll be adding thickened turkey drippings (a roux) for your final gravy.
  2. To collect the turkey drippings, carefully lift the cooked turkey from the roasting pan and place it on a cutting board to rest.
  3. Remove as much turkey fat as possible from the pan using a spoon or gravy separator. Reserve 1/4 cup of fat to make the roux.
  4. Place the roasting pan over two burners on the stove on medium heat.
  5. Deglaze the pan by adding 1/2 cup wine and stir constantly and scrape the bottom of the pan to loosen any browned bits—that’s where the flavors are.
  6. Pour the liquid from the roasting pan directly into the saucepan of hot turkey broth.
  7. Add 1/4 cup of the reserved fat to a separate saucepan over medium heat.
  8. Whisk in 1/4 cup of all-purpose flour to the fat to make the roux.
  9. Cook, stirring constantly, until the flour loses its "raw" aroma and the mixture becomes golden brown in color. Cooking the flour enhances the thickening power of the roux and adds color and nutty flavor to the gravy.
  10. Whisk in the hot turkey broth, pan drippings and roux together and simmer over medium heat, stirring frequently, until thickened, about 5 minutes.
  11. Stir in the Kitchen Bouquet or soy sauce.
  12. Season the gravy to taste with salt and pepper.
  13. Transfer to a warmed gravy boat or serving bowl and garnish with freshly chopped sage.

Other herbs and spices may suit your tastes as well. Try experimenting with a pinch of cloves, a sprinkle of thyme and a touch of mace.
 
Now that you have the gravy mastered, you'll need plenty of mashed potatoes (tomorrow’s post) and bread stuffing.

ChefSecret:  The trick to avoiding lumps in your turkey gravy is to cook together equal parts of flour with a turkey fat. This mixture is known as roux and serves as a thickener for gravy. Generally, 1/2 cup of roux will thicken 4 cups of gravy.

Quip of the Day:  Did you hear about a book called “Fifty Shades of Gravy”? It’s very saucy.
-------------------------------------------
Do you have a question or comment?  Send your thoughts to [email protected].  All recipes and cooking tips are posted on our website https://www.perspectives-la.com/covid-19-survival-guide.
-------------------------------------------
To you and everyone dear to you, be strong, positive, stay well, stay safe and be kind. Take a breath and count your blessings, and if you have a little extra to share with others, please consider donating to Feeding America and/or American Red Cross. 

#ThanksgivingRecipes #Thanksgiving #Sauce #Gravy #TurkeyGravy #Holidays2023 #BeThankful #QuarantineKitchen #Covid19 #RedCross #FeedingAmerica #PerspectivesTheConsultingGroup 

                                                                            ©PERSPECTIVES/The Consulting Group, LLC, 2023

0 Comments

Cooking Lesson #691: Baked Pasta

11/8/2023

0 Comments


…from the Perspectives Kitchen

Baked Pasta
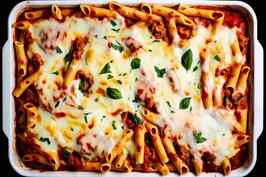
How you doin’? With prices on all food stuffs sky-rocketing, here is a comforting baked pasta that won’t break the bank. You can use whatever style and shape pasta you have in your pantry from lasagna noodles to shells or spaghetti. This recipe uses 1 pound of ground meat (beef, chicken, turkey, or Italian sausage) and plenty of melted cheese. This can be the perfect take along dish for potluck meals, family gatherings, or a weeknight dinner.
 
This recipe was a favorite on the national school lunch program served every Tuesday at my grade school. I loved it so much I asked my mother to talk with Mrs. Brady, the cafeteria lady, to get the recipe. The finished baked casserole can be frozen for up to 3 months and zapped in the microwave for quick serving.
 
Prep time:  25 minutes
Cook time:  20 minutes
Bake time:  50 to 55 minutes
Yield:  8 servings
 
Ingredients 
1 (16 ounce) package pasta (shape of your choice)
1 pound ground meat (your choice)
1 onion, chopped
1 (32 ounce) jar meatless spaghetti sauce
1/2 teaspoon seasoned salt (I prefer Lawry’s)
2 large eggs
1/3 cup grated Parmesan cheese
5 tablespoons butter, melted (or olive oil)
2 cups ricotta cheese, divided (or cottage cheese)
5 cups shredded mozzarella cheese, divided
 
Directions
  1. Preheat the oven to 350⁰ F.
  2. Lightly spray a 9 X 13-inch baking dish with food release (I prefer Pam).
  3. Bring a large pot of lightly salted water to a boil. Cook spaghetti in boiling water, stirring occasionally, until tender but firm to the bite, about 10 minutes. Drain.
  4. Heat a large skillet over medium heat.
  5. Cook and stir beef and onion in the hot skillet until meat is browned and onion is soft and translucent, about 7 minutes.
  6. Important—Drain excess oil from the pan.
  7. Stir in spaghetti sauce and seasoned salt with the cooked meat.
  8. Whisk eggs, Parmesan cheese and butter in a large bowl.
  9. Add spaghetti and toss to coat.
  10. Place 1/2 of the spaghetti mixture in the prepared dish. Top with 1/2 of the ricotta cheese, 2 cups mozzarella, and 1/2 of meat and sauce.
  11. Repeat layers.
  12. Cover the baking dish with aluminum foil.
  13. Bake in the preheated oven for 40 minutes.
  14. Remove the foil and sprinkle with remaining mozzarella.
  15. Continue to bake until cheese is melted and lightly browned, 20 to 25 minutes.
  16. Let the pan cool for about 10 minutes before cutting and serving.

ChefSecret:  I like to use a 50/50 mixture of Italian sausage and ground beef.

Quip of the Day:  How did the police solve the case of the stolen marinara sauce?  They caught the thief red handed.
-------------------------------------------
Do you have a question or comment? Send your thoughts to [email protected].  All recipes and cooking tips are posted on our website https://www.perspectives-la.com/covid-19-survival-guide.
-------------------------------------------
To you and everyone dear to you, be strong, positive, stay well, stay safe and be kind. Take a breath and count your blessings, and if you have a little extra to share with others, please consider donating to Feeding America and/or American Red Cross.

#Entree #BakedPasta #PastaBake #MeatSauce #Mozzarella #Parmesan #BudgetMeal #2023Recipes #Covid19 #FeedingAmerica #RedCross #PerspectivesTheConsultingGroup 
                                                                                      ©PERSPECTIVES/The Consulting Group, LLC, 2023

0 Comments

Cooking Lesson #688: Thanksgiving Deep Fried Turkey

11/1/2023

0 Comments


…from the Perspectives’  Holiday Kitchen 

Deep Fried Turkey
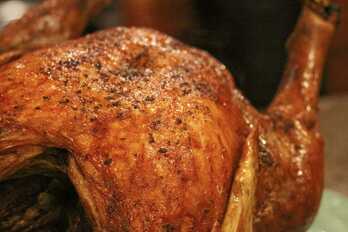
How you doin’? You’ve heard it talked about for years, right? This year it’s time to give it a shot. My Deep Fried Turkey recipe is not only easy, but it also produces a super crispy, flavorful and succulent bird. The perfect combination for a memorable Thanksgiving Turkey dinner!
 
I love the flavor and texture of deep-fried foods. I love perfectly cooked French fries. That said, I don’t fry much at home because it can be a big mess. My range top and kitchen counters are covered in oil when I’m finished even though I use a spatter screen. The odor of vaporized fry oil lingers around the house for days and I hate the smell of day-old oil. If there is one deep fry recipe, I love it’s got to be Deep Fried Turkey.
 
I’m sure you’ve seen those clips on YouTube and America’s Funniest Home Videos, of people lowering the turkey into an outdoor gas fryer and the whole thing going up in flames… including the garage!  While those scenes may be off putting and a little scary, I want to appeal to your adventuresome side and encourage you to give it try it anyway.                                                 

Outdoor Deep Fryer for Turkey
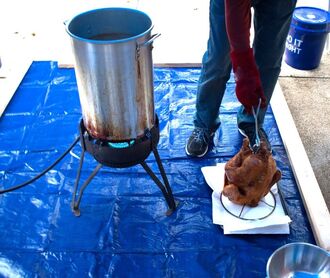
To do it right you must start by buying the right equipment. Safety First! For about $100 you can find an outdoor fryer on Amazon or your favorite hardware store, and about $60 bucks at Bass Pro Shops. There are all kinds of places and options to choose from but do it now before they sell out. 
 
You should have on hand:
  • long sleeve fryer gloves
  • protective apron (for frying or at least a thick material; not plastic)
  • eye protection (fryers splatter)
  • deep fry thermometer
  • meat thermometer
  • large foil roasting pan (for the fried bird to drain and cool)
  • fire extinguisher
  • a helper on hand to assist and run into the house for the little things you forgot
 
What else are you going to need? The ingredients list is quite simple and very easy to pull off in this recipe.
 
Ingredients 
Whole Turkey (Thawed Completely) I like to use a 10-pound bird
Cooking Oil (2-3 gallons of peanut oil)
Turkey Injecting Marinade (recipe below)
Turkey Dry Rub Seasoning (recipe below)
 
For the dry rub seasoning
3 tablespoons lemon pepper seasoning
2 tablespoons poultry seasoning
1 tablespoon salt
2 teaspoons roasted garlic powder (I prefer Penzy’s)
2 teaspoons onion powder
 
For the injecting marinade
1/2 cup peanut oil
1/4 cup water
1/4 cup lemon juice
2 tablespoons Dijon mustard
1 tablespoon salt
1 teaspoon poultry seasoning
1 teaspoon garlic powder
Deep Fried Turkey Seasoning
  
                     Read the directions thoroughly before starting the recipe.
Directions
How to make deep fried turkey
  1. Thaw 1 or 2 small turkeys in the refrigerator—this might take a day or two depending on the size of the turkey(s).
  2. Set up your turkey fryer outside on a flat, level surface, away from your house, garage or deck. Personally, I would never fry a turkey inside the house or inside the garage. Follow the instructions on your fryer and watch a few online videos… don’t wing it!
  3. Preheat the peanut oil in the fryer and let it come up to temperature--375⁰ F.
  4. When ready to cook, pat dry the outside of the turkey thoroughly, then inside the cavity as well, with paper towels.
  5. Inject the turkey with marinade. Then dry it again… just in case. You don’t want to fry a wet turkey. Remember… oil and water don’t mix. Hot oil and water can be explosive!
  6. Sprinkle the dry rub seasoning on and in the turkey and place it in the frying basket or on the rack.
  7. IMPORTANT: ever so slowly, lower the turkey into the hot oil.
  8. Close the lid and set a timer for the low side of the cooking time based on 3-4 minutes per pound.
  9. Using a meat thermometer, check the temperature of the bird in the thickest part of the breast; it should read 170 degrees before you pull the bird out.

​When fully cooked the skin will be dark, but very flavorful… not burnt tasting. The turkey meat will be ultra-tender and juicy from breast to tail. Best of all, you won’t ever be seen on YouTube (for this) or the evening news with your garage burning down in the background!

ChefSecrets:  Get ready by having everything ready to go.
  • Thaw the turkey, if frozen. To properly thaw a frozen turkey in the refrigerator, allow approximately 24 hours for every 4 pounds.
  • Don’t forget to remove the giblets and neck.
  • Remove any plastic leg holders or pop-up timers.
  • Fill the deep fryer halfway with oil and heat to 375°F.
  • Rinse the turkey thoroughly with warm water, or completely cover it with warm water and soak for no more than 30 minutes to ensure the cavity is free of any ice.
  • Combine all the dry seasonings in a small bowl and mix well.
  • Combine the oil, water, lemon juice, mustard, salt, poultry seasoning and garlic powder; whisk well to emulsify the mixture.
  • Using a marinade injection syringe, inject 1/2 cup of the marinade in each breast. Inject 1/4 cup marinade into each leg and thigh.
  • Sprinkle the turkey generously with turkey dry rub seasoning, completely coating the outside of the turkey and the inside of the cavity.
  • You can inject and dry rub the bird the day before for extra flavor but be sure to allow it to pat it dry again and let it come to room temperature before you fry it.
  • Place the turkey, breast side up, in the fryer basket. Slowly lower the basket into hot oil, being careful not to splatter hot oil.
  • Lift the basket from the hot oil slowly. Insert a meat thermometer in the meaty part of the breast; turkey is done when it reads 170°F.
  • If the turkey is not done, lower it carefully back into the oil for an additional 5 minutes. Once the turkey reaches the desired internal temp (minimum 170°F), remove it from the oil.
  • Let the turkey drain and rest in the fryer basket for 20 minutes before removing it for carving. The turkey can remain in the basket to cool until ready to serve.

Quip of the Day
:  My family told me to stop telling Thanksgiving jokes, but I said I couldn't quit cold turkey. So, Gobble 'til you wobble.


                                                    Important Disclaimer:
Perspectives and its employees are not responsible for dummies who don’t follow instructions and burn themselves or others or burn their house or garage down.


-------------------------------------------
Do you have a question or comment? Send your thoughts to [email protected]. All recipes and cooking tips are posted on our website https://www.perspectives-la.com/covid-19-survival-guide.
-------------------------------------------
To you and everyone dear to you, be strong, positive, kind, thankful, and stay well and safe. Take a breath and count your blessings, and if you have a little extra to share with others, please consider donating to Feeding America and/or American Red Cross. 
​
#ThanksgivingRecipes #Thanksgiving #DeepFriedTurkey #Turkey #ThanksgivingTurkey #HolidayRecipes #Holidays2023 #BeThankful #QuarantineKitchen #Covid19 #RedCross #FeedingAmerica #PerspectivesTheConsultingGroup 
​

                                                                              ©PERSPECTIVES/The Consulting Group, LLC, 2023​

0 Comments

Cooking Lesson #531: Brine Procedure & Roasting Thanksgiving Turkey

11/10/2022

0 Comments


…from the Perspectives’ Holiday Kitchen

Picture
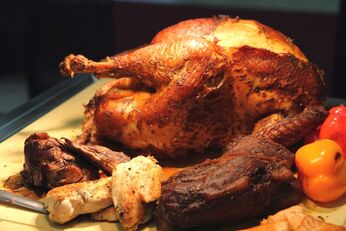
How you doin’? It that’s time in the season when we are thinking about Thanksgiving dinner. This year’s feast will be more expensive than ever before—so don’t mess it up! No dish has more riding on its success than the holiday turkey. Unfortunately, turkey loses its natural juices the longer it cooks. Fortunately, we have the solution—brining. Brining locks in a turkey's natural juices, so it won't dry out during the roasting process, ensuring the perfect centerpiece for a flavorful holiday feast.
 
Prep time:  13 hours, 20 minutes standing time
Cooking time:  Varies
Yield:  10-12 servings
 
Ingredients 
1 cup coarse kosher salt (I prefer Morton)
1 cup granulated sugar
2 gallons of cool water
12 to 15 pound fresh, whole, bone-in-skin-on turkey, rinsed and patted dry
8 tablespoons unsalted butter, divided (5 tablespoons softened and 3 melted)
1/2 teaspoon ground black pepper
1 cup white wine, chicken broth or water
 
Directions
To make the brine
  1. Combine kosher salt and sugar in cool water in a large, clean stockpot until completely dissolved.
  2. Place the whole turkey in the brine until completely submerged. Cover and refrigerate overnight, up to 14 hours.
  3. Remove the turkey from the brine, and rinse inside and out under cool running water for several minutes to remove all traces of salt.
  4. Pat dry with a paper towel.
To roast the turkey (quick recipe)
  1. Mix the 5 tablespoons of softened butter with the pepper.
  2. Place the turkey on rack in a roasting pan breast side down.
  3. Rub the seasoned butter under the skin.
  4. Brush the skin with the melted butter.
  5. Pour the 1 cup liquid (wine, broth or water) over the pan bottom to prevent drippings from burning.
  6. Roast turkey at 450° F for 25 minutes, baste and then rotate the roasting pan.
  7. Continue roasting until the skin turns golden brown about an additional 25 minutes; baste again.
  8. Reduce oven temperature to 325° F; continue to roast, basting and rotating the pan once about halfway through cooking, until the minimum internal temperature reaches 165° F.
  9. Remove the turkey from the oven. Let stand for 20 minutes before carving.
ChefSecret: 
  • To short cut to a 4-5 hour brine time: use 2 cups of coarse kosher salt and 2 cups of sugar. Cover and refrigerate for 4 to 5 hours.
  • Do NOT brine your turkey if it includes “basting” liquids that contain salt.
  • Feel free to add herbs and seasoning to your brine. Stuff the turkey cavity with lemon, garlic and more herbs.
Quip of the Day: “What if today, we were thankful for everything we have?”
-------------------------------------------
Do you have a question or comment? Send your thoughts to [email protected]. All recipes and cooking tips are posted on our website https://www.perspectives-la.com/covid-19-survival-guide.
-------------------------------------------
To you and everyone dear to you, be strong, be positive, stay well, stay safe and be kind. Have a wonderful safe and healthy holiday.

#ThanksgivingRecipes #Thanksgiving #RoastTurkey #Brine #UpsideDownTurkey #HolidayRecipes #Holidays2022 #BeThankful #QuarantineKitchen #RedCross #FeedingAmerica #PerspectivesTheConsultingGroup 
​
                                                      ©Perspectives/The Consulting Group, LLC, 2022

0 Comments

Cooking Lesson #370:  French Bresse-Style Turkey

11/8/2021

0 Comments


The Thanksgiving Collection

Roast Turkey on a platter with vegetablesPicture
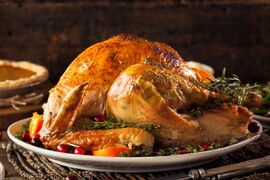
 ​How you doin’? Where has this year gone? It’s coming close to Thanksgiving Day already—my favorite food day of the year. In the past we’ve talked about making brined turkey, upside down turkey, spatchcocked turkey, fried turkey and, yes, even roasted turkey. It’s pretty easy to make great turkey, right?

Now it’s time to take it to the next level—a Bresse-Style Turkey. I got the inspiration for this recipe from Ariane Daguin at D’Artagnan. This is a real winner for those who love a traditional French-style turkey… super juicy on the inside with a nice golden brown, crisp skin on the outside and perfectly roasted flavor.
 
It’s not that this recipe is so complicated or particularly hard to do, it just has a few more steps and more quality time and ingredients than turkeys we’ve made in the past. This is the style of turkey I learned to make at the Cordon Bleu in Paris many Thanksgivings ago. So let me just say this, if you’re cooking your first turkey ever or if you are an old pro on your fortieth, you will still get the same marvelous result I did in France every single time.
 
There is only one catch… you will need a pot large enough to fit your turkey in (about 20 quarts) and you will need to start the preparation the day before. But again, it’s no big deal.  Actually, you will be making two recipes at the same time—the perfect turkey and the most flavorful turkey soup you’ve ever slurped!
 
Prep time:  1 hour
Balance/Brine time:  4 hours 40 minutes
Refrigerate time:  overnight
Roast time:  1 hour 30 minutes
Yield:  6 to 10 servings

Ingredients
2 containers Duck and Veal Demi-Glace (available at www.dartagnan.com)
4 medium carrots, rough chopped
4 stalks celery, rough chopped
3 medium yellow onions, thickly sliced
1 turnip, rough chopped
1 head garlic, peeled
3 ounces Duck Fat (available at www.dartagnan.com)
1 turkey, 12- to 14-pounds (more on this choice in the ChefSecrets)
2 tablespoons salt
2 teaspoons freshly ground black pepper
 
Directions
  1. Combine the duck and veal demi-glace, carrots, celery, onions, turnip and garlic in a large stock pot large enough to hold the turkey.
  2. Fill the pot with water to the halfway mark and bring to a boil over medium-high heat.
  3. While the stock heats, rinse turkey, remove the giblets and liver and, starting at the neck, carefully separate the skin from the breast and upper thighs with your fingers, being careful not to tear the skin.
  4. Rub the duck fat all over the outside, in between the skin and flesh. Truss the turkey with kitchen twine (tie back the wings and legs). This makes it easier to handle the bird later.
  5. When the stock begins to boil, add the salt and pepper—this is a hot brine process.
  6. Carefully add the trussed turkey to the pot and adjust the heat so it just simmers. Cover the pot with a lid and make sure the turkey is completely submerged.
  7. Simmer the turkey for 40 minutes, then remove the pot from heat. Let the turkey slowly cool to room temperature in the broth, up to 4 hours.
  8. Refrigerate the turkey in the pot overnight. If you don’t have enough room in the refrigerator, fill a tub or sink with ice and water to chill.
  9. Take the turkey out of the pot about 2 hours before you are planning to roast it.
  10. The next day, preheat oven to 475⁰ F.
  11. Take the turkey out of the pot, place it on a rack in a roasting pan and roast it in the hot oven for 30 minutes.
  12. Turn the oven off, leaving the bird inside for about an hour with the oven door shut.
  13. I promise when you are ready to eat the main course, the bird will be perfectly cooked and nicely roasted.
  14. Remember, you are going to use leftover stock as a wonderful base for turkey soup and gravy. Refrigerate the stock until ready to use.
Carve the bird—don’t mangle it!
  1. You don’t have to wait for the turkey to rest—it has been in the state of hibernation since the first 30 minutes of high-temperature cooking. It is now time to carve the bird. Don’t get all uptight and make this a bigger thing than it is.
  2. Place the turkey on a good sturdy cutting board with juice channels carved into the board to catch all the precious run off. I always put a kitchen towel underneath the cutting board to catch any spills and to steady the board.
  • Using a carving fork to steady the turkey, carefully remove the legs—yes, both of them. Cut through the crispy skin, tendons and joints so that you “capture” the whole leg and thigh.
  • Next separate the thighs from the drumsticks. Bend the leg backwards until the joint breaks and then cut though with your extra sharp carving knife. Now just slice along the top of the thigh parallel to the bone and remove as much meat as possible. Reserve the roasted bones for munching or stock.
  • Cut away the wings. You’ve got it by now. Find the joint and carefully cut through so as not to tear the skin. I never bother carving the wing meat off; I just pull it off Henry VIII-style and eat off the bone. It is not really proper etiquette to dispatch the bones over your shoulder—so behave.
  • Finally, you are left with the torso. Use your meat fork to steady the breast, cut down along the breastbone until you hit the rib cage and remove the whole breast lobe. Slice as needed for the immediate meal and try to keep the skin on the unused portion so the white meat will not dry out.
Okay, I’ve taken you from a wonderful raw bird to a beautifully carved turkey and the fun is just starting. Enjoy your Thanksgiving dinner and the many enjoyable leftovers coming up.

ChefSecret:  Turkeys—I don’t usually purchase self-basting or injected turkeys. They are usually factory-farmed, and you can’t control salt levels. I like smaller size 12 to 14-pound birds. Talk to your independent poultry guy and have him source a Wild Turkey (more dark meat), Heritage Turkey or Organic, Free-Range Turkey. All my suggested birds are smaller than commercially grown turkeys and are much tastier, too.

Quip of the Day: “America lost its true identity when more value was placed on suits and contracts rather than bib overalls and a handshake.”
-------------------------------------------
Do you have a question or comment? Send your thoughts to [email protected]. All recipes and cooking tips are posted on our website https://www.perspectives-la.com/covid-19-survival-guide.
-------------------------------------------
To you and everyone dear to you, be strong, be positive, stay well, stay safe and be kind. Have a wonderful safe and healthy holiday. If you have a little extra in your pockets to share with others at this difficult time, please consider donating to Feeding America. 

#ThanksgivingRecipe #Thanksgiving #Entrees #Turkey #RoastTurkey #French Bresse-Style #Dartagnan #HolidayRecipes #Holidays2021 #Thankful #QuarantineKitchen #Covid19 #FeedingAmerica #PerspectivesTheConsultingGroup 

                                                ©Perspectives/The Consulting Group, Inc., 2021

0 Comments
    Picture

    For over 4 decades collaboration and vision have been the cornerstones of our approach to developing innovative solutions. We fuel innovation, uncover opportunities, discover trends and embrace sustainability, turning imaginative ideas into profitable realities.

    We are expert in the following areas: Strategic Planning, Concept and Brand Development, Market Research, Operations Systems Planning, Operations Programming, Menu Planning & Inventory Optimization, Product Development, Training Programs, HACCP / Sanitation / Food Safety, Co-Packer Evaluation & Coordination, Food Processing & Facility Plant Design.

    Categories

    All
    Air Fryer
    Appetizers
    Baking
    Beef
    B'Fast/Brunch
    Chicken
    Cocktails
    Condiments
    Confections
    Dessert
    Dinner
    Entrees
    Gluten Free
    Gluten-Free
    Happy Hour
    Health & Beauty
    Healthy Recipes
    Holiday Recipes
    Instant Pot
    Instant-pot
    Keto
    Kids
    Lunch
    Lunch/Brunch
    Pets
    Pork
    Poultry
    Poulty
    Salads
    Sauces
    Seafood
    Sides
    Snacks
    Soups
    Sous Vide
    Special Edition
    Turkey
    Veal
    Vegetarian

    RSS Feed

    Archives

    February 2025
    January 2025
    December 2024
    November 2024
    October 2024
    September 2024
    August 2024
    July 2024
    June 2024
    May 2024
    April 2024
    March 2024
    February 2024
    January 2024
    December 2023
    November 2023
    October 2023
    September 2023
    August 2023
    July 2023
    June 2023
    May 2023
    April 2023
    March 2023
    February 2023
    January 2023
    December 2022
    November 2022
    October 2022
    September 2022
    August 2022
    July 2022
    June 2022
    May 2022
    April 2022
    March 2022
    February 2022
    January 2022
    December 2021
    November 2021
    October 2021
    September 2021
    August 2021
    July 2021
    June 2021
    May 2021
    April 2021
    March 2021
    February 2021
    January 2021
    December 2020
    November 2020
    October 2020
    September 2020
    August 2020
    July 2020
    June 2020
    May 2020
    April 2020

www.perspectives-la.com
Copyright © 2021 Perspectives/The Consulting Group, LLC  | Henderson, NV 89052 |   310-477-8877
  • Home
    • Who We Serve
    • How We Work
    • Services >
      • Concept Development
      • Strategic Planning
      • Brand Development
      • Operations
      • HACCP / Food Safety
      • Menu / Product Development
      • Marketing / Research
      • Design
      • Market Planning / Site Analysis
  • Why Perspectives?
    • About Us
    • Principals
    • Mission Statement
    • Code of Ethics
  • Clients
    • Testimonials
    • Client List
  • Contact Us
    • Phone, Address & Contact
  • Covid-19 Survival Guide
  • Perspectives On Food