…from the Perspectives’ Kitchen How you doin’? Perspectives developed SPOT, a Lebanese-style restaurant, for our Azerbaijan clients; it opened in Berlin, Germany. Got all that? Being that we didn’t feel all that safe in Beirut, we spent a couple of weeks in London where all the best Lebanese chefs immigrated to escape the Middle East turmoil. One of the dishes we came to love was Baba Ganoush for its bright, simple flavors and silky texture. After tasting the best that London had to offer, I updated this classic to appeal to European and American tastes.
The word bābā in Arabic is a term of endearment for 'father', while Ġannūj could be a personal name. The word combination is also interpreted as 'father of coquetry' or 'indulged/pampered/flirtatious daddy' or 'spoiled old daddy'. However, it is not certain whether the word bābā refers to an actual person indulged by the dish or to the eggplant (bāḏinjān or bātinjān in Arabic). Very old dish… very old history. In my Baba Ganoush recipe, the eggplant is broiled until it is charred / blackened from end to end. After you scrape off all the char, the only thing left is the steamed lush, smoky flesh. I then purée with roasted garlic, lemon juice, tahini and cayenne. When served, I top it with a swirl of cumin-flavored olive oil, paprika, mint and fresh parsley. I like to serve Baba Ganoush at summertime picnics and outdoor barbecues. It is a rustic spread full of smoke, garlicky piquancy, lemon and vegetable sweetness of the eggplant which complements grilled lamb and chicken. It tastes amazing on a soft triangle of homemade pita bread. Pita bread is pretty easy to make for home cooks and can even be made on the gates of a hot barbecue. Prep time: 30 minutes Cook time: 10 to 15 minutes Yield: 2 Cups Ingredients 2 pounds eggplant 1/4 cup tahini (sesame) 1/4 cup freshly squeezed lemon juice 4 garlic cloves, mashed to a paste 1/8 teaspoon cayenne 1/2 teaspoon kosher salt 1/2 teaspoon cumin seed, toasted until fragrant and coarsely ground 3 tablespoons olive oil 1/2 teaspoon smoky paprika 1 tablespoon finely chopped parsley 1 tablespoon finely chopped mint Homemade pita or chips for serving Directions
ChefSecret: You can personalize my Baba Ganoush recipe and make it yours. If you like it salty, top it with olives. If you like a ton of herbs, pile it up with mint, parsley and basil. If you live for the smoky flavor, sprinkle with a little more smoky paprika. Quip of the Day: Did you know that a Lebanese fortune teller reads the future in the swirls of Baba Ganoush? ------------------------------------------- Do you have a question or comment? Send your thoughts to [email protected]. All recipes and cooking tips are posted on our website https://www.perspectives-la.com/covid-19-survival-guide. ------------------------------------------- To you and everyone dear to you, be strong, positive, stay well, stay safe and be kind. Take a breath and count your blessings, and if you have a little extra to share with others, please consider donating to Feeding America, Tunnel to Towers, Union Rescue Mission and/or American Red Cross. #Appetizer #Dip #SmokyBabaGanoush #BabaGanoush #LebaneseDips #2024Recipes #URM #T2T #FeedingAmerica #RedCross #PerspectivesTheConsultingGroup ©PERSPECTIVES/The Consulting Group, LLC, 2024
0 Comments
…from the Perspectives’ Kitchen How you doin’? Summertime is salad and dip time. One of my all-time favorite salads is The Cobb—I can eat one every day and never get bored because of the different and interesting ingredients. The varied flavors and textures give you what we call comeback flavor.
You might ask yourself, what’s the origin of this now most popular salad? Well, the story goes like this… The Brown Derby-Beverly Hills was actually Perspectives’ first client. Sally Cobb, Bob Cobb’s widow, was trying to keep the Derby in Beverly Hills afloat at a time when the entire restaurant scene in Los Angeles was changing. I used to love the Brown Derby, and especially the classic Cobb Salad. So, here's the recipe along with the Hollywood folklore of how it was invented as told to me by Sally Cobb. One night in 1925—almost one hundred years ago!—Herbert K. Somborn was chatting with Abe Frank, the manager of the Los Angeles Ambassador Hotel, and Sid Grauman of Chinese Theater fame; and as idle chatter goes he remarked, "You could open a restaurant in an alley and call it anything or you could even build it in the shape of a hat and if the food and service are good, the patrons will come flocking." To achieve the standards set for this little Derby, Somborn, the husband of the celebrated cinema star, Gloria Swanson, selected a young friend who had been raised in the restaurant business. This was Robert H. Cobb, a combination food checker, steward, buyer, cashier and occasional cook when the Brown Derby opened. During its first four years, the original Little Hat Derby restaurant added only two items to its menu—a salad and a cake. The salad was almost an accident. Bob Cobb, growing weary of the steady hot-dog-hamburger diet, found an avocado in the icebox. He chopped it up, along with some lettuce, celery and tomatoes, plus a strip of bacon and some salad dressing, and had that for his dinner. Several days later he tried it again, adding other ingredients that he had purchased on his way to work—breast of turkey (some people claim it was chicken, but it was originally turkey), chives, hard-boiled egg, watercress and a wedge of Roquefort cheese for the dressing. And that's how the Cobb Salad was really born. Everything was finely chopped and that was very laborious, so Mr. Cobb went to an engineer who was able to invent a horizontal chopper. That device was later reproduced by Hobart Corporation and named the Buffalo Chopper (named for the city in which the concept was born). Since it’s summer I decided that I wanted to invent a dip to bring to family picnics that emulated the flavors of The Cobb Salad. With the help of Hidden Valley Ranch dip mix and all of the other Cobb Salad ingredients all chopped up it was like magic—the Cobb Salad Dip. Prep Time: 15-20 Minutes Yield: 8 to 10 servings Ingredients 1 packet Hidden Valley Original Ranch Dips Mix 16 ounces sour cream 3/4 cup shredded cooked chicken 1/2 cup crumbled bacon, plus 2 tablespoons more for garnish 1/2 cup crumbled hard-boiled eggs 1/2 cup crumbled blue cheese, plus 1/4 cup more for garnish 3/4 cup diced avocado 1/2 cup diced tomato 1 teaspoon Tabasco sauce (optional) Directions
ChefSecret: Got leftovers? Be safe—refrigerate within 2 hours after putting the dip out, or discard it. Quip of the Day: My friend ordered a cobb salad yesterday and was disappointed there was no corn or cobs in this iconic salad. ------------------------------------------- Do you have a question or comment? Send your thoughts to [email protected]. All recipes and cooking tips are posted on our website https://www.perspectives-la.com/covid-19-survival-guide. ------------------------------------------- To you and everyone dear to you, be strong, positive, stay well, stay safe and be kind. Take a breath and count your blessings, and if you have a little extra to share with others, please consider donating to Feeding America, Tunnel to Towers, Union Rescue Mission and/or American Red Cross. #Appetizer #Dip #CobbDip #Salad #CobbSalad #BrownDerby #Brunch #Lunch #HiddenValley #Cheez-It #Ritz #2024Recipes #URM #T2T #FeedingAmerica #RedCross #PerspectivesTheConsultingGroup ©PERSPECTIVES/The Consulting Group, LLC, 2024 …from the Perspectives’ Kitchen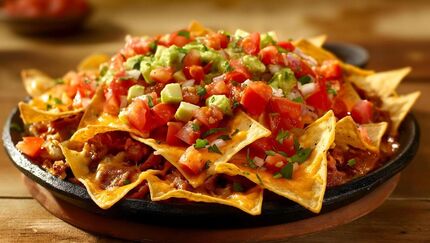 How you doin’? Are you looking for a quick, budget-friendly dinner that will appeal to everyone in the family? Well, here it is! Whether you’re planning to curl up with a binge-worthy TV series or watch a movie with the kids, nachos are definitely in the best in show category for rib-sticking dinners in front of the TV. In fact, they’re even great for getting family and friends together around the dinner table. And what’s not to like about a one-skillet meal on a busy weeknight? Not a lot of dishes to wash… yay!
Just like the crazy number of nacho choices you can find at Nacho Daddy's, my Nacho Daddy’s Style Skillet Nachos recipe is for topping lovers. Rather than balancing the cooked ingredients on top of the chips, we leave the toppings in the skillet, sliding them under the broiler for just a few minutes to melt the cheese. That way, the ingredients stay warm and juicy in the pan like Mexican fondue. Most importantly, the tortilla chips stay nice, crisp and safe in a bowl where they won’t get all sogged out! Prep time: 15 minutes Cook time: 20 minutes Yield: 4 to 6 servings Ingredients 1/2 cup chopped white onion 1 seeded and seamed finely diced jalapeño 1 chopped medium green pepper 1 pound 85% lean / 15% fat ground beef 1 cup salsa, store bought 1 cup defrosted frozen corn 1 cup canned black beans 3/4 cup shredded sharp Cheddar cheese 1/4 cup sour cream 2 sliced and diced avocados 3 green onions tops and bottoms 1 bag tortilla chips Directions
ChefSecret: You can substitute ground turkey or pork for the ground beef. Serve with a bottle Cholula brand hot sauce; add a shake or two to taste. Quip of the Day: My friends and family know that I like my jokes and puns the way I like my nachos—they must be very cheesy. ------------------------------------------- Do you have a question or comment? Send your thoughts to [email protected]. All recipes and cooking tips are posted on our website https://www.perspectives-la.com/covid-19-survival-guide. ------------------------------------------- To you and everyone dear to you, be strong, positive, stay well, stay safe and be kind. Take a breath and count your blessings, and if you have a little extra to share with others, please consider donating to Feeding America, Tunnel to Towers, Union Rescue Mission and/or American Red Cross. #Appetizers #Nachos #NachoDaddysSkilletNachos #NachoDaddys #Snacks #MexicanAppetizer #2024Recipes #URM #T2T #FeedingAmerica #RedCross #PerspectivesTheConsultingGroup ©PERSPECTIVES/The Consulting Group, LLC, 2024 ...from the Perspectives' Kitchen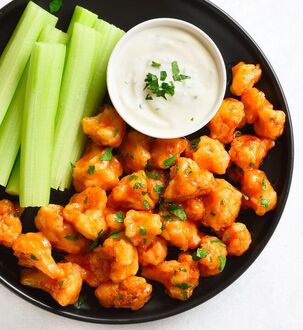 How you doin’? Buffalo wings were invented at the Anchor Bar near downtown Buffalo, NY. The bartender’s mom concocted the recipe when her son was trying to entertain and feed some of his late night guests. Most people had never seen a flying buffalo… let alone flying cauliflower.
|

For over 4 decades collaboration and vision have been the cornerstones of our approach to developing innovative solutions. We fuel innovation, uncover opportunities, discover trends and embrace sustainability, turning imaginative ideas into profitable realities. Categories
All
Archives
July 2024
|

 RSS Feed
www.perspectives-la.com
Copyright © 2021 Perspectives/The Consulting Group, LLC | Henderson, NV 89052 | 310-477-8877
Copyright © 2021 Perspectives/The Consulting Group, LLC | Henderson, NV 89052 | 310-477-8877