The Easter Collection 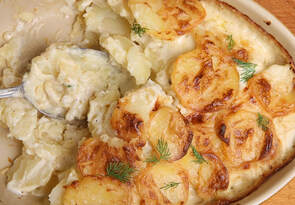 How you doin’? Spring is here and Easter is just around the corner. Easter, like Thanksgiving and Christmas, is a holiday for serious foodies. There are some dishes that are a must and call-out Easter to me. Scalloped Potatoes is one such dish that’s an easy classic, perfect for Easter or even just for a Sunday dinner.
In this side dish thinly sliced potatoes and onions are layered and covered in a decadent cream sauce and baked until tender, golden crisp and bubbly. Scalloped Potatoes were one of my favorite foods growing up, but I cheat and make them the easy way where the sauce comes together while baking. There is nothing like a crispy topped creamy side of scalloped potatoes for true comfort. Prep time: 15 minutes Bake time: 1 hour 20 minutes Cool time: 10 minutes Yield: 8 servings Ingredients 3 tablespoons unsalted butter, room temperature 5 thinly-sliced Yukon Gold potatoes, or more to fill the baking dish 1/2 cup thinly-sliced yellow onion strings 1 teaspoon kosher salt 1/4 teaspoon freshy ground black pepper 1/4 teaspoon garlic powder 1 pinch cayenne pepper 1 pinch ground nutmeg 1 cup grated sharp white Cheddar cheese 3-1/2 cups whole milk Directions
ChefSecret: For a richer scalloped gratin, top with butter dots, and/or use half ‘n half instead of the milk. More cheese can also be used if desired. I guess you can never have too much cheese. Covid-19 Quip of the Day: “So you been eating hotdogs and McNuggets your whole life and now you don’t want to take the COVID-10 vaccine because you don’t know what’s in it?” ------------------------------------------- Do you have a question or comment? Do you want to share a favorite recipe or pictures with our readers? Send your thoughts to [email protected]. All recipes and cooking tips are posted on our website https://www.perspectives-la.com/covid-19-survival-guide. We have added a new search feature to make it easier to navigate through our blogs. ------------------------------------------- To you and everyone dear to you, be strong and positive, stay well and safe and be kind to others. If you have a little extra in your pockets to share with others at this difficult time, please consider donating to Feeding America. Thanks for reading. #SideDish #Potatoes #ScallopedPotatoes #PotatoesGratin #WhiteCheddar #Holiday #Easter #QuarantineKitchen #Covid19 #FeedingAmerica #PerspectivesTheConsultingGroup ©Perspectives/The Consulting Group, Inc., 2021
0 Comments
The Easter Collection  How you doin’? I try to serve a dinner salad most nights. No matter what else I’m cooking I always feel fresh salads add a dash of healthful freshness. But then, I’m the guy who used to eat a box of oatmeal cookies to make me feel good—it was just oatmeal, right?
This Mediterranean Marinated Vegetable Salad makes an Easter statement with big, bold, fresh flavors and distinctive textures. You can substitute the white wine vinegar with red wine vinegar or add a dash of balsamic. You can serve it as a starter salad, side salad or an entrée salad. It will keep well for a couple of days refrigerated. Top this salad with traditional feta cheese crumbles or even bleu cheese crumbles right before serving. Prep time: 20 minutes Marinate time: 30 minutes or overnight Yield: 6 servings Ingredients For the dressing 3 tablespoons white wine vinegar 1 tablespoon fresh basil leaves, chiffonade cut 1 tablespoon Dijon mustard 1 teaspoon dried Italian seasoning 1/2 teaspoon granulated garlic 1/2 teaspoon kosher salt 1/4 teaspoon medium red pepper flakes 1/4 teaspoon freshly ground black pepper 3 tablespoons extra-virgin olive oil For the salad 1 (15 oz.) can chickpeas, rinsed and drained 1 cup lightly blanched broccoli florets 1/2 cup red onion strings 1/2 cup diced red bell pepper 1/2 cup whole cherry tomatoes 1 carrot, peeled and sliced 1/4 diced cucumber 1/4 cup pitted kalamata olives 6 tablespoons crumbled feta cheese Directions
ChefSecrets: I like to use dried herbs in marinades; they can stand the test of time and sit a while. Dried herbs won't turn color or turn gray as their flavors infuse into the marinade. I prefer to balance harder vegetables, like broccoli and cauliflower, with softer ones like peppers and tomatoes so their textures are in sync with the rest of the salad. Covid-19 Quip of the Day: “The parishioner asked the televangelist to pray for his hearing. After 3 minutes of violent shaking and trying to push him over backwards into the water the preacher asked, how’s your hearing? The parishioner replied, I don’t know, it doesn’t take place until next Thursday at the courthouse.” ------------------------------------------- Do you have a question or comment? Do you want to share a favorite recipe or pictures with our readers? Send your thoughts to [email protected]. All recipes and cooking tips are posted on our website https://www.perspectives-la.com/covid-19-survival-guide. ------------------------------------------- To you and everyone dear to you, be strong and positive, stay well and safe and be kind to others. If you have a little extra in your pockets to share with others at this difficult time, please consider donating to Feeding America. Thanks for reading. #Salads #SideDish #Vegetarian #MediterraneanSalad #FetaCheese #Easter #QuarantineKitchen #Covid19 #FeedingAmerica #PerspectivesTheConsultingGroup ©Perspectives/The Consulting Group, Inc., 2021 The Easter Collection  How you doin’? I hope things are getting better where you live, and that your family is staying healthy. There are a million stories that will come out of this pandemic; they will be a part of our history. Like our lives, every recipe has a history (some conflicting) and most have an interesting story to tell.
Have you ever wondered why a pound cake is called a pound cake? The origins of pound cake are rooted in Northern Europe and go back to the early part of 18th century. This simple 4-ingredient cake weighed 4 pounds. The ingredients in the cake were measured in one-pound increments—a pound each of butter, flour, sugar and eggs. Today, we expect smaller and lighter cakes than the original and although the recipe has changed for the better over the years, the name remains as pound cake. Due to the long whipping time of the butter and sugar, the recipe below is a much lighter version of a pound cake with lots of fresh lemon flavor in both the cake and the glaze. It’s completely fantastic when fresh, but even after it sits a few days, you can toast a slice and serve it with a little melted butter, chocolate or caramel syrup… sooo good! Prep time: 30 minutes Bake time: 60 to 75 minutes (use a cake tester) Yield: 12 servings Ingredients For the cake 2-1/2 cups granulated sugar 1-1/2 cups unsalted butter, softened 4 large eggs 3-1/2 cups all-purpose flour 1/2 teaspoon salt 1/2 teaspoon baking soda 1 cup buttermilk 1 teaspoon lemon extract 1/4 teaspoon almond extract 1 teaspoon lemon zest For the glaze 2 cups confectioners' sugar 1/3 cup lemon juice 2 tablespoons unsalted butter, softened 1 tablespoon lemon zest 2 tablespoon water, if needed Directions To make the cake
ChefSecret: Highly designed Bundt pans are often problematic and baked cakes can easily stick to the sides. You can use a non-stick Bundt or an angel food pan or even something as simple as loaf pan. Covid-19 Quip of the Day: “Let me start by saying, I think everyone ought to wear a mask when out in public; I do! But then just think, if a pair of undies won’t stop a fart do you honestly think a mask will stop a virus?” ------------------------------------------- Do you have a question or comment? Do you want to share a favorite recipe or pictures with our readers? Send your thoughts to [email protected]. All recipes and cooking tips are posted on our website https://www.perspectives-la.com/covid-19-survival-guide. ------------------------------------------- To you and everyone dear to you, be strong and positive, stay well and safe and be kind to others. If you have a little extra in your pockets to share with others at this difficult time, please consider donating to Feeding America. Thanks for reading. #Baking #Cake #Buttermilk #Lemon #Easter #QuarantineKitchen #Covid19 #FeedingAmerica #PerspectivesTheConsultingGroup ©Perspectives/The Consulting Group, Inc., 2021 … from the Perspectives Happy Hour Bar  How you doin’? I think there is a familial relationship between almonds and cherries because they go so well together. I used to dream of an Almond Joy studded with cherries. The flavors are so symbiotic. Now that spring has sprung let’s think about some cool drinks that are really “cool.”
Amaretto means "a little bitter" in Italian. It is a unique, sweet Italian liqueur that originated in Saronno. Depending on the brand, it may be made from apricot kernels, bitter almonds, peach stones or almonds, all of which are natural sources of the benzaldehyde that provides the almond-like flavor of the liqueur. When served as a beverage, amaretto can be enjoyed by itself, used as an ingredient to create several popular mixed drinks or added to coffee. Amaretto is also commonly used in culinary and pastry applications. This light and refreshing Cherry Amaretto Granita Cocktail is perfect for drinks on veranda or just on the balcony of your condo. It’s light and refreshing—a glass filled with “spring.” You can you use frozen cherries from the freezer case, or if they’re in season, buy fresh sweet cherries. Just remember to plan ahead so you have at least 24-hours to pit and freeze the pitted sweet cherries before needed. Prep time: 5 minutes Yield: Serves 2 people Ingredients 1 cup sweet cherry juice, chilled 2 ounces Amaretto liqueur 2 ounces vodka, chilled 2 cups ice 1 cup frozen pitted sweet cherries Instructions
ChefSecret: You can also make it a non-alcoholic version, by substituting the Amaretto with 1 teaspoon of almond extract—more if you crave it. Covid-19 Quip of the Day: “I’ve learned during the last year it might be nice to retire. My goal is to become a retired lottery winner.” ------------------------------------------- Do you have a question or comment? Do you want to share a favorite recipe or pictures with our readers? Send your thoughts to [email protected]. All recipes and cooking tips are posted on our website https://www.perspectives-la.com/covid-19-survival-guide. ------------------------------------------- To you and everyone dear to you, be strong and positive, stay well and safe and be kind to others. If you have a little extra in your pockets to share with others at this difficult time, please consider donating to Feeding America. Thanks for reading. #Cocktail #HappyHour #Vodka #Amaretto #Cherry #Granita #Cheers #QuarantineKitchen #Covid19 #FeedingAmerica #PerspectivesTheConsultingGroup ©Perspectives/The Consulting Group, Inc., 2021 …from the California Kitchen 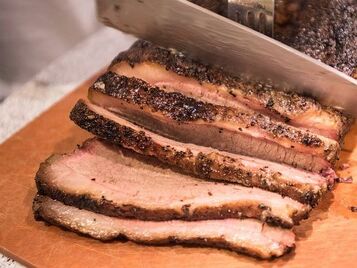 How you doin’? Beef brisket is a tough cut of meat—one of the toughest—that can be cooked in a number of different styles. If cooked properly, brisket can be broken down into a cut of meat that is flavorful, tender, and buttery rich Texas-style barbecue—Yum!
Traditional Texas-style barbecue smoked brisket is usually prepared by rubbing the brisket with a dry spice rub, then smoking the beef slowly with over charcoal or wood for 10 to 12 hours at 212⁰ F. My Instant Pot Beef Brisket can’t replace a good Texas-style barbecue smoked brisket completely—nothing can—but it’s an awesome shortcut and great alternative when you don’t have access to a grill, smoker or the time to do it. You won’t be able to help but fall in love with this tender beef and great texture, bursting with moist and juicy beefy flavors. Plus the super yummy smoky, sweet, savory, spicy homemade barbecue sauce. This recipe will save you time and hassle to meet your craving for deliciously gorgeous brisket, without any of the smokehouse clean-up. Prep time: 20 minutes Marinade time: 2 hours or overnight Instant Pot time: about 2 hours Yield: 4 to 6 servings Ingredients 2 to 3 pounds beef brisket (2 inches thick) For the dry rub 3 tablespoons dark brown sugar 2 teaspoons chili powder 2 teaspoons black pepper 1 teaspoon onion powder 1 teaspoon garlic powder 1 teaspoon cinnamon powder 1 teaspoon coarse kosher salt 1/2 teaspoon ground cumin 1/2 teaspoon ground fennel 1/4 teaspoon cayenne pepper 1/4 teaspoon liquid smoke (I prefer Wright’s) For the barbecue sauce 1 cup sliced onion 3 tablespoons minced garlic 1 tablespoon maple syrup 1 tablespoon honey 2 tablespoons apple cider vinegar 1 teaspoon liquid smoke (Wright’s) 1/2 cup beef or chicken stock 1 cup ketchup 2 tablespoons Dijon mustard 1 tablespoon dark brown sugar Directions To prepare the brisket dry rub
ChefSecrets: It ain’t no secret—always slice your brisket against the grain to maximize tenderness; and serve your sauce on the side. Covid-19 Quip of the Day: “We should train all Amazon delivery people to give the COVID-19 vaccine—the whole population would be immunized by Saturday…by Thursday if you’ve got Prime.” ------------------------------------------- Do you have a question or comment? Do you want to send a favorite recipe or pictures with our readers? Send your thoughts to [email protected]. All recipes and cooking tips are posted on our website https://www.perspectives-la.com/covid-19-survival-guide. We added a new search feature to make it easier to navigate through our blogs. ------------------------------------------- To you and everyone dear to you, be strong and positive, stay well and safe and be kind to others. If you have a little extra in your pockets to share with others at this difficult time, please consider donating to Feeding America. Thanks for reading. #Entrees #Beef #Brisket #InstantPot #BBQ #QuarantineKitchen #Covid19 #FeedingAmerica #PerspectivesTheConsultingGroup ©Perspectives/The Consulting Group, Inc., 2021 |

For over 4 decades collaboration and vision have been the cornerstones of our approach to developing innovative solutions. We fuel innovation, uncover opportunities, discover trends and embrace sustainability, turning imaginative ideas into profitable realities. Categories
All
Archives
July 2024
|
 RSS Feed
www.perspectives-la.com
Copyright © 2021 Perspectives/The Consulting Group, LLC | Henderson, NV 89052 | 310-477-8877
Copyright © 2021 Perspectives/The Consulting Group, LLC | Henderson, NV 89052 | 310-477-8877