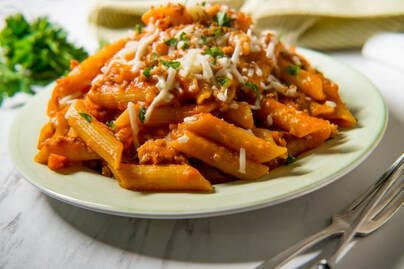
 Instant Pot Sausage Penne Pasta Instant Pot Sausage Penne Pasta How you doin’? Does this sound familiar? You got stuck in traffic and you have a house full of kids and an anxious spouse waiting for dinner. You forgot to pull something out of the freezer and don’t have time to stop at the local pizza joint. What’s one to do? Okay, here’s the solution. With my Instant Pot Sausage Penne Pasta recipe, after sautéing the sausage and the vegetables, everything including the pasta and the sauce cooks together under pressure in your Instant Pot—the whole kit-and-caboodle cooks in just about a half hour. What a great, easy Instant Pot solution for busy, unplanned weeknights to feed a hungry hoard! You will hear raves that your Penne Pasta is better than most anyone’s lasagna. Prep time: 15 minutes Cook time: 22 minutes (plus or minus depending on the Instant Pot size) Yield: 6 to 8 servings Ingredients 2 teaspoons olive oil 1-pound Italian sausage 1 cup diced onions 2 tablespoons minced garlic 2 chopped red or orange bell peppers 1/2 cup red wine 2-1/2 cups water 1 teaspoon dried Italian seasoning 12 ounces (4-1/2 cups) dry penne pasta 25-ounce jar marinara sauce (I use any of the Rao’s flavors) 3 cups fresh spinach coarsely chopped 1/2 cup mozzarella cheese shredded Directions
ChefSecrets:
------------------------------------------- Covid-19 Quip of the Day: Remember… Rapunzel was quarantined and met her future husband at the tower. Let’s think positive here. -------------------------------------------------------- Do you have a question or comment, want to share a favorite recipe or pictures? Send your thoughts to [email protected]. You can also find these blog posts at https://www.perspectives-la.com/covid-19-survival-guide. #PennePasta #ItalianSausage #Entrees #InstantPot #ComfortFood #Rao's #PerspectivesTheConsultingGroup #QuarantineKitchen #Covid19 #FeedingAmerica ©Perspectives/The Consulting Group, Inc., 2020
0 Comments
 Toketee Falls | © Robert Mollett, Mollett Photography Toketee Falls | © Robert Mollett, Mollett Photography But First… A Toast To Water How you doin’? I know many of you look forward to cocktail recipes on Friday—and that’s important, but sometimes you have to dial it back a little and give a shout-out to something as life-sustaining as water. That’s right H20, the wet stuff right out of the tap. Water is made up of hydrogen and oxygen, and it exists in gaseous, liquid, and solid states. Water is one of the most plentiful and essential compounds, occurring as a liquid on Earth's surface under normal conditions, which makes it invaluable for human uses and for plant and animal habitats. So, here’s a Friday Happy Hour Toast to Water. The medium for a toast is ordinarily a cocktail, highball, a glass of wine or a mug of beer, but this toast is different today. One of the purest and best things ever created by the Almighty is water. I have seen it welled up in the eyes of infancy. I have seen it trickle down the rosy cheeks of youth. I have seen it rush in mad torrents down the wrinkled cheeks of age. I have seen it in the dewy drops on blades of grass and on leaves of trees, shining like polished diamonds when the sun bursts in resplendent glory over the eastern hills. I have seen it trickle down the mountain sides in tiny rivulets, rushing over pebbly bottoms and purling around sharp stones with the music of liquid silver. I have seen it cool and crystal-clear bubbling from under a bank of dew-washed ferns. I have seen it encrusted in a glistening coat of white frost upon a mint julep glass. I have seen it sweeping over the precipitous falls in its mad rush to join with the great Father of Water and thence in majestic movement to the oceans where floats the battleships of the world and the commerce of nations. Yet, if I may be permitted, I should like to say in all seriousness, in all earnestness and with the full vigor of manhood… that water as a beverage is a gosh darn failure.  The Mai Tai Cocktail The Mai Tai Cocktail Okay, only kidding. Let’s get serious and get this happy hour going with a tropical Mai Tai.
Mai Tai Cocktail This classic rum-based Mai Tai cocktail recipe, infused with the citrus flavors of Curaçao, orange juice and lime juice, is the perfect drink to enjoy at the beach, or when you’re dreaming of being there. Victor J. Bergeron claimed to have invented the Mai Tai in 1944 at Trader Vic's Restaurant, in Oakland, California. The bracingly refreshing cocktail he created at the restaurant was introduced to the Hawaiian Islands in the 1950s. A San Francisco columnist once wrote that, “the best restaurant in San Francisco was in Oakland.” Vic had become “The Trader,” and so started the legend of “Trader Vic’s.” The success of Trader Vic’s was simple, a lush tropical island theme—the complete escape. You’d think of beaches, moonlight and pretty girls. I knew Vic well and I give him credit as the master of cocktails and island foods. We spent many afternoons over drinks at Trader Vic’s at the Beverly Hilton when we were conceptualizing The Warehouse Restaurant that was soon to open in Marina del Rey. Ingredients 1 ounce light rum 1 ounce orange Curaçao 1/4 cup orange juice 1/2 ounce fresh lime juice 1 dash orgeat syrup 1 dash simple syrup 1 tablespoon dark rum Or better yet, a float of 151 proof rum Mint, a pineapple slice, and a paper umbrella for garnish Directions
Sparkling Mai Tai Cocktail This is a spritzy, uptown version of the classic Mai Tai, created by a mixologist from San Francisco. It is the perfect cocktail for a weekend brunch. This recipe yields 4-servings. Allow about an hour to cool the mix. Ingredients 1 ounce fresh lime juice 1 ounce orgeat 1/4 cup orange liqueur such as Gran Gala or Grand Marnier 1 ounce Lemon Hart 151 rum 1/4 cup Appleton Estate Extra 12-Year-Old rum 2 cups blanc de blanc sparkling wine, preferably from California 1 firm lime, chilled 4 small sprigs mint Directions
ChefSecret:
Covid-19 Quip of the Day: “In Germany, they are preparing for the crisis by stocking up with sausage and cheese. That's the wurst käse scenario.” ------------------------------------------- Do you have a question or comment? Do you want to share a favorite recipe or pictures with our readers? Send your thoughts to [email protected]. All recipes and cooking tips are posted on our website https://www.perspectives-la.com/covid-19-survival-guide. ------------------------------------------- To you and everyone dear to you, be strong, be positive, stay well, stay safe and be kind—that’s the American way. If you have a little extra in your pocket to share with others at this difficult time, please consider donating to Feeding America. Thanks for reading. #MaiTai #TraderVics #Rum #LemonHart #VicBergeron #Water #Cocktail #HappyHour #TheWarehouseRestaurant #PerspectivesTheConsultingGroup #QuarantineKitchen #Covid19 #FeedingAmerica ©Perspectives/The Consulting Group, Inc., 2020 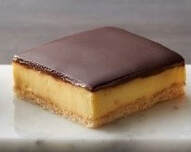 Éclair Bar Éclair Bar How you doin’? Two of my favorite desserts in the world are doughnuts (if you consider a doughnut a dessert—I think of it more as a morning life-starter) and custard-filled éclairs. The one thing these two pastries have in common is the chocolate coating. 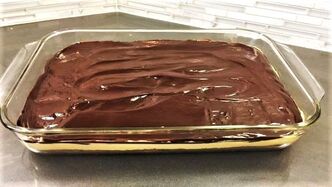 Éclair Bars Éclair Bars Around here, we fondly refer to that donut shop chocolate glaze as cheap and crappy chocolate. To tell you the truth, as the ChocolateDoctor from Choclatique, I am not ashamed to say, “I love it.” There is something about the flavor and texture of this inexpensive coating that works for me every time and sometimes I really crave it.
Éclairs are time consuming to make. First, you have to make the choux-pastry dough. Bake it, scoop it, fill it and finally prep the chocolate and dress it. My Éclairs Bars recipe is much easier to make and perfect for a large party. Prep time: 15 minutes Bake time: 20 minutes Cool time: 4 hours Yield: 24 servings Ingredients 1 can (8 oz) Pillsbury™ refrigerated crescent dough sheet 2 boxes (3.4 oz each) Jell-O™ vanilla-flavor instant pudding & pie filling mix 3 cups cold half-and-half 1-1/2 cups semisweet chocolate chips 3/4 cup heavy whipping cream Directions
ChefSecret: If you want a crisp, more éclair like pastry, you can substitute the crescent dough with 1 sheet of Pepperidge Farms puff pastry following the direction on the package. Covid-19 Quip of the Day: “I never thought the comment ‘I would never touch her with a 6-foot pole’ would become a national policy, but here we are!” ------------------------------------------- Do you have a question or comment? Do you want to share a favorite recipe or pictures with our readers? Send your thoughts to [email protected]. All recipes and cooking tips are posted on our website https://www.perspectives-la.com/covid-19-survival-guide. ------------------------------------------- To you and everyone dear to you, be strong, be positive, stay well, stay safe and be kind—that’s the American way. If you have a little extra in your pocket to share with others at this difficult time, please consider donating to Feeding America. Thanks for reading. #Baking #EclairBars #Dessert #Snack #Doughnuts #PerspectivesTheConsultingGroup #QuarantineKitchen #Covid19 #FeedingAmerica ©PERSPECTIVES/The Consulting Group, Inc. 2020 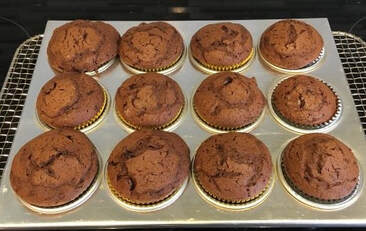 Chocolate Corn Muffins Chocolate Corn Muffins How you doin’? When I lived in Dallas there was this neat little food outlet in one of the malls that just sold muffins. I used to go there once a week and pick up a half dozen of their great muffins and have them for breakfast throughout the week. I thought this was the start of a new national franchise chain and then, POOF, it was gone.
I won’t be coy… I love muffins! There are so many wonderful flavors and textures—savory and sweet—you can eat them every day. This includes the addition of different toppings and different inclusions (chocolate chips, blueberries, etc.). When developing our chocolate muffin mix for Choclatique our R&D team was baking muffins by the hundreds daily. We knew a lot before we started, but I must confess everyday was a new learning experience. Why muffins? Well for starters they are very easy to make and bake—it can be one of the first baking lessons you can share with your children. Muffins are very portable—toss them in Ziploc bag or wrap them in food film. Because they can be baked in a paper muffin cup you can throw them in a lunch bag or and maybe even backpack— depending on what else is in there—without crushing them. Why are muffins so easy to make? There are relatively few ingredients, you don’t need an electric mixer, and you really don’t even need a muffin tin—you can bake muffins in a muffin cup (made out of paper with the foil liner divider). You can bake mini-muffins or giant muffins with the same recipes—just a little longer or shorter bake time. In other words, muffins are very forgiving. What are some of the best ChefSecrets for baking beautiful muffins?
The Chocolate Doctor’s Chocolate Corn Muffins Our top bakers test recipes all day long to add to our blog. While in the elevator going down to the car I asked, “Have either of you ever heard of Chocolate Corn Muffins?” I got a couple of wrinkled noses and a look of “Are you crazy?” Then they said, “Well, why not?” So here for the first time anywhere is our version of Chocolate Corn Muffins. Why not? Prep time: 10 minutes Bake time: 12 to 15 minutes Yield: 12 to 15 medium muffins Ingredients 1 cup all-purpose flour, sifted 1 cup medium cornmeal 1/2 cup cocoa powder, sifted 1 cup granulated sugar 1-1/2 tablespoons baking powder 1 teaspoons salt 1-1/3 cups whole milk 2 teaspoon pure vanilla extract 1 tablespoon honey 1/2 stick unsalted butter, melted and cooled 3 ounces dark chocolate (64%+), chopped, melted and cooled 2 large eggs 1 cup dark chocolate chips 3 tablespoons crystalline sugar for topping. Directions
ChefSecrets:
Basic Crumb-Topped Muffins This is as basic a muffin recipe as you can find. It will become your go-to recipe every time. Prep time: 20 minutes Bake time: 20 to 24 minutes Yield: 12 standard-size muffins Ingredients For the crumb topping 1/2 cup granulated sugar 1/2 cup packed light brown sugar 1 tablespoon ground cinnamon 1/4 teaspoon salt 10 tablespoons (5 ounces) unsalted butter, room temperature 1-3/4 cups cake flour For the muffins Cooking spray and/or paper muffin liners 2-1/2 cups cake flour 3/4 cup granulated sugar 1 teaspoon baking powder 1/2 teaspoon baking soda 1/4 teaspoon salt 12 tablespoons (6 ounces) unsalted butter, melted and cooled 2/3 cup buttermilk 2 large eggs 2 large egg yolks 2 teaspoons pure vanilla extract 1/4 cup powdered sugar (for dusting the baked muffins) Directions
Honey-Bran Muffins This is Honey-Bran Muffin is like the ones sold at Du-pars Bakery in the Los Angeles Farmer’s Market. Prep Time: 15 minutes Bake Time: 20 to 25 minutes Cool time: 20 minutes Yield: 2 Dozen Ingredients: For the glaze: 1/2 cup unsalted butter 1/2 cup granulated sugar 1/2 cup dark brown sugar, packed 5 tablespoons honey, warm 3 tablespoons boiling water For the muffins 3 cups raisins, dates, dried cherries or prunes, pureed in food processor (measured before processing) 1/2 cup honey, warm 1/3 cup vegetable oil 3 large eggs 2 cups buttermilk 1 cup wheat bran 3 cups all-purpose flour 3 teaspoons baking soda 2 teaspoon baking powder 1-1/2 teaspoons salt Directions:
Perfect Blueberry Muffins Around this time every year I like to bake blueberry muffins. They have a high dome and a thick batter (more of a dough) and they’re pretty as a picture. Prep time: 15 minutes Bake time: 25 to 30 minutes (use a tester) Cool time: 10 minutes, plus 15 minutes Ingredients 5 tablespoons unsalted butter, cold is fine 1/2 cup granulated sugar 1 tablespoon finely grated lemon zest 3/4 cup plain unsweetened yogurt or sour cream 1 large egg 1-1/2 teaspoons baking powder 1/4 teaspoon baking soda 1/4 teaspoon salt 1-1/2 cups all-purpose flour 1-1/4 to 1 1/2 cups blueberries, fresh or frozen (no need to defrost) 3 tablespoons turbinado sugar (sugar in the raw) Directions
Covid-19 Quip of the Day: “Keep in mind, even during a pandemic, no matter how much you eat, your earrings will still fit.” ------------------------------------------- Do you have a question or comment, want to share a favorite recipe or pictures? Send your thoughts to [email protected]. You can also find past blog posts at https://www.perspectives-la.com/covid-19-survival-guide. To you and everyone dear to you, be strong, be positive, stay well, stay safe and be kind—that’s the American way. If you have a little extra in your pocket to share with others at this difficult time, please consider donating to Feeding America. Thanks for reading. #Baking #Muffins #BlueberryMuffins #BranMuffins #CrumbTopping #ChocolateCornMuffins #CornMuffins #Breakfast #Brunch #Dessert #Snack #PerspectivesTheConsultingGroup #QuarantineKitchen #Covid19 #FeedingAmerica ©PERSPECTIVES/The Consulting Group, Inc. 2020 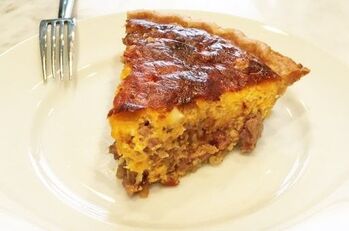 Low Country Egg Pie Low Country Egg Pie How you doin’? I really like the foods of the old South, especially dishes that can be easily adapted to restaurant brunch menus. This is a Southern country take on a French quiche from my Customs House Restaurant kitchens back in the 1980’s. I made it this weekend and it still stands up.
Prep time: 30 minutes Cook time: 10 minutes Bake time: 1 hour or so Cool time: 10 minutes Ingredients 1 tablespoon unsalted butter 1 cup chopped yellow onion 12 ounces spicy ground breakfast pork sausage 4 large eggs 1/2 cup liquid Ranch-style salad dressing (you can use blue cheese dressing as well) 2/3 cup whole milk 5-ounces sharp Cheddar cheese, shredded 1 teaspoon pepper sauce (Tabasco works well) 1/2 teaspoon salt 1/4 teaspoon black pepper 1/2 teaspoon granulated sugar 1 (9-inch) unbaked deep-dish pie crust Old-Fashioned Country Gravy (see recipe below) Directions
ChefSecret:
Ingredients 6 ounces spicy ground breakfast pork sausage 2-1/2 tablespoons all-purpose flour 1/4 teaspoon salt 1/4 teaspoon coarse ground black pepper 1/2 teaspoon hot sauce (Tabasco) 1-1/2 cups whole milk Directions
Covid-19 Quip of the Day: “Maybe if we start telling people the brain is an app, they’ll start using it—please wear a mask and practice social-distancing to stop the spread.” ------------------------------------------- Do you have a question or comment? Do you want to share a favorite recipe or pictures with our readers? Send your thoughts to [email protected]. All recipes and cooking tips are posted on our website https://www.perspectives-la.com/covid-19-survival-guide. ------------------------------------------- To you and everyone dear to you, be strong, be positive, stay well, stay safe and be kind—that’s the American way. If you have a little extra in your pocket to share with others at this difficult time, please consider donating to Feeding America. Thanks for reading. #Entree #Baking #Breakfast #Lunch #Brunch #LowCountry #CountryGravy #SpicySausage #PerspectivesTheConsultingGroup #QuarantineKitchen #Covid19 #FeedingAmerica ©PERSPECTIVES/The Consulting Group, Inc., 2020 |

For over 4 decades collaboration and vision have been the cornerstones of our approach to developing innovative solutions. We fuel innovation, uncover opportunities, discover trends and embrace sustainability, turning imaginative ideas into profitable realities. Categories
All
Archives
July 2024
|
 RSS Feed
www.perspectives-la.com
Copyright © 2021 Perspectives/The Consulting Group, LLC | Henderson, NV 89052 | 310-477-8877
Copyright © 2021 Perspectives/The Consulting Group, LLC | Henderson, NV 89052 | 310-477-8877