…from the Perspectives’ Kitchen How you doin’? Summer veggies are at their prime this time of year. So now is the best time to go to your local farms and farmer’s markets and shop for the finest produce available. I can eat corn in various forms any time of year, but especially in the summer when it is at its crisp, sweet best. I like to add corn to wraps and salads for the sweetness and crunch it adds. And if you grill it first you add flavor dimension to the mix.
In this recipe, I’ve infused the cooking water with garlic, thyme, and bay leaves, and then blanched the corn in it for a few minutes, so it’s full of flavor but still pops when you bite into it. We also cut the corn from the cob in chunks/rows, so that it has a fresher presence in the salad. Then I toss the corn together with flakes of crispy salmon, fresh veggies and peppery arugula. It’s dressed in an olive oil and za’atar, (an aromatic Middle Eastern spice blend made with toasted sesame seeds), thyme, marjoram and sumac. The result is a delightful summer salad with a refreshing, flavorful and satisfying taste. This salad travels well, so I like to make it, pack it, and take it on the go. It’s particularly nice for picnics at the beach, the jazz concert in the park or just the back yard. Prep time: 20 minutes Cook time: 30 minutes Yield: 4 servings Ingredients Kosher salt 2 lemons 3 garlic cloves, crushed 3 sprigs thyme 3 bay leaves, preferably fresh 1/2 cup plus 3 tablespoons extra-virgin olive oil, divided 4 teaspoons za'atar seasoning, plus more for serving 1 teaspoon kosher salt 5 fresh ears corn on the cob, husked 4 6-ounce skinless salmon fillets 2 medium heirloom tomatoes, cut into wedges 1/2 thinly sliced medium red onion 4 cups baby arugula, for serving Kosher salt, to taste Freshly-ground pepper, to taste Directions
To make the salmon
ChefSecret: If you have extra za’atar seasoning you can use it as a rub for grilled meats and veggies, swirl it into spreadable cheese or hummus or whisk it into breadcrumbs to give fried fish, chicken and onion rings a Mediterranean twist. Quip of the Day: A blonde walks into a library. She asks the librarian, “Can I get the salmon salad?” The librarian answers, “Sorry, this is a library.” The blonde responds, “Oh, right! (this time whispering) Can I get a salmon salad?” ------------------------------------------- Do you have a question or comment? Send your thoughts to [email protected]. All recipes and cooking tips are posted on our website https://www.perspectives-la.com/covid-19-survival-guide. ------------------------------------------- To you and everyone dear to you, be strong, positive, stay well, stay safe and be kind. Take a breath and count your blessings, and if you have a little extra to share with others, please consider donating to Feeding America, Tunnel to Towers, Union Rescue Mission and/or American Red Cross. #Salad #Entree #SalmonSalad #MediterraneanSalmonSalad #Zaatar #Summertime #2024Recipes #URM #T2T #FeedingAmerica #RedCross #PerspectivesTheConsultingGroup ©PERSPECTIVES/The Consulting Group, LLC, 2024
0 Comments
…from the Perspectives’ Kitchen How you doin’? What do you do when you have left over rotisserie chicken?… wrap it all up!
I like to make quick lunch wraps with leftovers in the test kitchen. My Grilled Tortilla Chicken Wrap recipe is just perfect for an easy lunch or simple weeknight dinner. Add all your favorite salad veggies and a yummy sauce for a delicious summer meal. Feel free to add green onions, shredded carrots, diced celery, feta cheese, or any other salad ingredients you have hanging out in the fridge. Prep time: 15 minutes Yield: 4 to 6 servings Ingredients 1 pound shredded leftover roasted or rotisserie chicken breasts or thighs 2 cups tzatziki sauce 4 to 6 large tortillas warmed 1 cup shredded romaine lettuce 4 to 6 thinly sliced tomatoes 12 sliced red onion rings Directions
Greek Tzatziki Sauce Prep time: 10 minutes Yield: 4 to 6 servings My easy tzatziki sauce is a delicious summer condiment. Use it to dress up grilled veggies or a chilled crudité, sandwiches, salads and more, or add it to my Grilled Tortilla Chicken Wrap. Ingredients 1/2 cup finely chopped cucumber 1 cup thick whole milk Greek yogurt 1 tablespoon fresh lemon juice 1/2 tablespoon extra-virgin olive oil 1 grated garlic clove 1/4 teaspoon kosher salt 1 tablespoon chopped fresh dill 1 tablespoon chopped fresh mint, optional Directions
ChefSecret: Add a little more texture and flavor by grilling the assembled wrap in the same frying pan with a touch of melted butter. Quip of the Day: What’s a sandwich’s favorite type of music? Wrap. ------------------------------------------- Do you have a question or comment? Send your thoughts to [email protected]. All recipes and cooking tips are posted on our website https://www.perspectives-la.com/covid-19-survival-guide. ------------------------------------------- To you and everyone dear to you, be strong, positive, stay well, stay safe and be kind. Take a breath and count your blessings, and if you have a little extra to share with others, please consider donating to Feeding America, Tunnel to Towers, Union Rescue Mission and/or American Red Cross. #Entree #Wrap #RotisserieChicken #GrilledTortilla #TzatzikiSauce #Summertime #2024Recipes #URM #T2T #FeedingAmerica #RedCross #PerspectivesTheConsultingGroup ©PERSPECTIVES/The Consulting Group, LLC, 2024 …from the Perspectives Kitchen How you doin’? My Old Fashioned Cathead Biscuits are a wonderful way to spoil your family. Cathead biscuits have been around for years. It is an old-fashioned recipe that never disappoints!
Why are they called Cathead biscuits? Simply because they are as big as a cat’s head. When we call them out as old Southern Cathead Biscuits, some of the oldest family recipes go back to pre-Civil War times. They are simple, inexpensive and only have 6 ingredients—most can be found in your pantry. Try them tonight… or tomorrow with a Southern-Style Fried Chicken Thigh Biscuit Sandwich. Prep time: 10 minutes Bake time: 20 minutes Yield: 8 large biscuits Ingredients 2 cups self-rising flour 1 teaspoon baking powder 1 to 2 tablespoons white shortening (Crisco) at room temperature or lard or rendered bacon fat; about the size of a walnut 1 cup buttermilk 1/2 teaspoon kosher salt 2 tablespoons melted salted butter (for brushing top after baking) Directions
ChefSecret: For taller, lighter and flakier biscuits, cut straight down with the cutter. Do not twist the cutter as it prevents the biscuits from getting a full rise. For the highest rise biscuit, ensure the biscuits are touching so they rise up and not out. For crusty edges, arrange them 1 inch apart, for softer edges, place them close together. Quip of the Day: Two biscuits are in an oven… One biscuit looks at the other and says, “man, it’s hot in here.” The other biscuit replied, “AHHH, a talking biscuit!!!” ------------------------------------------- Do you have a question or comment? Send your thoughts to [email protected]. All recipes and cooking tips are posted on our website https://www.perspectives-la.com/covid-19-survival-guide. ------------------------------------------- How you doin’? My Old Fashioned Cathead Biscuits are a wonderful way to spoil your family. Cathead biscuits have been around for years. It is an old-fashioned recipe that never disappoints! Why are they called Cathead biscuits? Simply because they are as big as a cat’s head. When we call them out as old Southern Cathead Biscuits, some of the oldest family recipes go back to pre-Civil War times. They are simple, inexpensive and only have 6 ingredients—most can be found in your pantry. Try them tonight… or tomorrow with a Southern-Style Fried Chicken Thigh Biscuit Sandwich. Prep time: 10 minutes Bake time: 20 minutes Yield: 8 large biscuits Ingredients 2 cups self-rising flour 1 teaspoon baking powder 1 to 2 tablespoons white shortening (Crisco) at room temperature or lard or rendered bacon fat; about the size of a walnut 1 cup buttermilk 1/2 teaspoon kosher salt 2 tablespoons melted salted butter (for brushing top after baking) Directions
Quip of the Day: Two biscuits are in an oven… One biscuit looks at the other and says, “man, it’s hot in here.” The other biscuit replied, “AHHH, a talking biscuit!!!” ------------------------------------------- Do you have a question or comment? Send your thoughts to [email protected]. All recipes and cooking tips are posted on our website https://www.perspectives-la.com/covid-19-survival-guide. ------------------------------------------- To you and everyone dear to you, be strong, positive, stay well, stay safe and be kind. Take a breath and count your blessings, and if you have a little extra to share with others, please consider donating to Feeding America, Tunnel to Towers, Union Rescue Mission and/or American Red Cross. #Baking #SouthernBiscuits #CatheadBiscuits #Crisco #Lard #2024Recipes #T2T #URM #FeedingAmerica #RedCross #PerspectivesTheConsultingGroup ©PERSPECTIVES/The Consulting Group, LLC, 2024 …from the Perspectives’ Kitchen 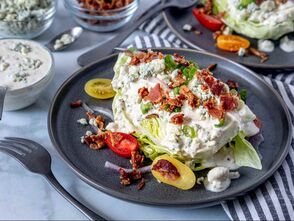 How you doin’? When looking for a great steak place in the greater Las Vegas area I tend to lean toward local Henderson restaurants. In fact, if you talk to most locals, the only time they venture down to the strip is when they have guests or clients in town.
Green Valley Ranch’s upscale Hank’s Fine Steaks and Martinis is the perfect go-to place. The restaurant offers fine surf 'n' turf beneath crystal chandeliers with impeccable table side service. Professional table side service these days in many Las Vegas restaurants and Hanks does it well. But don’t think of a stuffy, old fashioned kind of place or service. Hank’s is contemporary in design and the service is all about hospitality, making it a comfortable go-to restaurant for special occasions or just a great night out for dinner. With all the wet and dry-aged beef options you want to start your meal with a light Wedge Salad. You don’t want to spoil your appetite with something like their excellent Lobster Chowder or French Onion Soup Gratinee—a little too rich to go with Chateaubriand. My personal preference is for the house Wedge Salad with homemade Ranch Dressing. This is not just any store-bought, bottled or dry mix ranch—it is house made Ranch Dressing at its finest. There are a couple of things that make my Ranch Dressing special. First, I redefined the mayonnaise, sour cream and buttermilk ratios so the texture is just right. It’s thin enough that you can toss it, and it’s got the perfect amount of stick-to-it-iveness so that it clings to lettuce wedge, salad goodies and is dippable without being globby. No one likes an over-dressed giant glob of dressing on their lettuce wedge. My Ranch Dressing is light, tangy and herby, thanks to a perfect blend of parsley, chives and dill. Now for the greens--Wedge Salads are just about as simple as they come but that’s their appeal as they complement the steak course to the fullest. They are sophisticated, yet simple and special at the same time. This Wedge Salad is what you might expect to order at a country club, fancy restaurant or my house. The wedge of juicy, well chilled iceberg lettuce is the perfect blank canvas for all your favorite toppings like. Seasonally sweet cherry tomatoes, black pepper rimmed bacon, some fresh-cut chives for a pretty pop of green along with options of black olives, pickled sweet red onions, toasted croutons, plenty of crumbled bleu cheese and whatever else you love. This Wedge Salad is perfect for a lunch entrée or for a great starter for a steak or lobster dinner. Remember to keep it simple, just salt and pepper, because you’re going to want to drag that steak through the leftover dressing. Ranch Dressing Prep time: 10 minutes Yield: 2 cups Ingredients 3/4 cup mayonnaise 1/2 cup sour cream 3/4 cup buttermilk 2 teaspoons white wine vinegar 1 tablespoon minced fresh parsley 2 teaspoons chopped fresh chives 2 teaspoons minced fresh dill 1 teaspoon minced garlic 1/4 teaspoon onion powder 1/2 teaspoon kosher salt 1/2 teaspoon freshly-ground black pepper Directions
ChefSecret: I like to make a double recipe. Once you have a jar full of the stuff, you’re going to want to dip, dunk and drench everything in it, like blistered shishito chile peppers, air-fried pickles and jalapeño poppers. It’s also amazing on the classics, from wee baby carrots to pepperoni pizza, and of course, this wedge salad. Wedge Salad Prep time: 15 minutes Yield: 4 servings Ingredients 1 firm, fresh head iceberg lettuce, cut in quarters 1 cup ranch dressing 6 strips chopped crispy-cooked peppered bacon 10 cherry tomatoes cut in half 4 teaspoons chopped chives 1/2 cup crumbled bleu cheese Directions
Quip of the Day: Q. Why did the cowboy ride a horse while eating salad? A. Because he loved the ranch dressing. ------------------------------------------- Do you have a question or comment? Send your thoughts to [email protected]. All recipes and cooking tips are posted on our website https://www.perspectives-la.com/covid-19-survival-guide. ------------------------------------------- To you and everyone dear to you, be strong, be positive, stay well, stay safe and be kind. Take a breath and count your blessings, and if you have a little extra to share with others, please consider donating to Feeding America and/or American Red Cross. #Entree #Salad #WedgeSalad #RanchDressing #Lunch #Dinner #2023Recipes #Covid19 #FeedingAmerica #RedCross #PerspectivesTheConsultingGroup ©PERSPECTIVES/The Consulting Group, LLC, 2023 …from the Perspectives’ Kitchen  How you doin’? There is a new French bakery and café that opened just down the street from where I live. The ladies who own the place are from Lyon. They barely speak English but have wonderful genuine French recipes. Their French almond cream is to die for. I can tell you conversing with them strains my high school French, but I was able to capture this recipe for saving stale bread—it’s called a Bostock.
It is a non-discriminating recipe, whether you bake bread from scratch or source from local bakeries or the grocery store. It’s short of amazing how quickly last night’s leftover stale bread which was destined for bread crumbs and croutons is turned into something that puts French Toast for breakfast to shame. Yes, even those sad, day-old croissants that lost their flaky texture can be converted into something magnificent even, better than the original. Leave it to the French to figure out how to take a breadstuff past its prime and elevate it to cult status. Likely originating in bakeries trying to get rid of second-day stale bread, this process of adding a sugar syrup and re-baking with an almond cream topping is a genius way to make almost any stale baked bread rise to perfection again! While traditionally made with thick slabs of bread like sweet brioche, the technique can be used with great success with almost any plain or sweet bread. Ingredients 4 thick slices of stale bread 1 cup granulated sugar 2 cups water 7 ounces almond paste (not marzipan) 2 large eggs 1/8 teaspoon kosher salt 1/2 teaspoon almond extract 1/4 teaspoon vanilla bean paste 1/2 cup raw slivered almonds Sliced fruit (optional) 1/4 cup sifted confectioners’ sugar (optional) Directions
ChefSecret: If you have a lot of bread left, prepped Bostock can be frozen uncovered in a single layer on a sheet pan and then stashed in freezer bags. Bake straight from frozen, increasing the baking time by a couple of minutes. Any leftover baked Bostock is a great addition to bread pudding. Quip of the Day: Baking is cheaper than therapy. ------------------------------------------- Do you have a question or comment? Send your thoughts to [email protected]. All recipes and cooking tips are posted on our website https://www.perspectives-la.com/covid-19-survival-guide. ------------------------------------------- To you and everyone dear to you, be strong, be positive, stay well, stay safe and be kind. Take a breath and count your blessings, and if you have a little extra to share with others, please consider donating to Feeding America and/or American Red Cross. #Baking #SweetAlmondBostock #Almonds #Bostock #2023Recipes #QuarantineKitchen #Covid19 #FeedingAmerica #RedCross #PerspectivesTheConsultingGroup ©PERSPECTIVES/The Consulting Group, LLC, 2023 |

For over 4 decades collaboration and vision have been the cornerstones of our approach to developing innovative solutions. We fuel innovation, uncover opportunities, discover trends and embrace sustainability, turning imaginative ideas into profitable realities. Categories
All
Archives
July 2024
|
 RSS Feed
www.perspectives-la.com
Copyright © 2021 Perspectives/The Consulting Group, LLC | Henderson, NV 89052 | 310-477-8877
Copyright © 2021 Perspectives/The Consulting Group, LLC | Henderson, NV 89052 | 310-477-8877