…from the California Kitchen 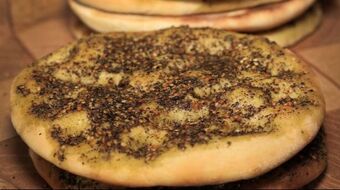 How you doin’? I can’t help but smile when I tell this story, although it’s always better told in person over cocktails. We were contacted on the internet to submit our credentials to develop a unique Lebanese restaurant concept for people in Azerbaijan. One week later we were awarded the project and were asked to come to Baku to meet with the client. Little did we know that this would turn out to be something of a James Bond novel type story visiting many cities and countries in Europe and the Mid-East.
The first thing we had to do was find out where Baku, Azerbaijan was. We found it’s a small country located in a crack between Georgia and Iran—not the safest place in the world considering that there had been a state of war (shooting war) between Armenia and Azerbaijan for years (and it still goes on today). Of course, one never knows what the Iranians are up to. We were supposed to meet our client in London and travel to Baku with him so he could get us into his country. After waiting a week for Azer, eating at many of the Lebanese restaurants in London we found that he couldn’t get into the UK due to passport irregularities and never showed—a little unsettling to say the very least. Joan and I hopped on plane to now meet Azer at the airport in Baku. After clearing customs (which wasn’t all that easy), we finally connected with Azer and were whisked to a new hotel, unpacked and had our first business meeting… here is the gist of the meeting. A Russian-Azerbaijani (formerly KGB… yes, for real) living in Baku wanted to open a chain of Lebanese restaurants in capitol cities across Europe. The targets (pardon the pun) were Kiev, Berlin, Paris, London and Washington, DC. It sounded like a secret agent’s hot list to us. So, we put our on trench coats and started on the “mission.” I must reiterate… this was the strangest project we ever worked on—the details could and will fill a book someday. In the meantime, rest assured we were not involved in any illicit or covert activities for either side. We developed a restaurant concept named SPOT and opened the first unit in Berlin in a vacated 3-story McDonald’s that was built directly over Adolph Hitler’s Berlin bunker where he took his own life—no kidding. As we dug down deep to fix a foundation leak, we found numerous artifacts—Nazi rifles, helmets, medals and papers that we had to turn over to the German government. This was one helluva experience and I swear it’s all true. SPOT’s food was fabulous! Our company did a great job in the test kitchen to bring authentic pre-war Lebanese food to the customers of SPOT. I still get a hankering for Man'oushe and Hummus. Man'oushe is a delicious puffy bread that is made in a hot deck oven. It is often topped with za'atar, a popular mix of herbs and spices served in the Middle East. This recipe is easy and delicious! The flatbread can accommodate other types of toppings on it. The toppings vary from minced meat, feta cheese, fresh herbs like mint, cucumber, tomato and za'atar and is great dipped in hummus. Okay, here's the Man'oushe (bread) recipe so you can begin to taste the flavors of old Beirut, by way of Berlin and Baku. Prep time: 30 minutes Proof time: 1 hour Bake time: 7 minutes Yield: 12 pieces Ingredients For the dough 2 cups warm water 2 teaspoons honey 3 teaspoons dry yest 6 cups bread flour 3 teaspoons kosher salt 4 tablespoons extra-virgin olive oil 1 teaspoon white vinegar 1 tablespoon grated parmesan cheese Semolina (for the baking; not the dough) For the za'atar topping (optional) 2/3 cup za'atar 1/2 cup extra virgin olive oil Directions To make the dough
How To Serve
Quip of the Day: “I recently purchased a toilet brush. Long story short—I’m going back to toilet paper as soon as possible.” ------------------------------------------- Do you have a question or comment? Send your thoughts to [email protected]. All recipes and cooking tips are posted on our website https://www.perspectives-la.com/covid-19-survival-guide. ------------------------------------------- To you and everyone dear to you, be strong and positive, stay well and safe and be kind to others. If you have a little extra in your pockets to share with others at this difficult time, please consider donating to Feeding America. Thanks for reading. #Baking #Snack #Appetizer #Bread #Flatbread #Manoushe #Lebanese #Berlin #Baku #Azerbaijan #QuarantineKitchen #Covid19 #FeedingAmerica #PerspectivesTheConsultingGroup ©Perspectives/The Consulting Group, Inc., 2021
0 Comments
…from the California Kitchen 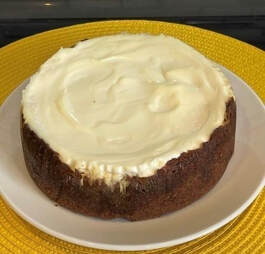 How you doin’? I love Italian cannoli, but I don’t make it all that often because the fried pastry tube is a pain to make. The ready-to-use (premade) tubes just aren’t all that good. If you feel the way I do here is the best substitute for old-fashioned cannoli and I make it quite often.
Typically, cannoli consists of the tube-shaped shell of fried pastry dough, and a sweet, creamy filling usually containing ricotta—a staple of Sicilian cuisine. They range in size from 4- to 8-inches. In mainland Italy, they are commonly known as Cannoli Siciliani. Well, after experimenting in the test kitchen, I finally came up with a suitable, easy-to-make substitute by way of a cheesecake that cooks perfectly in a 6- to 7-inch springform pan fitted for the Instant Pot. This recipe is great for very special Italian-inspired dinners that can be enjoyed later with leftovers the night after. It easily lasts 3 or 4 days. Garnish with Italian brandy cherries, fresh raspberries, strawberries on top, whipped cream, and a drizzle of chocolate syrup if you're feeling extra indulgent. Prep time: 10 minutes Cook time: 50 minutes Cool time: 4 hours or overnight Yield: 1 6-or 7-inch cheesecake, about 8 servings Ingredients For the crust 2 tablespoons unsalted butter (for the pan) 2 cups crushed graham crackers or Italian biscotti cookies 1/4 cup light brown sugar 1/4 teaspoon kosher salt 1/4 cup unsalted butter, room temperature 1/2 teaspoon almond extract For the cannoli filling 15 ounces ricotta cheese, drained 8 ounces cream cheese, at room temperature 1/2 cup granulated sugar 1 tablespoon cornstarch 1 tablespoon all-purpose flour 1 tablespoon sour cream 1/2 teaspoon Fiori di Sicilia flavor (see ChefSecret) 1/8 teaspoon kosher salt 2 large eggs 1/4 cup mini-bitter sweet chocolate chips 1/4 cup toasted and chopped pistachio nuts Directions To prepare the springform pan
ChefSecret: Have you ever wondered what the Italian bakers use to get the unique flavor and aroma in their baked goods? It’s Fiori di Sicilia, an intense extract that combines vanilla, citrus and flower essences. “Flowers of Sicily” is what it literally means. Many Italian bakers use this flavoring in their panettone baking. It seems clear that extracts containing flower essences are common in Italy. What is Fiori di Sicilia, you ask? The dominant flavors in Fiori di Sicilia are vanilla and orange, so a combination of those two make a fine substitute. Also a little rose flower water, to make make-up for some of the floral aromas. But don’t be afraid to omit it entirely, because to be honest, it can be just too darn strong for some people. Make sure if you are using this in place of pure vanilla extract to only use half the amount called for. This extract is available at King Arthur Baking or Amazon. Quip of the Day: “If you can’t laugh at yourself, I’ll do it for you.” ------------------------------------------- Do you have a question or comment? Send your thoughts to [email protected]. All recipes and cooking tips are posted on our website https://www.perspectives-la.com/covid-19-survival-guide. ------------------------------------------- To you and everyone dear to you, be strong and positive, stay well and safe and be kind to others. If you have a little extra in your pockets to share with others at this difficult time, please consider donating to Feeding America. Thanks for reading. #Desserts #InstantPot #Cheesecake #Cannoli #Ricotta #Pistachios #FioriDiSicilia #QuarantineKitchen #Covid19 #FeedingAmerica #PerspectivesTheConsultingGroup ©Perspectives/The Consulting Group, Inc., 2021 …from the Happy Hour Bar  How you doin’? I received two emails today asking if I would write a couple of recipes for them since we cut down to just three per week and have so much extra time on my hands. I love you guys. I did a cooking show for about 10 years on ABC called Stump the Chef. So, if I survived that I can help you with a couple of extra recipes. Look for them in your mailbox.
A modified version of this recipe came up on my Gelson’s ad blog this morning. The subject was very dear to my heart because it came from the Happiest Place on Earth—Disneyland. I worked for the Disney Company in several areas, from rides and attractions design to food and restaurant development. Lots of great memories. Allow me to share one with you. This month is the 57th anniversary of Disneyland’s Enchanted Tiki Room. When it first opened in Disneyland, in 1963, its claim to fame was the first-ever audio-animatronics—featuring talking birds. If you’ve been lucky enough to enjoy the show you will remember that a quartet of chatty macaws hosted a Hawaiian-themed floor show, performed by a few hundred warbling birds, flowers, and tikis. It sounds old hat now, but at the time, it was so awe-inspiring that even the show’s barker, Juan the Toucan, drew giant crowds of people, who jammed the entry to the show, mesmerized by a talking bird hawking the show’s many delights (thunderstorms!) and cajoling passersby to come inside. Enough bird stories! The Enchanted Tiki Room was sponsored by Dole, the geniuses behind the snack bar’s signature frozen treat—the one and only Dole Whip. The drink is a delectable whirl of frozen pineapple chunks, coconut milk, banana and some sugar. There’s also some lemon and lime juice in there to keep the thing from getting too sweet. The result is a thick, sorbet-like drink that’s sweet-tart and very pineapple-y. It tastes amazing with a couple jiggers of rum added… this addition was never offered in the show. So, my dear friends, in honor of the 57th anniversary of The Enchanted Tiki Room, lifting of Covid restrictions, and being that its Happy Hour Friday let’s celebrate! Freeze time: 2 hours Prep time: 10 minutes Yield: 2 servings Ingredients 16 ounces frozen pineapple chunks, from fresh, not canned 1/2 cup canned coconut milk 3 tablespoons granulated sugar 1/8 teaspoon kosher salt 1 tablespoon lemon juice 1 tablespoon lime juice 1/2 frozen banana 2 tablespoons ice water 3 ounces gold rum (not part of the original Disney/Dole recipe) Fresh pineapple, sliced and quartered, for garnish Directions
ChefSecret: Make it a little fancy and fill a pastry bag with the drink mixture and pipe into the two glasses. Garnish with a tropical orchid if you have one. At one time, you could get the adult version of the Dole Whip at the very exclusive Club 33 above Pirates of the Caribbean. Quip of the Day: “Please drink responsibly! To me that means don’t spill any of it.” ------------------------------------------- Do you have a question or comment? Send your thoughts to [email protected]. All recipes and cooking tips are posted on our website https://www.perspectives-la.com/covid-19-survival-guide. ------------------------------------------- To you and everyone dear to you, be strong and positive, stay well and safe and be kind to others. If you have a little extra in your pockets to share with others at this difficult time, please consider donating to Feeding America. Thanks for reading. #Cocktail #HappyHour #Rum #Pineapple #Disneyland #EnchantedTikiRoom #DoleWhip #SummerCocktail #Cheers #QuarantineKitchen #Covid19 #FeedingAmerica #PerspectivesTheConsultingGroup ©Perspectives/The Consulting Group, Inc., 2021 … from the California Kitchen 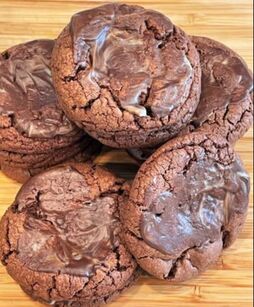 How you doin’? This melt-in-your-mouth chocolate cookie is topped with mint chocolate “frosting.” It's delicious and it's easy! It is the perfect after dinner mint treat to complement any meal and any season.
But what you may ask, was the origin of this cookie recipe? It all started with the Girl Scouts nearly 100 years ago. Their cookies have been evolving ever since Girl Scout Cookies got their start. Back then, there was no such thing as the Thin Mint, Samoa or Tagalong. According to the organization’s history, the Mistletoe Troop in Muskogee, Okla., baked and sold the first-ever batch of Girl Scout Cookies in their high school cafeteria in 1917. A July 1922 American Girl magazine feature provided a simple sugar cookie recipe, suggesting that they be sold door-to-door for 25 to 30 cents per dozen (my, how times have changed!). Girl Scouts selling cookies in 1928. But not every Girl Scout was doing the baking herself. “Grandma used to bake the cookies,” former Girl Scout Selma Rutledge says, “I was never the kitchen cooker, I stayed outside and sold them. Selling cookies taught me how to meet people and how to present myself. It gave me the courage to stand up and speak up.” She used to wrap five or six of Granny’s oatmeal cookies in a small paper bag, with a little ribbon around it. That was the start. But when did the Thin Mint emerge? Although Rutledge sold homemade cookies, the Girl Scouts began standardizing their cookies in 1936, when the organization licensed its first baker. 1939 brought the first iteration of the Thin Mint, then called “Cooky-Mints.” By 1948 there were 29 different licensed bakers making a Girl Scout Mint Cookie. The minted cookie has had a myriad of names over the years… Mints changed to Chocolate Mint to Thin Mint to Cookie Mint to Chocolate Mint to Thin Mints to Thin Mint and finally, back to the plural Thin Mints. Here is my recipe for what is close in flavor to the original. This version, Chocolate Mint Cookies, is a littler thicker and chewier cookie than the Girl Scout version, but the chocolaty-mint flavor is spot on! Prep time: 10 minutes Refrigerate time: 1 hour Bake time: 10 to 12 minutes Cool time: 20 minutes Yield: About 30 cookies Ingredients 3/4 cup unsalted butter (1-1/2 sticks) 1-1/2 cups packed dark brown sugar 2 tablespoons water 2 cups semisweet chocolate chips 2 large eggs, room temperature 1/4 teaspoon mint extract 2 -1/2 cups all-purpose flour 1-1/4 teaspoons baking soda 1/2 teaspoon salt 36 chocolate thin mint wafer candies (like Andes Mints) Directions
ChefSecret: Do not skip the step to refrigerate the dough. This allows the flour to properly hydrate so that it doesn’t over spread when baking, ensuring the perfect cookie size and texture. Quip of the Day: “I suggested building beds above each other to save space, but the idea was debunked.” ------------------------------------------- Do you have a question or comment? Send your thoughts to [email protected]. All recipes and cooking tips are posted on our website https://www.perspectives-la.com/covid-19-survival-guide. We have added a new search feature to make it easier to navigate through our blogs. ------------------------------------------- To you and everyone dear to you, be strong and positive, stay well and safe and be kind to others. If you have a little extra in your pockets to share with others at this difficult time, please consider donating to Feeding America. Thanks for reading. #Baking #Snack #Dessert #Cookies #GirlScoutCookies #ThinMints #AndesMints #QuarantineKitchen #Covid19 #FeedingAmerica #PerspectivesTheConsultingGroup ©Perspectives/The Consulting Group, Inc., 2021 …from the California Kitchen  How you doin’? Chinese workers first brought their unique cuisine to America during the gold rush in California and the building of the Transcontinental Railroad. Back then, the food was mainly for the immigrants Chinese only.
In the 1930’s Chinese-American food (Cantonese-style) was growing in popularity. A rich brown sauce began to be served with many stir-fry dishes. This “gravy,” as it was called, was rich with an array of complex umami flavors. Egg Foo Young (a Chinese omelet) was no exception. Egg Foo Young has become one of the most popular Chinese take-out dishes in America today. But it is so much better to make at home when it can be served fresh and hot right out of the pan. Don’t cringe at the thought of it—making Egg Foo Young at home is easier than you might think. All you need are some eggs, fresh veggies and your favorite meats (Chinese sausage, beef, pork, chicken, shrimp or a combination—even tofu can work), and you will soon be making delicious, better than take-out Egg Foo Young at home. No need to head out to a Chinese restaurant—you’re now the pro—when you can cook great Chinese food so well at home. This omelet style dish has become sort of ubiquitous and can be found in the Chinese-American, Chinese-British, and Chinese-Indonesian cuisine. Like many dishes, this one has been adapted depending upon where it is served and the local available ingredients. What is common is that Egg Foo Young is served with fresh vegetables like bean sprouts, spring onions, mushrooms, cabbage, and water chestnuts. This is the perfect dish that can adapted to whatever you have on hand—even leftovers from your visit to a Chinese restaurant (I often include leftover steamed or fried rice—just toss it in). This is an easy meal to make at home. Prep time: 10 minutes Cook time: 15 minutes Additional time to make the sauce: 10 minutes Yield: 2 servings Ingredients For the Egg Foo Young omelet 1 teaspoon sesame oil 1/4 cup chopped sweet onion 1/4 cup chopped green onion bottoms 1/4 cup chopped celery 1/4 cup chopped water chestnuts 1/4 cup sliced white mushrooms 1/4 teaspoon cornstarch 1/2-pound shrimp, peeled, deveined and roughly chopped (or other precooked proteins) 2 tablespoons low sodium soy sauce 1 teaspoon salt 1/4 teaspoon black pepper 1 teaspoon sriracha hot sauce 1-1/2 cups bean sprouts 6 eggs, well beaten 2 tablespoons green onion tops For the Egg Foo Young gravy 1/2 cup plus 5 tablespoons chicken stock 1 tablespoon oyster sauce 1/4 teaspoon sugar 1 teaspoon soy sauce 1-1/2 teaspoons cornstarch Directions To make the Egg Foo Young
ChefSecret: I use two (2) small sauté pans and divide all the ingredients equally. That way I can easily serve two perfect Egg Foo Young omelets. Quip of the Day: “Recently, I’ve put a lot of thought into it and I just don’t think being an adult is gonna work for me.” ------------------------------------------- Do you have a question or comment? Do you want to share a favorite recipe or pictures with our readers? Send your thoughts to [email protected]. All recipes and cooking tips are posted on our website https://www.perspectives-la.com/covid-19-survival-guide. We have added a new search feature to make it easier to navigate through our blogs. ------------------------------------------- To you and everyone dear to you, be strong and positive, stay well and safe and be kind to others. If you have a little extra in your pockets to share with others at this difficult time, please consider donating to Feeding America. Thanks for reading. #Entrees #EggFooYoung #ChineseFood #ChineseOmelet QuarantineKitchen #Covid19 #FeedingAmerica #PerspectivesTheConsultingGroup ©Perspectives/The Consulting Group, Inc., 2021 |

For over 4 decades collaboration and vision have been the cornerstones of our approach to developing innovative solutions. We fuel innovation, uncover opportunities, discover trends and embrace sustainability, turning imaginative ideas into profitable realities. Categories
All
Archives
July 2024
|
 RSS Feed
www.perspectives-la.com
Copyright © 2021 Perspectives/The Consulting Group, LLC | Henderson, NV 89052 | 310-477-8877
Copyright © 2021 Perspectives/The Consulting Group, LLC | Henderson, NV 89052 | 310-477-8877