PERSPECTIVES/ THE CONSULTING GROUP, LLC
  • Home
    • Who We Serve
    • How We Work
    • Services >
      • Concept Development
      • Strategic Planning
      • Brand Development
      • Operations
      • HACCP / Food Safety
      • Menu / Product Development
      • Marketing / Research
      • Design
      • Market Planning / Site Analysis
  • Why Perspectives?
    • About Us
    • Principals
    • Mission Statement
    • Code of Ethics
  • Clients
    • Testimonials
    • Client List
  • Contact Us
    • Phone, Address & Contact
  • Covid-19 Survival Guide
  • Perspectives On Food

Cooking Lesson #43— Happy Hour Hurricane Cocktail

5/29/2020

0 Comments

 
PictureHurricane Cocktail
How you doin’? It’s finally Friday! Whoopie, it’s Happy Hour time! You’re going to be doing very well shortly.
 
What’s your favorite Southern city? I have two--I love Nashville and New Orleans! (Nashville HOT Fried Chicken will be the subject of a later blog.) When I think of New Orleans, I think the French Quarter and when I think about the French Quarter, I think of Pat O’Brien’s. O’Brien’s is known for great jazz entertainment and their most popular signature drink—The Hurricane Cocktail. The perfect place to sip a Hurricane is still in Pat O’s legendary courtyard, overlooking the flaming fountain.
 
This local NOLA libation is made with rum because during World War II whiskey was hard to come by, but rum was plentiful. The name for the drink comes from the glass it’s served in that resembles a hurricane lamp. You can find Hurricanes elsewhere around the city as well, and most bartenders will be happy to mix you one, but they just don’t taste as good as Pat O’Brien’s. You can see people swaying down Bourbon Street carrying their take-away souvenir glasses.

Ingredients
2 oz. light rum
2 oz. dark rum
2 oz. passion fruit juice
2 oz. orange juice
1/2 oz. fresh lime juice
1 tablespoon simple syrup
1 tablespoon grenadine
Garnish: orange slice and cherry flag
 
Directions
  1. Shake all ingredients in a cocktail shaker with ice and strain into a hurricane glass filled with ice.
  2. Garnish with an orange slice and cherry flag.

#Hurricane #Cocktail #Gin #HappyHour #Cocktail #PerspectivesTheConsultingGroup #QuarantineKitchen #Covid19 

0 Comments

Cooking Lesson #42— Cheddar Corn Cakes

5/28/2020

0 Comments

 
Picture
How you doin’? Did you ever try my recipe for Texas Cowboy Casserole (Lesson #14) using Original Bisquick? Why not? Don’t be a slacker. You’re at home with the kids and baking and cooking are great releases from all the stress you are going through. Okay, I’m going to give you another chance to be a “baking hero.”

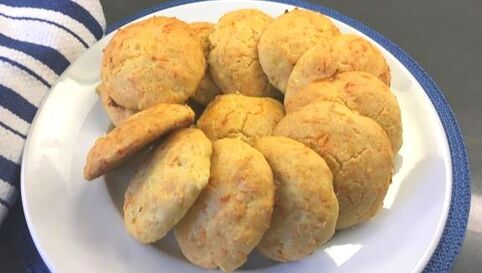
Cheddar Corn Cakes make a great accompaniment to a nice dining room dinner or an informal outdoor cookout. It all starts with a box of Jiffy Corn Muffin mix and a box of Original Bisquick. Skip the standard bake-and-serve, store-bought dinner rolls and try these quick-to-fix biscuits studded with cheddar and corn kernels. It's almost impossible to resist eating one right from the oven!
 
Prep time: 20 minutes
Bake time: 20 minutes
Yield: 16 to 20 biscuits
 
Ingredients
Food release spray (Pam)
1 box of Jiffy Corn Muffin Mix (8.5-oz.)
1 large egg
1/3 cup milk
 
2-1/2 cups Original Bisquick Baking Mix
1/4 cup granulated sugar
2 teaspoons ground mustard
1/2 teaspoon ground dry rosemary
8 tablespoons cold salted butter, cubed
1/2 can (14-3/4 ounces) cream-style corn
1 cup shredded mild cheddar cheese
2 large eggs, lightly beaten
2 tablespoons milk, plus more for brushing the tops
1/4 cup melted salted butter for brushing the tops after baking
 
Directions
  1. Preheat your oven to 425°F.
  2. Prepare 2-baking sheets with parchment paper sprayed with food release (Pam).
  3. In a medium bowl combine the muffin mix, egg and milk; set aside.
  4. In a large bowl, whisk together the Bisquick, sugar, mustard and rosemary.
  5. Cut in the butter until mixture resembles coarse crumbs.
  6. Add the creamed corn, cheese, eggs and milk; stir until just moistened.
  7. Add in the prepared corn muffin batter.
  8. Deposit batter on the prepared sheet pans using a #20 scoop (standard ice cream scoop).
  9. Place the corn cakes 2-inches apart on the prepared sheet pans, brush biscuit tops with milk.
  10. Bake 18-22 minutes or until golden brown. Turn and rotate pans midway through the baking time.
  11. When the biscuits come out of the oven brush with melted butter.
  12. Serve warm.
#Biscuits #JiffyMuffinMix #Bisquick #Brunch #Dinner #CheddarBiscuits #PerspectivesTheConsultingGroup #QuarantineKitchen #Covid19

0 Comments

Cooking Lesson #41— Instant Pot Green Chicken Enchilada Stacks

5/27/2020

0 Comments

 
PictureJoan Vieweger fighting the germ bastards
How you doin’? As we continue to be glued to our televisions either watching reruns of NCIS or the Covid-19 news, we are all learning how hard all the scientists and health care providers are working to bring this war on coronavirus to an end as soon as possible. It seems it has the capacity to devastate our country men and women. The germs are relentless. We remind you to maintain social distancing (at least 6-feet) and wear a mask. We are doing our part to beat these little bastards.
 
Okay, on to today’s cooking lesson. I love green chicken enchiladas, but many times I just don’t have the time to make them—prepare the filling, fry the tortillas, grate the cheese, roll the tortilla, bake them and get them on the table. 
 
I creatively copied this simple recipe from a Mexican dish I saw at El Coyote Cafe in Los Angeles. I wanted to find a way to cut the cooking time and eliminate some of the repetitive steps. You won’t be surprised to hear that I use my trusty Instant Pot which cuts cooking time and improves the taste and texture of the filling.
 
Prep time:  30 minutes
Cook time:  30 minutes (estimated Instant Pot cooking time)
Assembly time:  10 minutes
Oven time:  20 to 25 minutes
Yield:  8 stacks
 
Ingredients
2 teaspoons chili powder
1 teaspoon kosher salt
1-1/2 teaspoon ground cumin
1-1/2 pounds skinless, boneless chicken thighs (you can use chicken breasts if you prefer white meat)
1/2 cup chicken broth
1 can (28-oz) green enchilada sauce, divided (I use Las Palmas brand)
3 cups shredded Monterey Jack cheese, divided
1 can (4-oz.) mild chopped green chilies
1/2 cup chopped yellow onion
2 red jalapeno peppers, chopped, more or less to taste
1/2 cup peanut oil or other stable vegetable oil for frying
16 corn tortillas, or more to taste
1 (10 ounce) can red enchilada sauce
 
Directions
  1. Mix the chili powder, salt and cumin together in a bowl. Rub the mixture over the chicken.
  2. Chop the chicken into 1-inch cubes.
  3. Pour the chicken broth and 1 cup of green enchilada sauce into an Instant Pot.
  4. Add the chicken and select HIGH PRESSURE and set the timer for 5 MINUTES. Allow 10 to 15 minutes for pressure to build.
  5. In a large mixing bowl, combine 2 cups Monterey Jack cheese, 1 cup green enchilada sauce, green chiles, onions and jalapenos. Stir to thoroughly blend.
  6. Preheat the oven to 350⁰F.  
  7. Release pressure on the Instant Pot using the NATURAL RELEASE method according to manufacturer's instructions for 5 MINUTES. Release remaining pressure carefully using the quick-release method according to manufacturer's instructions, about 5 minutes. Unlock and remove the lid.
  8. Remove the chicken from the cooking liquid and cool for about 20 minutes. Discard the cooking liquid.
  9. Transfer cooled cooked chicken to the mixing bowl with the cheese mixture. Stir until chicken mixture is blended.
  10. Heat the peanut oil in a skillet. Fry the tortillas to soften them, 1 at a time, by dipping into the hot oil for 10 to 15 seconds per side. Drain the tortilla on paper towels.
To assemble the stacks
  1. Lightly spray 8 individual baking dishes with food release (Pam).
  2. Place 1 tablespoon of green enchilada sauce on the bottom of each baking dish.
  3. Place a fried tortilla on top of the sauce.
  4. Spoon 2 to 3 tablespoons chicken mixture onto the tortilla.
  5. Place the second tortilla on top, add a little green sauce and another 2 tablespoons of the chicken mixture. 
  6. Repeat steps 3-5 with the remaining seven baking dishes.
  7. Combine the remaining green enchilada sauce with the red enchilada sauce in a bowl and spoon it evenly over enchilada stacks in the baking dishes. Sprinkle the remaining 1 cup Monterey Jack cheese over the tops of each stack.
  8. Bake the dishes in the preheated oven for 20 to 25 minutes until the sauce is bubbly and the cheese begins to brown.
ChefSecret: If you’re not cooking for a crew of eight, cook/finish only what you need and cover with food film the rest keep in your refrigerator or cover with food film and foil and freeze for later.

#InstantPot #GreenEnchiladas #ElCoyote #PerspectivesTheConsultingGroup #QuarantineKitchen #Covid19

0 Comments

Cooking Lesson #40— Thai Noodle Salad

5/26/2020

0 Comments

 
PictureExecutive Chef Spencer Kells
How you doin’? I recently heard from Spencer, our former R&D chef. Chef Spencer is now the executive chef for Chatrium Hotels in Bangkok Thailand. Chef Spencer tells us that tourism in Thailand has slowed considerably due to the pandemic, so, I guess I’m not going to be traveling to Thailand any time soon. I’m really missing great Thai food. There are only a few decent Thai restaurants in Los Angeles that have food that is even close to authentic Thai food.
 
A little history about the chef… We first met Chef at the Mandarin Oriental on the Chao Phraya, the major river in Thailand that flows from the north through Bangkok and out into the Gulf of Thailand—a beautiful setting. Chef Spencer is a Brit with over 30 years of culinary experience in high-end hotels, restaurants and resorts across the globe, including America, Australia, Barbados, England and Thailand which is what attracted us to him, aside from the fact he is such a very likable guy.
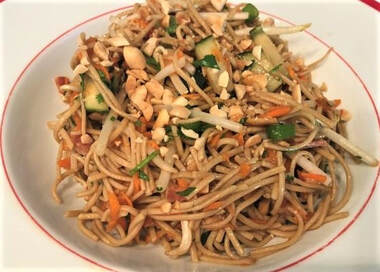
Thai Noodle SaladThai Noodle Salad
So, when you’re missing good Thai food and none of your favorite restaurants are open, what do you do? Create and innovate.  Here is my easy recipe for a salad with an elegant Asian flair and good for even the fanciest party meal. I think Chef Spencer would approve. Most Thai noodle salads have a peanut butter infused dressing—this one doesn’t and is much lighter. It's not only a healthy alternative but is delicious. It is zesty and pairs well with some Thai barbecued chicken and a bottle of Singha Thai Beer. I like to sprinkle some additional peanuts right before serving.
 
Prep time:  15 minutes
Cook time:  10 minutes
Chill time:  1 hour
Yield:  4 servings
 
Ingredients
15 ounces dried Soba noodles
1-3/4 teaspoons dark sesame oil, divided
1/3 cup rice vinegar
1/2 cup soy sauce
2 tablespoons Thai fish sauce
1 lime, zest (microplane) and juice
3 tablespoons brown sugar
1 tablespoon minced garlic
2 teaspoons Sambal--chili garlic paste, or to taste (optional)
1 cup finely shredded carrots
1/2 cup chopped fresh cilantro
2 tablespoons green onion top rounds
2 tablespoons cucumbers, julienne cut
1/2 cup bean sprouts
1/4 cup + 1 tablespoon coarsely chopped roasted, salted peanuts
8 ounces grilled chicken breast, julienne cut (optional)
2 tablespoons crisp bacon bits (optional)
 
Directions
  1. In a large pot, cook Soba noodles according to package directions.
  2. Drain and rinse noodles with cold water; set aside. Toss with 1/2 teaspoon of the sesame oil to keep them from clumping together.
  3. In a large bowl, pour the rest of the sesame oil, rice vinegar, soy sauce, fish sauce and lime juice.
  4. Mix in lime zest, brown sugar, garlic, and Sambal; stir until sugar dissolves.
  5. Add in the carrots, cilantro, green onions, cucumbers, bean sprouts and peanuts.
  6. Cut the noodles in half. Stir into dressing mixture.
  7. Cover and refrigerate for at least 1 hour.
  8. Toss salad again before serving. If it seems a little dry, splash with a little soy sauce and vinegar.
  9. Top with 1 tablespoon of chopped peanuts and sliced chicken or bacon if using.
  10. Serve chilled.

ChefSecret:  What is Sambal? It is an Asian chili sauce or paste typically made from a mixture of a variety of chili peppers with shrimp paste, garlic, ginger, shallot, scallion, palm sugar and lime juice. It is native to Indonesia, Malaysia, Sri Lanka, Brunei, Singapore and Country Thai cuisines. It is quite spicy, so use sparingly.

What is a microplane? A Microplane grater originated as an excellent smoothing tool for woodworkers, and it has proved to be an indispensable grating tool for chefs and cooks. It is a great tool for quickly zesting citrus fruits and even grates the hardest Parmigiano-Reggiano cheese.

#Salad #ThaiNoodleSalad #SpencerKells #ChatriumHotels #Brunch #Lunch #PerspectivesTheConsultingGroup #QuarantineKitchen #Covid19

0 Comments

Cooking Lesson #39—Portuguese Custard Tartlets

5/25/2020

0 Comments

 
Picture
How you doin’? Since you have so much time on your hands and your cooking skills have undoubtedly improved during the pandemic, I am throwing you a bit of a challenge today.

In Lisbon at A Padaria Portuguesa the center of the restaurant is the hot bakery and the star of the bakery is the Pasteis de Nata—Portuguese Custard Tartlets.to edit.

Picture
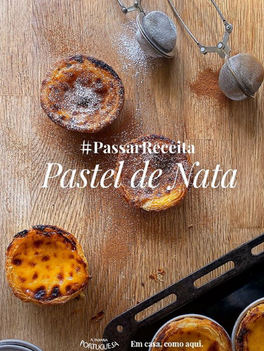
Many cuisines have a custard dessert, in America we have custard pies, in France it’s the Crème Brûlée and in Hong Kong you can find the Don Tarts on the dim sum cart. Pasteis de Nata is so popular in Portugal that every bakery has their version. Pasteis de Belem is the most famous. They bake over 20,000 of these tarts a day.

What makes these tarts so much better than other international custard offerings? The pastry is thinner and crisper and the filling is usually still hot and creamy from the oven. They are sprinkled with a touch of cinnamon—they are absolutely delicious. Despite there being lots of wonderful freshly made Nata houses in Lisbon, A Padaria Portuguesa and Pasteis de Belem are definitely the best.
 
I’ve watched this recipe made in APP central bakery for years. This is a difficult recipe to make at home, but during this time you should have all the time in the world. I decided to simplify it a little to tailor it to the American kitchen. You’ll find that you already have all the ingredients in your kitchen pantry and refrigerator—they just require a few basics. It is a rather busy recipe and some practice is helpful, but well worth it.
 
Prep time:  1-1/2 hours
Chill time:  2 hours or overnight
Bake time:  25 minutes
Ready In:  4 hours
 
Ingredients
For the laminated dough
1 cup all-purpose flour
1/4 teaspoon kosher salt
1/3 cup cold water
1 stick unsalted butter Plugra (European-style), softened, divided
 
For the syrup
3/4 cup white sugar
1/4 cup water                                                 
1 tablespoon water
1 lemon, zested with a microplane
 
For the custard
1/3 cup all-purpose flour
1/4 teaspoon kosher salt
1-1/2 cups milk
6 large egg yolks
Syrup (from recipe above)
2 teaspoons vanilla extract (optional)
 
Directions
To make the laminated dough
  1. Combine the flour, salt and cold water in a bowl. Mix with a wooden spoon until dough just comes together and pulls away from the sides of the bowl. Dough should be sticky; adjust with more flour or water to achieve a workable dough.
  2. Transfer the dough onto a well-floured surface. Dust a little more flour over the top. Knead for a minute or two to form a round. Cover and let rest for 30 minutes.
  3. Roll the dough into a square about 1/8-inch thick, dusting with flour as necessary; dough will still be sticky.
  4. To make the laminated dough, spread 1/3 of the butter over 2/3 of the square using a spatula, leaving a 1/2-inch border. Flip the unbuttered side over the middle of the square and fold the opposite end over it like a letter. Straighten the edges as needed.
  5. Turn the dough with a bench scraper to unstick it from the counter, dust with flour. Flip and sprinkle more flour on top. Roll dough into a 1/8-inch-thick rectangle, carefully stretching edges as needed. Spread another 1/3 of the butter over 2/3 of the dough. Fold into thirds. Transfer onto a lined baking sheet and freeze until butter is slightly chilled, about 10 to 15 minutes.
  6. Sprinkle the dough with more flour and roll into a square about an 1/8-inch thick. Spread the remaining butter over the dough, leaving a 1- to 1-1/2-inch border on the top edge. Dip your finger in water and lightly moisten the unbuttered edge.
  7. Roll dough into a log starting from the bottom edge. Dust with more flour and smooth over the ends. Wrap the dough log with plastic wrap and refrigerate for at least 2 hours, or overnight.
To make the syrup
  1. Combine the sugar, 1/4 cup plus 1 tablespoon water and lemon zest in a pot. Boil over medium heat, without stirring, until syrup reaches 210° to 215⁰ F. Remove from heat and set aside.
  2. Preheat your oven to 550⁰ F.
  3. Butter a muffin tin.
To make the custard
  1. Whisk the flour, salt and cold milk together in a saucepan. Cook over medium heat, whisking constantly, until milk thickens, about 5 minutes. Remove from heat and let cool for 10 minutes.
  2. When the milk mixture has cooled enough to not scramble the eggs, whisk the egg yolks into the cooled milk one at a time. Add the syrup and vanilla extract. Mix until combined. Strain custard into a Pyrex measuring cup to remove any egg solids.
  3. Unwrap the dough and trim to straighten the uneven ends.
  4. Score the log into 12 equal pieces using a knife or bench scrapper; cut through the dough log.
  5. Place a piece of dough in each muffin cup. Dip your thumb lightly in some cold water. Press thumb into the center of the swirl; push the dough against the bottom and up the sides of the cup until it reaches at least 1/8 inch past the top. Fill each cup 3/4 of the way with custard.
  6. Bake in the preheated oven until the pastry is browned and bubbly, and the tops start to blister and caramelize, about 12 minutes.
  7. Cool tarts briefly; serve warm.

#PasteldeNata #CustardTart #aPadariaPortuguesa #Lisbon #Portugal #QuarantineKitchen #Covid19 #PerspectivesTheConsultingGroup #Dessert

0 Comments
<<Previous
    Picture

    For over 4 decades collaboration and vision have been the cornerstones of our approach to developing innovative solutions. We fuel innovation, uncover opportunities, discover trends and embrace sustainability, turning imaginative ideas into profitable realities.

    We are expert in the following areas: Strategic Planning, Concept and Brand Development, Market Research, Operations Systems Planning, Operations Programming, Menu Planning & Inventory Optimization, Product Development, Training Programs, HACCP / Sanitation / Food Safety, Co-Packer Evaluation & Coordination, Food Processing & Facility Plant Design.

    Categories

    All
    Air Fryer
    Appetizers
    Baking
    Beef
    B'Fast/Brunch
    Chicken
    Cocktails
    Condiments
    Confections
    Dessert
    Dinner
    Entrees
    Gluten Free
    Gluten-Free
    Happy Hour
    Health & Beauty
    Healthy Recipes
    Holiday Recipes
    Instant Pot
    Instant-pot
    Keto
    Kids
    Lunch
    Lunch/Brunch
    Pets
    Pork
    Poultry
    Poulty
    Salads
    Sauces
    Seafood
    Sides
    Snacks
    Soups
    Sous Vide
    Special Edition
    Turkey
    Veal
    Vegetarian

    RSS Feed

    Archives

    February 2025
    January 2025
    December 2024
    November 2024
    October 2024
    September 2024
    August 2024
    July 2024
    June 2024
    May 2024
    April 2024
    March 2024
    February 2024
    January 2024
    December 2023
    November 2023
    October 2023
    September 2023
    August 2023
    July 2023
    June 2023
    May 2023
    April 2023
    March 2023
    February 2023
    January 2023
    December 2022
    November 2022
    October 2022
    September 2022
    August 2022
    July 2022
    June 2022
    May 2022
    April 2022
    March 2022
    February 2022
    January 2022
    December 2021
    November 2021
    October 2021
    September 2021
    August 2021
    July 2021
    June 2021
    May 2021
    April 2021
    March 2021
    February 2021
    January 2021
    December 2020
    November 2020
    October 2020
    September 2020
    August 2020
    July 2020
    June 2020
    May 2020
    April 2020

www.perspectives-la.com
Copyright © 2021 Perspectives/The Consulting Group, LLC  | Henderson, NV 89052 |   310-477-8877
  • Home
    • Who We Serve
    • How We Work
    • Services >
      • Concept Development
      • Strategic Planning
      • Brand Development
      • Operations
      • HACCP / Food Safety
      • Menu / Product Development
      • Marketing / Research
      • Design
      • Market Planning / Site Analysis
  • Why Perspectives?
    • About Us
    • Principals
    • Mission Statement
    • Code of Ethics
  • Clients
    • Testimonials
    • Client List
  • Contact Us
    • Phone, Address & Contact
  • Covid-19 Survival Guide
  • Perspectives On Food