…from the Perspectives’ Kitchen How you doin’? Grilled steak is one of summer’s most effortless meals, and my recipe has the perfect balance of smoky char and herbal brightness. I marinate a tri-tip in tamari, toasted whole coriander and cumin and lots of lime. I like the rich, fermented soy and earthy cumin combination that brings out the savory meatiness defining this cut of steak. The acid from the lime brightens things up and tenderizes the meat so it cooks up juicy with a buttery texture.
I also grind up some of the toasted coriander and cumin seeds to make a rub for the steaks. On the grill, the tamari and spices char up, creating a lovely crust on the steak. It seals in the meat’s juices and flavor, but it also adds some great texture and a warm counterpoint to the chimichurri. My chimichurri is made with cilantro, garlic, shallots, fresh red jalapeño, lime and a little honey. It’s a departure from the classic Argentinian recipe, but it’s got all the herb-acid-heat you’d expect, and it adds the perfect touch of super zippy and refreshing flavors. Prep Time: 10-15 minutes Marinade time: 4-12 hours Grilled time: 25-30 minutes Dwell time: 10 minutes Yield: 4 to 6 servings Ingredients For the steak 2 tablespoons coriander seeds 1 tablespoon cumin seeds 2 tablespoons freshly squeezed lime juice 2 tablespoons low-sodium tamari 1/3 cup extra virgin olive oil 3 pounds prime tri-tip 1 teaspoon kosher salt 1/2 teaspoon freshly ground black pepper 1 tablespoon peanut oil, for brushing For the lime chimichurri 1-1/2 cups finely chopped fresh cilantro, 1 tablespoon minced shallot 1 stemmed, seeded, and minced red jalapeño 1 tablespoon grated or pressed garlic 2 tablespoons freshly squeezed lime juice 1/4 teaspoon honey 1/2 cup extra virgin olive oil Directions
ChefSecret: This steak recipe makes one of the best steak salads with sliced grape tomatoes, cucumber, avocado and torn lettuce. Use the leftover chimichurri marinade as a salad dressing. Be sure to boil the dressing and cool it before reusing. Quip of the Day: Q. Which hand do you use to cut your steak? A. Neither, you use a knife. ------------------------------------------- Do you have a question or comment? Send your thoughts to [email protected]. All recipes and cooking tips are posted on our website https://www.perspectives-la.com/covid-19-survival-guide. ------------------------------------------- To you and everyone dear to you, be strong, positive, stay well, stay safe and be kind. Take a breath and count your blessings, and if you have a little extra to share with others, please consider donating to Feeding America, Tunnel to Towers, Union Rescue Mission and/or American Red Cross. #Entree #Dinner #TriTip #Cumin #Chimichurri #GrilledTriTip #CutAgainstTheGrain #2024Recipes #URM #T2T #FeedingAmerica #RedCross #PerspectivesTheConsultingGroup ©PERSPECTIVES/The Consulting Group, LLC, 2024
0 Comments
…from the Perspectives’ Kitchen How you doin’? Summertime is grillin’ time and there is nothing quite as wonderful as a beautifully grilled, flame-kissed ribeye steak.
Why is it that many of the simplest dishes are the most feared? This is especially true if the goal of the dish is to transform a single ingredient, like poached eggs, whipped cream or, yes, even a grilled steak. All these dishes lean on unique techniques and the right timing, which can feel mysterious until you’ve gotten the hang of it. Grilled steak can be even more intimidating because there’s a grill, fire and the expense of a great piece of meat involved. A really nice cut of steak can cost big bucks. To my taste there’s really no substitute for the flavor you get from grilling steak. And once you get the hang of it, grilled steak is one of the quickest, easiest meals around. It’s practically a convenience food. It’s also one of the most satisfying dinners to make. Nothing beats the primal joy that comes with pulling a perfectly seared, tender, juicy ribeye off the grill. So, here are couple of my tips to turn you into a grilling professional. Temper time: 1 hour before grilling Prep time: 5 minutes Grill time: 10 to 12 minutes Rest time: 5 minutes Yield: 1 serving Ingredients 1-1/2- to 2-inch thick ribeye steak Salt and pepper to taste More to learn in the ChefSecret below Directions
ChefSecret: You can substitute the salt and pepper with Montreal Seasoning for a well-rounded flavor. I like to glaze the ribeye with balsamic vinegar when I take it out of the refrigerator for perfect grill marks and a touch of sweetness. Quip of the Day: I’ve got beef with anyone who doesn’t appreciate a good ribeye steak. ------------------------------------------- Do you have a question or comment? Send your thoughts to [email protected]. All recipes and cooking tips are posted on our website https://www.perspectives-la.com/covid-19-survival-guide. ------------------------------------------- To you and everyone dear to you, be strong, positive, stay well, stay safe and be kind. Take a breath and count your blessings, and if you have a little extra to share with others, please consider donating to Feeding America, Tunnel to Towers, Union Rescue Mission and/or American Red Cross. #Entree #Dinner #Grill #SteakOnTheGrill #Ribeye #FlameKissed #DontFearTheFlame #2024Recipes #URM #T2T #FeedingAmerica #RedCross #PerspectivesTheConsultingGroup ©PERSPECTIVES/The Consulting Group, LLC, 2024 …from the Perspectives’ Kitchen How you doin’? I love messy, exotic-sounding foods so I look for appetizing ideas and add my own spin on them.
Picadillos are a favorite in the Philippines and some Latin American countries. Lot of ingredients produce lots of flavor thrills. Its popularity is based on a satisfying mélange of flavor and textures. With hearty ground beef, juicy chunks of tomatoes, peanuts, olives and sweet, rum-pumped raisins, there’s a little different flavor and texture in every single bite. Spicy chorizo adds a modest heat level, and a warm blend of spices—cinnamon, cloves, cumin and nutmeg—gives the whole thing a deep, well-rounded flavor. The only thing left is to garnish with some chopped cilantro and serve in corn tortillas or atop your favorite rice. Prep time: 15 minutes Cook time: 1 hour Yield: 6 servings Ingredients 2 tablespoons extra virgin olive oil 2 cups medium diced sweet yellow onions 3 ounces diced Spanish hard chorizo 6 tablespoons minced garlic cloves 1 pound 80/20 ground beef 1/2 pound ground pork 1/2 teaspoon kosher salt or to taste 1/4 teaspoon freshly ground black pepper or to taste 1 28-oz can whole peeled tomatoes, crushed drained and 2 tablespoons red wine vinegar 1 tablespoon balsamic vinegar 1 tablespoon ground cinnamon 2 teaspoons ground cumin 2 bay leaves 1/8 teaspoon ground cloves 1/8 teaspoon ground nutmeg 1/4 cup roasted peanuts 2/3 cup plump raisins soaked in 1/3 cup rum 2/3 cup pimento stuffed olives 1/2 cup chopped cilantro, for garnish 6-8 corn warmed tortillas, for serving Directions
ChefSecret: Potatoes, peas and carrots are also popular ingredients. Store leftovers refrigerated in an airtight container for up to 4 days. Quip of the Day: Q: What do you call a peanut riddle that is easy to crack? A: A brittle… a peanut brittle. ------------------------------------------- Do you have a question or comment? Send your thoughts to [email protected]. All recipes and cooking tips are posted on our website https://www.perspectives-la.com/covid-19-survival-guide. ------------------------------------------- To you and everyone dear to you, be strong, positive, stay well, stay safe and be kind. Take a breath and count your blessings, and if you have a little extra to share with others, please consider donating to Feeding America, Tunnel to Towers, Union Rescue Mission and/or American Red Cross. #Entree #Dinner #PeanutPicadillo #Chorizo #Beef #RumRaisins #Peanuts #NPB #NationalPeanutBoard #Olives #2024Recipes #URM #T2T #FeedingAmerica #RedCross #PerspectivesTheConsultingGroup ©PERSPECTIVES/The Consulting Group, LLC, 2024 Ancient Scrolls from Almost 2,000 Years Ago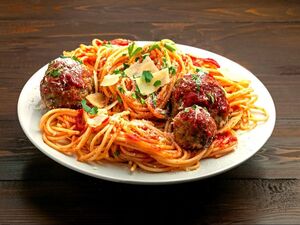 How you doin’? In my last book I talked about the importance to mankind of food and drink to culture.
“The Anthropology of Man Can Be Traced More Accurately Through the Foods & Beverages Of Time Rather Than Just The Richness Of Art, The Prose Of Literature, The Rhythm Of Music Or The Structure Of Architecture.” Well, listen up… an ancient scroll from almost 2,000 years ago has finally been decoded. Quite the step up from the bits of hieroglyphics we ‘learned’ in high school Ancient Egypt classes, this task needed the help of artificial intelligence (AI) to be worked out. The Herculaneum papyri are made up of about 1,800 scrolls and ended up buried in ash after Mount Vesuvius erupted in 79AD. These scrolls were excavated from an ancient Roman villa, but it’s been an absolute slog trying to unroll and read them. So, the Vesuvius Challenge was set up in March 2023 to try and decode them, offering a mega prize pot of $1million to crack the code. Papyrologists (yes, they’re a real thing) worked with the contest, believing the Roman scroll contains ‘never-before-seen text from antiquity’. Might it be politics, religion, pros, poetry or maybe something else? Three students managed to read 15 columns in a scroll, helped out by AI-powered coding machines. Youssef Nader in Germany, Luke Farritor in the US, and Julian Schilliger in Switzerland will get to share the $700,000 prize money after managing to read over 2,000 letters. Nat Friedman is one of the challenge’s organizers and TIME reports that after printing out the winning submission he said: “All this has been in this dreamlike digital world in my imagination before. Seeing it on paper, rolling it up, it just made it so tangible.” This winning submission totals four passages, each of 140 characters. TIME explains: “With at least 85% of the characters in each of those passages recoverable by professional papyrologists. It also contains a further 11 columns of text.” The text in question is a piece of Epicurean philosophy on the subject of cuisine pleasure… that’s right, Epicurean philosophy! The winning submission shows ancient Greek letters on a large patch of scroll, and the author seems to be discussing the question: are things that are scarce more pleasurable as a result? The scrolls were excavated from an ancient Roman villa, Herculaneum. The author, whose identity is unconfirmed, doesn’t think so: “As too in the case of food, we do not right away believe things that are scarce to be absolutely more pleasant than those which are abundant,” one passage from the scroll reads. In the final section of the scroll, the author appears to criticize his intellectual adversaries, who 'have nothing to say about pleasure, either in general or in particular, when it is a question of definition'. Professor Alice Roberts dubbed this discovery ‘the archaeological discovery of my lifetime’. Although, there is yet a whole load to be discovered with the combined efforts of the Vesuvius Challenge resulting in about five percent of one scroll being read. And the contest confirmed on X: "In 2024, our goal is to from reading a few passages of text to entire scrolls, and we're announcing a new $100,000 grand prize for the first team that is able to read at least 90% of all four scrolls that we have scanned." So, what might they have discovered—a recipe for spiced, Roman-Style Meat Balls? Roman Meatballs with Pompeiian Tomato Sauce Prep time: 25 minutes Cook time: 40 minutes Total time: 1 hour 5 minutes Ingredients For the meatballs 1/2-pound lean ground beef 1/2-pound ground pork 1 cup Italian seasoned breadcrumbs 1/2 cup Italian grated Parmesan cheese 2 tablespoons fresh chopped Italian parsley 4 cloves minced garlic 2 large eggs, lightly beaten 1 teaspoon kosher salt 1/2 teaspoon black pepper olive oil (for browning the meatballs) For the sauce 1/2 cup virgin olive oil 1 medium finely diced yellow onion 4 cloves garlic, whole 1-28-ounce can of San Marzano Italian-style tomatoes (imported from Italy) 1-28-ounce can of tomato purée 3 tablespoons freshly chopped Italian parsley 2 teaspoons dried thyme kosher salt to own taste fresh ground black pepper to own taste Accompaniments 1-pound dried spaghetti extra chopped parsley for serving Fresh basil added options red pepper flakes for serving grated Pecorino Romano Directions To make the meatballs
To put it all together
Chefs Secret: No need to add olive oil to the drained pasta… you’ll just end up with unnecessarily oily pasta. Quip of the Day: After a long day of conquering, Julius Caesar liked to unwind with a nice Roman-ade. ------------------------------------------- Do you have a question or comment? Send your thoughts to [email protected]. All recipes and cooking tips are posted on our website https://www.perspectives-la.com/covid-19-survival-guide. ------------------------------------------- To you and everyone dear to you, be strong, positive, stay well, stay safe and be kind. Take a breath and count your blessings, and if you have a little extra to share with others, please consider donating to Feeding America, Tunnel to Towers, Union Rescue Mission and/or American Red Cross. #Entree #RomanMeatballs #SpaghettiAndMeatballs #PompeiianTomatoSauce #HerculaneumPapyri #Dinner #2024Recipes #URM #T2T #FeedingAmerica #RedCross #PerspectivesTheConsultingGroup ©PERSPECTIVES/The Consulting Group, LLC, 2024 …from the Perspectives’ Kitchen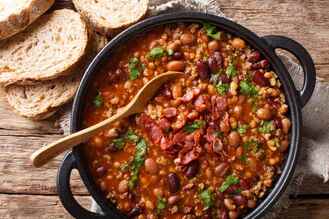 How you doin’? It’s the Big Game weekend, you’ve got a crowd coming over for a watch party and you need a big bowl of something good to serve. How ‘bout a big pot of Texas Cowboy Stew? Not those Cowboys, obviously, though they do know how make perfect all-weather, all-sport entree. Texas Cowboy Stew is a hearty, filling meal you’ll be gobbling down on all winter long.
My classic stew recipe is made extra satisfying with the addition of both ground beef (80/20) and kielbasa sausage and also uses several canned goods for added convenience. It’s spiced with a blend of chili powder, cumin, and black pepper for savory heat. After all, what would a ‘cowboy’ recipe be without a swift kick in the ass? Texas Cowboy stew is a robust, old-fashioned campfire stew. It is traditionally a tomato-based medley of meat, beans and potatoes cooked in a large pot over an open fire. It’s the type of dish that was born out of necessity, but also one that provides ample comfort after a long day of sitting in a saddle or that favorite spot on the couch. Luckily, we live with modern kitchen comforts, so you can swap the campfire for an Instant Pot or a Crock-Pot. Chili and stew recipes are merely suggestions. You have a ratio of meats and vegetables, and you can make it your own using whatever you have on hand. Swap in leeks for onions, fresh or frozen corn for canned or ground turkey for beef. You can even top it with shredded cheese for extra richness. It's quick and easy to make on the stovetop but tastes best when simmered all day in a crockpot or slow cooker. Serve with cornbread and a simple green salad. Prep time: 25 minutes Cook time: 1 hour 15 minutes Yield: 8-10 servings Ingredients 2 pounds ground beef (80/20) 2 pounds kielbasa sausage, sliced into 1/2 inch pieces 1 cup chopped red onion 3 tablespoons chopped garlic 2 cups water 1 16-ounce bottle beer 2 (15.2 ounce) cans whole kernel corn, with liquid 2 (15 ounce) cans pinto beans, with liquid 2 (14.5 ounce) cans peeled and diced tomatoes, drained 1 (10-ounce) can Rotel diced tomatoes, with liquid 4 medium baking potatoes, peeled and diced 2 teaspoons ground cumin 2 teaspoons chili powder 1 tablespoon kosher salt 1 teaspoon ground black pepper 1 tablespoon all-purpose flour flat leaf parsley for garnish Directions
ChefSecret: You can make this dish faster in an Instant Pot or slower in a Crock Pot. Quip of the Day: Q. Why do cowboys always ride horses? A. Because they’re far too heavy to carry! ------------------------------------------- Do you have a question or comment? Send your thoughts to [email protected]. All recipes and cooking tips are posted on our website https://www.perspectives-la.com/covid-19-survival-guide. ------------------------------------------- To you and everyone dear to you, be strong, positive, stay well, stay safe and be kind. Take a breath and count your blessings, and if you have a little extra to share with others, please consider donating to Feeding America, Tunnel to Towers, Union Rescue Mission and/or American Red Cross. #Entree #TexasCowboyStew #BigGameChili #Beef #Sausage #Beer #Dinner #2024Recipes #URM #T2T #FeedingAmerica #RedCross #PerspectivesTheConsultingGroup ©PERSPECTIVES/The Consulting Group, LLC, 2024 |

For over 4 decades collaboration and vision have been the cornerstones of our approach to developing innovative solutions. We fuel innovation, uncover opportunities, discover trends and embrace sustainability, turning imaginative ideas into profitable realities. Categories
All
Archives
July 2024
|
 RSS Feed
www.perspectives-la.com
Copyright © 2021 Perspectives/The Consulting Group, LLC | Henderson, NV 89052 | 310-477-8877
Copyright © 2021 Perspectives/The Consulting Group, LLC | Henderson, NV 89052 | 310-477-8877