…from the Perspectives’ Kitchen How you doin’? I like S'mores but don’t often find myself in the wild sitting by an open campfire and I don’t have a fire pit. So here is an easy indoors recipe made in a bowl with a microwave oven.
This recipe uses all the essential ingredients—milk chocolate, crumbled graham crackers and miniature marshmallows. It looks so good you'll want to grab a spoon and dig in as soon as you see how good a Bowl of S’mores looks. This is an easy, beginner-friendly recipe that takes just three minutes to prepare and requires only three ingredients. Aside from the three ingredients, you will need a microwave safe bowl and a microwave. You’ll have mini desserts in a bowl in no time for your next indoor bed spread picnic or a fun summer dessert. Everyone will be thrilled and surprised. Prep time: About 3 minutes Yield: 1 serving Ingredients 1 full-size graham cracker sheet 1/2 milk chocolate bar (I prefer Hershey's Milk Chocolate) 15 miniature marshmallows (I prefer Kraft Puffed Minis) Directions
ChefSecret: Try doing it in a cone. Follow the mixing directions above and stuff the uncooked ingredients in a waffle cone. Microwave on high for 20 to 30 seconds. Wrap in a napkin and serve. No campfire required to make melty S'mores in a Cone. Quip of the Day: I’m on a S’mores diet. Whenever I see S’mores, I eat them. ------------------------------------------- Do you have a question or comment? Send your favorite recipes, pictures or thoughts to [email protected]. Recipes and cooking tips are posted on our website https://www.perspectives-la.com/covid-19-survival-guide. ------------------------------------------- To you and everyone dear to you, be strong, positive, stay well, stay safe and be kind. Take a breath and count your blessings, and if you have a little extra to share with others, please consider donating to Feeding America, Tunnel to Towers, Union Rescue Mission and/or American Red Cross. #Dessert #Snack #Smores #BowlOfSmores #Chocolate #GrahamCracker #MiniMarshmallows #4thOfJuly #2024Recipes #T2T #URM #FeedingAmerica #RedCross #PerspectivesTheConsultingGroup ©PERSPECTIVES/The Consulting Group, LLC, 2024
0 Comments
…from the Perspectives’ Kitchen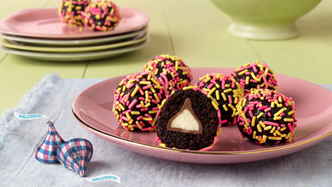 credit: Hershey's credit: Hershey's This Valentine’s Surprise Brownie Kiss Truffles recipe is easy to make and easier to love. With fudgy brownie on the outside and Hershey’s Kisses Vanilla Frosting on the inside.
The candy hidden on the inside will surprise your guests and even yourself with how delicious they are. Bookmark this recipe because you can customize every batch with your favorite toppings like seasonal sprinkles, coconut flakes or chopped nuts. You can also use another flavored Kiss to make every bite a surprise. Prep time: 25 minutes Bake time: 35 minutes Cool time: 2 hours Yield: 36 truffles Ingredients 1 pan fudgy brownie from mix or your favorite brownies recipe (13 x 9 x 2-inch) 36 Hershey's Kisses Vanilla Frosting Filled Milk Chocolates 1 cup roasted finely chopped nuts of your choice, lightly toasted sweetened coconut flakes, sprinkles or nonpareils for rolling. Directions
ChefSecret: You can mix up your flavor of Kisses and the crumbles coating the outside of your truffle to suit any holiday or celebration or just your own whims. Storage: Store truffles in a closed container in your refrigerator for up to 7 days. Quip of the Day: Let’s seal our love with a Hershey’s Kiss. ------------------------------------------- Do you have a question or comment? Send your thoughts to [email protected]. All recipes and cooking tips are posted on our website https://www.perspectives-la.com/covid-19-survival-guide. ------------------------------------------- To you and everyone dear to you, be strong, positive, stay well, stay safe and be kind. Take a breath and count your blessings, and if you have a little extra to share with others, please consider donating to Feeding America, Tunnel to Towers, Union Rescue Mission and/or American Red Cross. #ValentinesSurprise #BrownieKissTruffles #Hershey #BrownieTruffles #HappyValentinesDay #2024 #T2T #URM #FeedingAmerica #RedCross #PerspectivesTheConsultingGroup ©PERSPECTIVES/The Consulting Group, LLC, 2024 …from the Perspectives’ Kitchen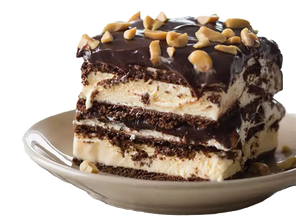 How you doin’? This is an incredibly fun, easy, rich and satisfying ice cream dessert. All your friends and family will be screaming about this after dinner surprise. “I scream, you scream, we all scream for ice cream made with store-bought ice cream sandwiches and a jar of hot fudge sauce—well, maybe a few more ingredients that you may already have in your kitchen.
I used to love to munch on ice cream sandwiches and, to this day I can’t resist a bowl of ice cream. It’s gotten so bad that I can’t keep a container of Ben & Jerry’s in my freezer—B&J’s being my favorite ice cream. I know they’ve gotten a little commercial being owned by Unilever (a British multi-national company), but they have kept the quality up on all their legacy flavors. When our R&D team was in South Burlington, VT we all went to the factory. While we missed the last tour, we did get a free triple scoop. Make this great dessert recipe a day or two before you need it and freeze it. No need to slack this out, it can be enjoyed immediately or devoured straight from the freezer if you really lack self-control! It's a perfect game-day dessert. Prep time: 30 minutes Cook time: 2 minutes Freeze time: 1 hour 30 minutes or overnight Ingredients 16 ounces hot fudge topping, (I used Mrs. Richardson’s Hot Fudge for this recipe) 1/4 cup whipping cream 3/4 cup peanut butter (smooth or chunky) (I prefer Skippy) 19 ice cream sandwiches (store bought) 12 ounces frozen whipped topping, thawed 4 ounces additional hot fudge for topping (optional) 1 cup chopped salted peanuts (I only use US-grown peanuts) Directions
ChefSecret: If you decide to use Hershey’s Hot Fudge, do not add the cream—use straight out of the container. Quip of the Day: A gorilla walks into a restaurant and sits down at a booth. A waitress comes over to take his order. He orders an ice cream sundae. The waitress goes back into the kitchen, gets an ice cream sundae and takes it to his table. The gorilla eats the whole sundae and then motions to the waitress for the check. The waitress comes over, gives him the bill and remarks “we don’t get a lot of gorillas coming in here”. The Gorilla replies “After charging $15 for an ice cream sundae, I’m not surprised.” ------------------------------------------- Do you have a question or comment? Do you want to share a with our readers? Send your favorite recipes, pictures or thoughts to [email protected]. Recipes and cooking tips are posted on our website https://www.perspectives-la.com/covid-19-survival-guide. ------------------------------------------- To you and everyone dear to you, be strong, positive, stay well, stay safe and be kind. Take a breath and count your blessings, and if you have a little extra to share with others, please consider donating to Feeding America, Tunnel to Towers, Union Rescue Mission and/or American Red Cross. #Dessert #HotFudgeIceCreamBar #HotFudge #IceCreamBars #Ben&Jerrys #MrsRichardsons #Peanuts #NPB #2024 #T2T #URM #FeedingAmerica #RedCross #PerspectivesTheConsultingGroup ©PERSPECTIVES/The Consulting Group, LLC, 2024 …from the Perspectives’ Kitchen 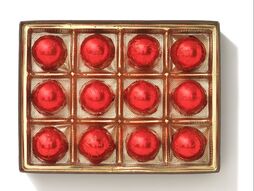 How you doin’? Whether or not you’re a big fan of chocolate-covered cherries, or cherry cordials, you have to admit they have a special place in the pantheon of the gods of chocolate candies. They are unremittingly sweet and gooey and have that liquid stuff in the middle that is messy, fun and sort of mysterious.
If you’re looking to make a BIG impression this coming Valentine’s Day, impress your true love with a gift from your heart and your hands… Dark Chocolate Liquid Cherry Cordials. This unique chocolate is famous for its liquid center. I’ll bet you have been wondering for years how chocolatiers get all that liquid goodness in the center of a chocolate truffle. I can tell you this… they are not injected. You can purchase dome shaped molds on Amazon and other websites. They are inexpensive and they hold up very well for many Valentine’s Days, Mother’s days and Christmases to come. I use a good quality dark chocolate, but you can use milk or white chocolate if you prefer. Better yet, why not make a nice assortment of all three chocolates? NOTE: You will need to start making your liquid cherry cordials about a month ahead of when you are planning to give them as it takes a few weeks to allow the Sugar Fondant to begin to evolve into a liquid. This recipe requires a little practice to get your technique perfected. So, it’s never too early to start and anyway, even the rejects still taste great. For best results weigh out the truffle elements in grams. Read All Instructions Completely Before Beginning Do Not Take Short Cuts—Think Quality Prep time: 1 to 1-1/2 hours Cool time: 1-1/2 hours Dwell time: about 2-4 weeks Yield: 36-48 truffles Ingredients (These amounts are per truffle; multiply them based on the number of truffles you wish to make. For best results weigh out the truffle elements in grams.) 3.50 grams tempered dark chocolate, (I prefer Guittard Dark Chocolate) 1 whole stemless Maraschino cherry 4.00 grams sugar fondant (recipe below) 1.50 grams tempered dark chocolate Directions
Sugar Fondant Ingredients 7.00 ounces confectioners’ sugar, sifted 1-1/2 ounces room temperature unsalted butter 1-1/2 ounces light corn syrup (I prefer Karo) Directions
ChefSecret: You need to prepare the truffles about 3 to 4 weeks ahead of the time you’re planning to give them as gifts. Quip of the Day: Put “eat chocolate” at the top of your list of things to do today. That way, at least, you’ll get one thing done! ------------------------------------------- Do you have a question or comment? Send your thoughts to[email protected]. All recipes and cooking tips are posted on our website https://www.perspectives-la.com/covid-19-survival-guide. ------------------------------------------- To you and everyone dear to you, be strong, positive, stay well, stay safe and be kind. Take a breath and count your blessings, and if you have a little extra to share with others, please consider donating to Feeding America, Tunnel to Towers, Union Rescue Mission and/or American Red Cross. #Confection #Chocolate #DarkChocolate #CherryCordials #Guittard #Truffles #ValentinesDay #2024Recipes #URM #T2T #FeedingAmerica #RedCross #PerspectivesTheConsultingGroup ©PERSPECTIVES/The Consulting Group, LLC, 2024 |

For over 4 decades collaboration and vision have been the cornerstones of our approach to developing innovative solutions. We fuel innovation, uncover opportunities, discover trends and embrace sustainability, turning imaginative ideas into profitable realities. Categories
All
Archives
July 2024
|
 RSS Feed
www.perspectives-la.com
Copyright © 2021 Perspectives/The Consulting Group, LLC | Henderson, NV 89052 | 310-477-8877
Copyright © 2021 Perspectives/The Consulting Group, LLC | Henderson, NV 89052 | 310-477-8877