… from the Happy Hour Bar  How you doin’? It’s Friday and time for another Home Happy Hour Cocktail. The Ruby Red Pink Grapefruit Martini is a wonderful refreshing cocktail with a slightly tart edge.
When I was first hired as a consultant to the original Hollywood Brown Derby, Sally Cobb was trying to give me a crash history lesson into everything “Brown Derbish.” We started in the cocktail lounge when the bartender handed me a namesake drink—the Brown Derby. I asked Sally what it was and she insisted, “Try it, you’ll like it—then I’ll tell you.” I first took a sip but then dove in. It was intriguing and satisfying. I felt the tartness of the grapefruit hit my tongue, with a slight burn from the bourbon that gently gave way to a smooth honeyed heat that lingered long after. It was good, very good. I asked again what it was I was drinking and she replied, “The Brown Derby.” It’s interesting how some drinks become so entrenched in cocktail lore. Bartenders everywhere are mixing, shaking and stirring up living history every night, many from decades passed. The Brown Derby is one of those cocktails. While the original was a combination of bourbon, grapefruit and honey, history tells us that this particular cocktail was invented at the Vendome Club in Hollywood in the early 1930’s and was named after the famous hat-shaped restaurant on Wilshire Boulevard—The Brown Derby, of course. In those days, the Brown Derby was a popular celebrity hangout, the place to be and be seen. A place where actors came in still wearing today’s on-camera make-up. Regardless of the cocktail’s origins it’s a classic worth re-visiting. The bourbon merges nicely with the honeyed grapefruit base giving the drink depth and structure. The beauty of this drink is in its simplicity, no fancy liqueurs or hard-to-find ingredients, just pure clean flavors. But wait! I decided to mix it up a bit and try whiter liquors and gave both vodka and gin a shot. I mixed up a kind of Brown Derby cocktail last week that only makes me wonder why it took me so long. I do declare, this pretty-in-pink cocktail is sophisticated and refreshing. Yes, real men do, Drink Pink! Prep time: 5 minutes Yield: 2 drinks Ingredients 5 ounces gin or vodka (neutral-flavored) 2 tablespoons freshly-squeezed Ruby Red grapefruit juice 3/4 tablespoon honey 1/2 tablespoon vermouth 1 teaspoon freshly squeezed lemon juice Garnish with a couple of pink grapefruit wedges Directions
ChefSecret: You can also make this drink poured over ice cubes served in a rocks glass. Covid-19 Quip of the Day: I visited a monastery last Sunday. As I walked by the kitchen, I saw a man frying chips. I asked him, “are you the friar?” He replied, “No I’m the chip monk!” ------------------------------------------- Do you have a question or comment? Do you want to share a favorite recipe or pictures with our readers? Send your thoughts to [email protected]. All recipes and cooking tips are posted on our website https://www.perspectives-la.com/covid-19-survival-guide. ------------------------------------------- To you and everyone dear to you, be strong and positive, stay well and safe and be kind to others. If you have a little extra in your pockets to share with others at this difficult time, please consider donating to Feeding America. Thanks for reading. #Cocktail #HappyHour #Vodka #Gin #Martini #Grapefruit #RubyRedGrapefruit #Cheers #QuarantineKitchen #Covid19 #FeedingAmerica #PerspectivesTheConsultingGroup ©Perspectives/The Consulting Group, Inc., 2021
0 Comments
… from the California Kitchen 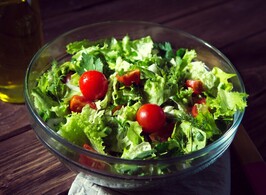 How you doin’? It's not all that difficult to make a salad. We'd be lying if we told you otherwise. There are ways it can go wrong, but we’ll have more on that in the ChefSecret below.
Just because it's easy doesn't mean you're making the best salad every time. It's not enough to make a decent salad—that’s just lettuce, tomato and a little dressing—I want you to make the best damn salad all the time. That's why I gathered all of my best salad dressing recipes to help you come up with fool-proof salad solutions every time. Good salads are a composite of many things, but they all finish off with a great salad dressing—here’s what you need to know along with recipes for some of the best darn dressings. These dressing recipes come from my restaurants and are so easy to make. You’ll never want to buy a store-bought dressing again. Here's what every salad needs:
Avocado Dressing I’ve found that very few avocado dressings have a lot of flavor. If you’re depending on the avocado fruit alone remember that it is very oily—good oil—but not so much in the flavor department. You’re going to have to depend on all the other ingredients to bring out the natural flavor of the avocado. By the way with Avocado Dressing, more avocado doesn’t make it better. Prep time: 10 minutes Yield: 1-1/2 cups Chill time: 4 to 8 hours Ingredients 1 avocado, peeled and pitted 1/2 cup plain yogurt 1/4 cup extra-virgin olive oil 3 tablespoons lemon juice 2 tablespoons minced garlic 1 teaspoon sea salt 1/4 teaspoon hot pepper sauce 1/8 teaspoon ground black pepper Directions
ChefSecret: Make the Avocado Dressing even “sexier” by adding a tablespoon or two of chopped avocado on the top of the dressed greens. You can use light olive oil or Canola oil to replace the EVOO, if desired. My Best Caesar Salad Dressing I have been serving Caesar Salads in my restaurants for years using this made-on-premise dressing. It’s really quite easy and I think it’s the best Caesar Dressing ever. Of course, you don’t have to limit the use of this dressing to just a traditional Caesar Salad—it’s great on any green salad and even makes a nifty chicken marinade as well. Due to food safety concerns, I always suggest using pasteurized egg yolks which can be purchased in your local supermarket. However, it is easy to pasteurize eggs in your own kitchen—check out the ChefSecret at the end of this recipe. Some people are a bit squeamish about using anchovies. They don’t like to open the tin and touch those slimy little things. Anchovies add that earthy, sweet, salty and umami flavor that cannot be found anywhere else. I keep of tube of anchovy paste in the refrigerator so I always have it on hand. I also add a couple of anchovy filets on top of the Caesar Salad, but that’s a personal option. If you are serving a Chicken Caesar Salad leave off the anchovies. Prep time: 10 minutes Chill time: 4 to 8 hours Yield: 10 servings Ingredients 1 cup mayonnaise 1/4 cup pasteurized egg yolks (see procedure for pasteurized eggs or egg substitute) 1/4 cup freshly grated Parmesan cheese 2 tablespoons cold water 3 tablespoons minced garlic 1-1/2 tablespoons fresh lemon juice 1 tablespoon anchovy paste (from a tube) 2 teaspoons granulated sugar 1/2 teaspoon dried parsley salt and ground black pepper to taste Directions
ChefSecret: Avoid using raw or uncooked eggs in any of your recipes. It’s really easy and very important to pasteurize eggs correctly. Here’s how:
Green Goddess Dressing Sorta like you remember it from the 1970's, if you’re that old. According to food historians, chef Philip Roemer of the Palace Hotel in San Francisco invented the first Goddess Salad Dressing in 1923 to honor actor George Arliss, who was staying in the hotel while he starred in a play called “The Green Goddess.” If you’ve never seen the play or the silent film that followed, it’s no surprise, as the plot is rife with politically incorrect stereotypes that might not sit well with today’s audiences. It’s generally assumed that Roemer’s Green Goddess salad dressing was inspired by a sauce served to Louis XIII, not over salad greens but with giant smoked or grilled eels. To guests at the Palace Hotel in the 1920s it wasn’t quite that exotic. They enjoyed the dressing ladled over canned artichoke, a luxury at the time. In the 1960s, a bottled version made by Lawry’s Foods (prime rib fame) appeared on grocery store shelves and in the 1980s, it was offered at most self-serve salad bars. In newspaper articles on the subject, Green Goddess dressing has gone in and out of favor throughout the years, evolving from a mayonnaise-centric original recipe into something lighter and brighter. Chefs have added more herbs, reduced or eliminated the mayonnaise, incorporated avocado and featured surprising flavor elements like curry powder. Give my original recipe a try and then gussy it up with whatever works best for you. Prep: 15 minutes Chill time: 4 to 8 hours Yield: 6 servings Ingredients 1 avocado, peeled and pitted 1 cup mayonnaise 5 anchovy filets, rinsed and chopped or 8 tablespoons anchovy paste 2 tablespoons chopped green onion 1 tablespoon lemon juice 1 tablespoon chopped garlic 1 teaspoon granulated sugar 1 teaspoon curry powder salt and pepper to taste Directions
Balsamic Vinaigrette The same country that brought you such notable artists as Michelangelo and Leonardo da Vinci as part of the Renaissance also provides a culinary artistry that offers incomparable quality and taste—the wonderfully adaptable aged balsamic vinegar, aceto balsamico di Modena. Balsamic vinegar can only be produced in the regions of Modena and Reggio in Italy. The first historical reference to balsamic vinegar dates to 1046, when a bottle of balsamic vinegar was reportedly given to Emperor Enrico III of Franconia as a gift. In the Middle Ages, it was used as a disinfectant. It also had a reputation as a miracle cure, good for everything from sore throats to labor pains. Balsamic vinegar is an aged reduction of sweet white grapes (Trebbiano for red and Spergola for white sauvignon) that are boiled to a syrup. The grapes are cooked very slowly in copper cauldrons over an open flame until the water content is reduced by over 50%. The resulting “must” is placed into wooden barrels and an older balsamic vinegar is added to assist in the acetification. Each year the vinegar is transferred to different wood barrels so that the vinegar can obtain some of the flavors of the different woods. The only approved woods are oak, cherry, chestnut, mulberry, acacia, juniper, and ash. The age of the vinegar is divided into young – from 3 to 5 years maturation; middle aged – 6 to 12 years; and the highly prized very old which is at least 12 years and up to 150 years old (tastes like gold—costs like gold). I use a young balsamic vinegar to make this tangy vinaigrette. It is wonderful on mixed greens, tomato, onion and cucumber salads. It's also good if used sparingly over steamed veggies or stir-fries. Sometimes I use balsamic vinegar to marinate steaks or chicken as well. If you’re looking for authentic balsamic vinegar make sure to read the ingredient declaration and source of origin as over 90% of the balsamic on the shelves in the United States is not the genuine, undiluted article. Prep time: 10 minutes Chill time: 1 hours Yield: 1 cup (about 6 servings) Ingredients 1/2 cup extra virgin olive oil 1/2 cup white or dark balsamic vinegar 2 tablespoons crushed garlic 2 tablespoons dry parsley 1 teaspoon chiffonade cut fresh basil 1 teaspoon ground mustard 1/2 teaspoon kosher salt 1/4 teaspoon freshly cracked black pepper Directions
Creamy / Chunky Blue Cheese Dressing Blue Cheese Dressing has a very murky origin story. It has been suggested that it originated in France, but that’s highly unlikely. The French prefer lighter vinaigrette-style dressings on their salads. It’s doubtful that putting cheese in their salads would even occur to the French--Mon Dieu--sacrilège! Blue moldy cheeses have been in America since at least the Revolution where that well-noted Francophile, Thomas Jefferson, enjoyed it at his dinner table. The first recorded evidence of Blue Cheese, or Roquefort Dressing as we’ve come to know it, was in the Edgewater Hotel Salad Book in 1928. An earlier version of the dressing appears in the Fannie Farmer’s 1918 Cookbook. By the 1930’s the dressing had spread in popularity not only through Fannie Farmer, but also through Irma Rombauer’s ubiquitous book, The Joy of Cooking. Another possibility is Oscar (Oscar of the Waldorf) Tschirky introduced the dressing to patrons of the Waldorf Hotel in New York via his boss, George Boldt, who was served the dressing while on a boat tour in the Thousand Islands in upstate New York. Maybe that was also the origin of Thousand Island Dressing. Who knows for sure? Regardless of the which story you like best you can make a perfect salad with my Creamy and Chunky Blue Cheese Dressing recipe. It has a nicely balanced flavor and sweetness with a great creamy and chunky textural balance. It is absolutely the best, rich and Creamy Blue Cheese Dressing ever! Prep time: 10 minutes Chill time: 4 hours Yield: 6 1-ounce servings Ingredients 5 ounces crumbled blue cheese (divided) 6 tablespoons buttermilk 6 tablespoons sour cream 4 tablespoons mayonnaise 4 teaspoons white wine vinegar 1/4 teaspoon granulated sugar 1/4 teaspoon garlic powder salt and freshly cracked black pepper to taste Directions
ChefSecret: Whole milk may be used in place of buttermilk for a milder flavor. Refrigerated the dressing in an air-tight container for up to two weeks. Classic French Dressing Historically, in both France and the United States, French dressing was simply a basic vinaigrette consisting of oil, vinegar, seasonings and usually minced shallots or a drop of mustard. The first such product labeled French dressing appears to have been Chef Milani's 1890 French Dressing. The chef put his own twist on the classical dressing by adding a bit of ketchup. The original Milani’s dressing is still available, but the current manufacturer claims it was introduced in 1938. It should be noted that some historical references indicate that it existed in this form as early as 1925. One might say that it isn’t at all French or classic, but it tastes great. Prep time: 10 minutes Chill time: 4 hours Yield: 2 cups Ingredients 1 cup extra virgin olive oil 2/3 cup tomato ketchup 1/2 cup granulated sugar 1/2 cup white vinegar 2 tablespoons finely chopped white onion 1 tablespoon fine chopped shallot 1 tablespoon lemon juice 1 teaspoon dry mustard 1 teaspoon paprika 1 teaspoon kosher salt 1 teaspoon finely ground black pepper Directions
Homestyle Garlic Ranch Dressing Did you know that Ranch has been the best-selling salad dressing in the United States since 1992, when it overtook Italian? It is also popular in the United States as a dip, and as a flavoring for potato chips and other foods. Many people use it as dressing on baked potatoes. In 2017, 40% of Americans named Ranch as their favorite dressing, according to a study by the Association for Dressings and Sauces (yes, there is such an association). It all started in the early 1950s, a plumber (yes, a plumber) Steve Henson developed what is now known as ranch dressing while working as a contractor for three years in the remote Alaskan tundra. In 1954, Steve and his wife Gayle opened Hidden Valley Ranch, a dude ranch at the former Sweetwater Ranch on San Marcos Pass in Santa Barbara County, California, where they served Henson's creation to customers. It became popular, and they began selling it in packets for customers to take home to be mixed with mayonnaise and buttermilk. As demand grew, they incorporated Hidden Valley Ranch Food Products, Inc., and opened a factory to manufacture it in larger volumes, which they first distributed to supermarkets in the Southwest, and eventually, nationwide. Hidden Valley Ranch is now a brand owned by Clorox. Ranch dressing connoisseurs will love this recipe with a garlic kick! It is a staple in my household and I make it fresh from scratch often. Prep time: 10 minutes Chill time: 4 to 8 hours Yield: 1 quart Ingredients 2 cups mayonnaise 1 cup buttermilk 1/2 cup diced whited onion 2 tablespoon diced garlic 1/2 cup canola oil 2 diced hard-boiled eggs 5 tablespoons sour cream 2 tablespoons dried parsley 1 tablespoon garlic powder 1 teaspoon ground black pepper 2 pinches kosher salt Directions
ChefSecret: Other dairy or nut milks can be substituted in place of buttermilk, such as Greek yogurt, regular milk or cream. The type of mayo you use will change the consistency. Traditional Italian Dressing North American style Italian salad dressing is thought to date back to 1941 in Framingham, Massachusetts. Florence Hanna, the daughter of Italian immigrants and wife of restaurateur Ken Hanna, made large batches of her family's salad dressing for the house salads at the restaurant. The restaurant, originally called The '41 Cafe, later changed locations and became known as Ken's Steak House. The salad dressing became so popular that it was made in large vats in the basement of the steak house to keep up with demand. Customers started requesting the Italian dressing to go. The Crowley family, who owned a nearby manufacturing business, approached the Hanna family about bottling the popular salad dressing. This resulted in the creation of Ken's Salad Dressing, which now comes in several variations of Italian, as well as many other flavors. Ken’s Salad Dressing can be found in grocery stores across the country. Same ideas from different minds… Italian salad dressing was also served in Kansas City, Missouri, at the Wishbone Restaurant beginning in 1948. The Wishbone had opened in 1945 by the Sollomi family. The Italian dressing served at the Wishbone was based on a recipe from Lena Sollomi's Sicilian family which was a blend of oil, vinegar, herbs and spices. Prep time: 10 minutes Chill time: 1 hour Yield: 1/2 cup dry mix Ingredients 1 tablespoon garlic salt 1 tablespoon onion powder 1 tablespoon granulated sugar 2 tablespoons dried oregano 1 teaspoon ground black pepper 1/4 teaspoon dried thyme 1 teaspoon dried basil 1 tablespoon dried parsley 1/4 teaspoon celery salt 2 tablespoons kosher salt Directions
ChefSecret: To prepare the dressing, whisk together 1/4 cup white vinegar, 2 tablespoons water and 2 tablespoons of the prepared dry mix. Let the mixture rest to allow time for the spices to blossom and then whisk in 2/3 cup canola oil. Spiced-Up Thousand Island Dressing Thousand Island dressing – you know it as the mix of ketchup, mayo and a few other things that tops a Reuben or many a burger. In other words, it's pretty much pedestrian fare. But did you know its origins trace back to the highest ranks of American society? At least, that's the tale you'll hear from boat tour guides in the Thousand Islands, a chain of islands between northern New York and Canada that are the dressing's namesake. That version of the story begins at Boldt Castle, the palatial summer home that Waldorf-Astoria owner George Boldt built for his wife, Louise, at the turn of the last century–on a heart-shaped island, no less. According to legend, George and Louise were out for a cruise on their steam yacht and it was time for lunch. Greens were on the menu, but the Boldt’s' chef forgot to bring any dressing with him onboard. So, he improvised with what was on hand—whipping together mayonnaise, ketchup, pickle relish, Worcestershire sauce and a hard-boiled egg. Voila! Thousand Island dressing was born. I offer you a spicy version of Thousand Island dressing, using chili sauce instead of ketchup and a touch of hot sauce. This is best if left to refrigerate overnight. Prep time: 10 minutes Chill time: 4 hours or, better yet overnight Yield: 1-1/2 cups Ingredients 1 cup mayonnaise 2 tablespoons chili sauce 2 tablespoons minced green bell pepper 2 tablespoons minced pimento 2 tablespoons minced sweet pickle 1 teaspoon hot sauce Directions
Old-Fashioned Steak-House Sauce & Dressing (From Peter Luger’s Steak House in-Brooklyn, NY) Peter Luger Steak House Old Fashioned Sauce & Dressing is an all-purpose condiment that is not only great on steak, but also as a salad dressing, on slabs of red ripe tomatoes and avocados, burgers, chicken and even a great base sauce for pizza. Like most things Luger, it is the best! They began bottling and selling their sauce after customers begged for it. The taste is somewhere between cocktail sauce (spicy with a touch of horseradish) and traditional steak sauce. I started hacking it nearly 20-years ago. Another plus… the sauce is fat-free. Prep time: 10 minutes Cook time: 10 minutes Chill time: 4 hours Yield: 4 cups Ingredients 12 ounces ketchup (I prefer Heinz) 4-3/4 ounces apple cider vinegar 1/2 cup granulated sugar 3-3/4 ounces Worcestershire Sauce (I prefer Lea & Perrins) 2 tablespoons freshly minced white onion 1-1/2 tablespoons fresh, finely-grated horseradish Directions
ChefSecret: Don’t Screw-Up The Salad…please! Now that you have a library of great professional dressings, don’t screw-up the salad. Salads are supposed to be light, bright, and full of life—but too often, they hit the table flat, limp and soggy, with all the good stuff at the bottom of the bowl…yuck! There are several reasons this happens. Now here are some tips so you and your guests can enjoy the crunchiest, most satisfying salads. Here are the most common mistakes people make when tossing up a salad. Don’t just go with what you know There's a whole world of greens outside of iceberg, arugula, mesclun, kale, and romaine. Browse your farmers' market or grocery produce aisle to find fresh, crisp seasonal leafy greens for your salad base, like spinach, mâché, dandelion greens, microgreens, baby kale, chicory, and escarole. You'll be amazed how much flavor and texture they'll add. Don’t just wash and toss A soggy salad is a bad salad. Dry those greens! Consider purchasing a salad spinner (OXO brand about $30 on Amazon Prime). This is one of the few single-purpose kitchen items that is worth it. If you don't have a salad spinner, try this—line a plastic shopping bag with paper towels, toss in your wet, semi-drained greens and knot the bag. Then take the bag by the knot and give it a couple hard spins in the air. Your greens will come out mostly dry. Not all greens are created equal and need a dressing Once the greens are in the bowl, you need to give your greens some seasoning before getting dressed. After you've dried them, season the naked greens with a little salt and cracked pepper. Consider this as another layer of flavor—then you won't have to over-season the dressing to compensate. Speaking of seasoning, remember, just a little mustard, lemon juice and olive oil by themselves are not a great dressing. It's important to season your dressing to taste. Not every dressing will work for every salad There's a lot to consider when it comes to dressing greens. First, and most important, you need to ask yourself, “Self, do my greens match up to my dressing?” Delicate arugula won't hold up to a bold, creamy Blue Cheese dressing. Kale overpowers a light balsamic vinaigrette. Like fine wines, match the bold with the bold, and the light with the light. Second, try to strike the perfect balance of dressing and salad. Overdressing your salad makes it a soggy, limp and messy, while underdressing will leave something to be desired. Add the dressing little by little—tasting as you go—to make sure you get the perfect amount to coat the leaves. Go lightly when tossing your greens A salad should be light and airy—even if it's made with hearty greens and a creamy dressing—and handled with a gentle touch. Using tongs and salad tools to toss the salad allowing the air to get into the mix and incorporate all your ingredients in an even way. Drizzle the dressing (do not pour) along the side walls of the salad bowl, then lightly toss the greens until the dressing is evenly distributed. No bruised or crushed leaves here! And never cut romaine leaves; they must be torn to avoid bruising. By the way if you don’t have tongs or salad set use gloved hands. Don’t toss it all together—save the crunchies for the top Sometimes, it's best to leave some ingredients out until the last minute. I like adding in some of the heavy ingredients for the toss—like nuts, seeds, tomatoes, peas, and other bulky add-ins that sink to the bottom—then topping the salad with the rest post-toss. That way you get to see everything that's in the salad, and it's easier to get a little bit of everything in every bite when there's stuff on top. Also, toss your greens in a little dressing before adding herbs: their delicate flavor will shine through much more when they're the outermost layer. I like to save the crunch things like croutons for last. Covid-19 Quip of the Day: “Did you see the picture of a young bride—dress, veil and all, walking down a street carrying a picture of her groom who, as the sign on his picture reads, groom in isolation. That’s going to be a disappointing wedding night.” ------------------------------------------- Do you have a question or comment? Do you want to share a favorite recipe or pictures with our readers? Send your thoughts to [email protected]. All recipes and cooking tips are posted on our website https://www.perspectives-la.com/covid-19-survival-guide. ------------------------------------------- To you and everyone dear to you, be strong and positive, stay well and safe and be kind to others. If you have a little extra in your pockets to share with others at this difficult time, please consider donating to Feeding America. Thanks for reading. #Salads #SaladDressings #Vinaigrette #PeterLuger #QuarantineKitchen #Covid19 #FeedingAmerica #PerspectivesTheConsultingGroup ©Perspectives/The Consulting Group, Inc., 2021 … from the California Kitchen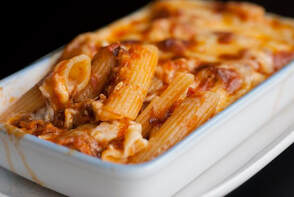 How you doin’? I thought I would get back to my roots for this blog and bring you one of the simplest pasta dishes ever. When I first met my chef friend, Joe Cochran, he was the executive chef at the Lowes, Santa Monica and was always fun to work with. We invited our ABC audience (The Super Foodies) to a live marathon cooking show at the Lowes where we demonstrated over 40 recipes in 90 minutes. One of Joe’s best dishes is/was his Baked Penne With Spicy Italian Sausage—a recipe that followed him around to all his subsequent assignments.
I wanted to make a similar dish using an Instant Pot. Here is my version of a perfect, stress-free, rich and creamy fool proof recipe. You’ll be calling out penne, penne, penne (The Big Bang) every chance you get. Prep time: 10 minutes Cooking time: 25 minutes Yield: 4 large servings Ingredients 2 tablespoons olive oil 8 ounces uncooked Italian sausage, casings removed 1/2 teaspoon kosher salt 1 teaspoon red pepper flakes 2 tablespoons minced garlic 1/2 cup red wine (cheap) 1 (22- to 25-ounce) jar marinara sauce (I prefer Rao’s Marinara) 2 cups water 8 ounces dried penne pasta 8 ounces ricotta cheese 1 cup shredded part-skim mozzarella cheese Directions
Storage: Leftovers can be refrigerated in an airtight container for up to 4 days. ChefSecret: This recipe does not have to be baked—it is perfect right out of the Instant Pot. If you would like to brown the melted cheese a bit, take a portion of penne and spoon it into an oven-safe dish and stick it under a broiler for about 60 seconds—just enough to brown the melted cheese. Covid-19 Quip of the Day: I don’t think anyone expected that when we changed the clocks last year, we’d go from Standard Time Zone to the Twilight Zone. ------------------------------------------- Do you have a question or comment? Do you want to share a favorite recipe or pictures with our readers? Send your thoughts to [email protected]. All recipes and cooking tips are posted on our website https://www.perspectives-la.com/covid-19-survival-guide. ------------------------------------------- To you and everyone dear to you, be strong and positive, stay well and safe and be kind to others. If you have a little extra in your pockets to share with others at this difficult time, please consider donating to Feeding America. Thanks for reading. #Entrees #InstantPot #Penne #Pasta #Raos #LowesHotel #JoeCockran #QuarantineKitchen #Covid19 #FeedingAmerica #PerspectivesTheConsultingGroup ©Perspectives/The Consulting Group, Inc., 2021 … from the California Kitchen  How you doin’? Over the years there have been many wars fought over food. The pasta wars raged between parties crediting either Italian or Chinese invention of the noodle. Recent archaeology seems to have given pride of invention conclusively to the Chinese, who can also claim gunpowder, silk, paper, compasses, the novel coronavirus and, quite possibly, global circumnavigation. But the actual noodles unearthed at a 4,000-year-old Chinese archaeology site are not your average mei fun.
Marco Polo doubtless enjoyed many great meals in the palace of the Chinese emperor in the 13th century. It is very probable that he brought a dried version of the noodle back to Italy. But when Polo was in China during the Yuan Dynasty, noodles were already a common dish in both northern and southern regions of the country. Their origins were apparently much older. Early Chinese noodles were both startlingly similar and significantly different from the stretchy, chewy varieties served today. Four thousand years ago, an epic disaster wiped out the city of Lajia on the Yellow River with cataclysmic speed. The earthquake and subsequent river flooding buried an overturned pot, preserving a nest of long yellow noodles under a wall of mud. When the noodles were unearthed in 2005, their existence conclusively ended the argument about who had the earliest claim to the noodle. The Thai sweet chili sauce gives this dish a sweet and spicy flavor that many kids love. You can adjust the heat level by adding more or less of the sauce or adding additional red pepper flakes, if you like it hot. Prep time: 30 minutes Cook time: 15 minutes Yield: 6 servings Ingredients For the noodles Salted Water for Boiling 12 ounces dry Chinese lo mein noodles (or spaghetti) 2 tablespoons low sodium soy sauce 3/4 cup sweet chili sauce 1/2 teaspoon garlic powder 1/4 teaspoon ground ginger 3 tablespoons sesame oil For the meat marinade 1/2 cup low sodium soy sauce 1/2 teaspoon garlic powder 1 (1 pound) pork loin, cut into 2-inch strips For the stir fry 2 tablespoons cooking oil 2 medium onions, cut into bite-size pieces 1/8 teaspoon crushed red pepper flakes 3 tablespoons sweet chili sauce 3 cups chopped Napa cabbage 3/4 cup sliced celery 1 cup sliced carrots 3 red bell peppers, chopped For the thickener 2 teaspoons cornstarch 1/4 cup cold water Directions
ChefSecret: The success of this recipe and most other Asian meals is to have all the ingredients portioned out in small bowls and stage in the order of their use. Covid-19 Quip of the Day: “It’s been a great blessing to be at home with my wife these last few months. We’ve caught up on everything I’ve done wrong in the last 20 years.” ------------------------------------------- Do you have a question or comment? Do you want to share a favorite recipe or pictures with our readers? Send your thoughts to [email protected]. All recipes and cooking tips are posted on our website https://www.perspectives-la.com/covid-19-survival-guide. ------------------------------------------- To you and everyone dear to you, be strong, be positive, stay well, stay safe and be kind—that’s the American way. If you have a little extra in your pocket to share with others at this difficult time, please consider donating to Feeding America. #Entrees #StirFry #SweetAndSpicyPork #Pork #SpicyNoodles #Noodles #Dinner #QuarantineKitchen #Covid19 #FeedingAmerica #PerspectivesTheConsultingGroup ©Perspectives/The Consulting Group, Inc., 2021 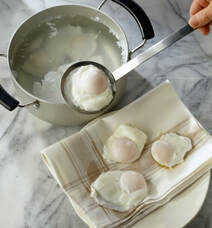 How you doin’? Did you have eggs for breakfast this morning? Do you think eggs negatively impact your cholesterol? If you do, that information is outdated. For almost a half century, the FDA included a daily recommended intake for dietary cholesterol, just like their recommendations for sodium and fat. Eggs contained more than half of this daily intake and were quickly labeled as not-good-for-you. That myth persists today, despite the evidence to prove that dietary advice is outdated.
Political Note & Commentary: This comment is not geared toward any party—Republican or Democrat or anyone in between—but to all the “do-gooders” in Washington, DC who should stay the hell out of our diets and stomachs. As evidenced by recent events regarding Covid-19, much of the “scientific” information we get from the Feds is incorrect (coming from someone who has been on lockdown in Los Angeles, California for almost a year). Likewise, there is a whole list of dietary mistakes they’ve made that have been over-turned. Maybe it would be best if they just stuck to raising our taxes and spending our money like drunken sailors and leave the food choices up to us. Even though eggs have suffered a bad rap for being bad for your cholesterol and, by extension, your heart, nothing could be further from the truth. Eggs are actually good for your heart; they're just victims of confusion, bad P.R. and a few decades of unproven, uneducated and ignorant thinking (that’s when we let the inmates run the asylum). Eggs are good for you and they deserve your respectful consideration! In 2015, the FDA dropped this negative recommendation entirely, citing a lack of evidence that dietary cholesterol has any real impact on your overall health. Eggs suddenly went from major culprit to relatively innocent. This new scientific change of heart is still fairly recent and not widely known, so maybe that’s why the egg myth still persists. Another reason eggs get bad press is because of the confusion between dietary cholesterol (found in food) and blood cholesterol made in the body. As a matter of fact, your body needs and makes its own cholesterol for essential functions like helping cell membranes form, creating hormones, helping the liver process fats and making Vitamin D. Cholesterol is also extremely important for developing children. It drives me crazy when I hear a parent say that they have cut the intake of eggs for very young children or put them on a low-cholesterol diet. While your body makes all the cholesterol it needs, this doesn't mean the cholesterol in your food is excessive and therefore bad for you. It's actually saturated fat, not dietary cholesterol, that can be more harmful for your heart. I know the difference between good and bad cholesterol is confusing to a lot of our readers, so let me clear up some of the confusion. Cholesterol is often thought of as good or bad. Good cholesterol refers to HDL (high-density lipoproteins) and bad cholesterol refers to LDL (low-density lipoproteins). Lipoproteins help carry cholesterol through the bloodstream. HDL, or good cholesterol, helps your body flush out bad cholesterol, improving your heart health. LDL, or bad cholesterol, can cause plaque to build up in your arteries and increase your risk for heart disease, heart attacks and strokes. How do we make more of the good cholesterol and less of the bad stuff? We can raise our HDL—the good stuff—by consuming fiber-rich foods; we can lower our LDL by limiting saturated and trans fats in our diet. Eggs have been proven to be a heart-healthy choice. They contain little saturated fat—that increases bad cholesterol—and are packed with good protein. This has been tested on people just like you. A study by the American Journal of Clinical Nutrition found that people who ate 12 eggs a week for three months did not increase their risk of heart disease as was previously thought. The American Heart Association now recommends one egg a day as part of a healthy diet. Here’s the rub—while eggs themselves are heart healthy, the most common stir-ins like cheese, sausage, bacon and cream are all high in saturated fat and can make an egg dish unhealthy. It all goes back to what my mother used to say—everything in moderation. So, consume less cheese and ham in your Sunday Omelets and “beef” up the veggies, like tomatoes, asparagus, mushrooms and spinach. You can even cook eggs fat free by poaching them and skipping the hollandaise in Canadian Bacon Eggs Benedict or try creating some savory, spicy bowls with an egg on top. Do you feel a little better equipped to make your own decisions on eating eggs? Great, let’s start by poaching some eggs. Egg Poaching Method Ingredients 8 quarts water (roughly, a large kettle half full of water) 2 tablespoons vinegar (5%) 1 teaspoon kosher salt Eggs as needed Directions
ChefSecret: I promise you won’t taste the vinegar. It just helps gather the strands of wild egg whites into a ball around the yolk. Likewise, creating the whirlpool in the simmering water helps to hold the egg whites close to the yolk. Grilled Chicken Tenders & Poached Egg Sliders Burrata adds extra creamy goodness to grilled chicken sliders. Prep time: 20 minutes Cook time: 10 minutes Yield: 8 sliders (4 servings) Ingredients 8 thin boneless chicken tenders (hammered flat) 1 pinch salt and pepper 1 tablespoon olive oil 8 King’s Hawaiian Original Rolls, split 1 tomato, thinly sliced 8 fresh basil leaves 4 ounces packaged burrata Directions
ChefSecret: A very good and simple variation is to use low sodium smoked, sliced turkey breast (luncheon meat) instead of the grilled chicken. Covid-19 Quip of the Day: “Because of the pandemic, I’m at a place in my life where errands are starting to count as going out.” ------------------------------------------- Do you have a question or comment? Do you want to send a favorite recipe or pictures with our readers? Send your thoughts to [email protected]. All recipes and cooking tips are posted on our website https://www.perspectives-la.com/covid-19-survival-guide. We added a new search feature to make it easier to navigate through our blogs. ------------------------------------------- To you and everyone dear to you, be strong and positive, stay well and safe and be kind to others. If you have a little extra in your pockets to share with others at this difficult time, please consider donating to Feeding America. Thanks for reading. #Entrees #Eggs #PoachedEggs #Sliders #Breakfast #Brunch #AHA #AmericanHeartAssociation #QuarantineKitchen #Covid19 #FeedingAmerica #PerspectivesTheConsultingGroup ©Perspectives/The Consulting Group, Inc., 2021 |

For over 4 decades collaboration and vision have been the cornerstones of our approach to developing innovative solutions. We fuel innovation, uncover opportunities, discover trends and embrace sustainability, turning imaginative ideas into profitable realities. Categories
All
Archives
July 2024
|
 RSS Feed
www.perspectives-la.com
Copyright © 2021 Perspectives/The Consulting Group, LLC | Henderson, NV 89052 | 310-477-8877
Copyright © 2021 Perspectives/The Consulting Group, LLC | Henderson, NV 89052 | 310-477-8877