…from the Perspectives’ Happy Hour Bar How you doin’? As we spring into summer, there’s really no shortage of fantastic cocktails—but our current favorite is the festive Michelagua. My recipe is made with cold-pressed watermelon juice, a light lager and spices. I love the intense, melon-y flavor and bright color it gives the drink. It’s also practically overflowing with big chunks of juicy mango, so you get some tangy-sweet notes in every slurp.
The best way to think of it is as a pimped-up version of the Cheleda (a Mexican beer-based cocktail), with a handful of extra ingredients and a much bolder flavor punch. Like the Cheleda, beer forms the base, but unlike the Cheleda, you get a lot more than salt and lime with it. The recipe varies by region, but as a basic rule you can expect beer, lime, salt, spices, salsas, and tomato juice, all served in a lime and salt and/or chili powder rimmed glass. In some places, you may also get a few chiles for extra bite. In many ways, a Michelada (see ChefSecret) is like a Bloody Mary that's lost its vodka and gained some beer. It's also fully customizable, so don't be surprised if you order a Michelada and find yourself with something that looks more like a meal than a drink, with steamed shrimp, smoky bacon and even pickles all jutting out of the top. You might also find some with additional seasonings such as hot sauce, Worcestershire sauce, celery salt, black pepper, serrano peppers, Chamoy powder, Maggi sauce and soy sauce… it's entirely up to you. The following recipe can be used as a guide but feel free to adapt the spices to suit your own taste. But the kicker in my cocktail—the thing that makes it so very special—is that I dip the rim of the glass in Tajín fruity Chamoy hot sauce and Tajín seasoning. The Chamoy is full of lime and apricots, the Tajín has some mild heat and together they give this drink a bright, refreshing lilt with a bit of a punch. Yes, Watermelon-Mango Michelagua is, by definition, a drink. But because of all the mango floating around in there, you could just as easily call it a snack. (It’s begging for one of those combination spoon-straws.) And you better believe you’ll be sipping it poolside this summer! Prep time: 10 minutes Yield: 1 cocktail Ingredients 1/4 cup Tajín Fruity Chamoy Hot Sauce, plus more for garnish 1/4 cup Tajín Clásico Seasoning, plus more for garnish 3/4 cup diced mango, divided Crushed ice 1/4 cup fresh, cold-pressed watermelon juice (I like Evolution) 1 12-ounce bottle light beer 1/2 ounce simple syrup 1/2 ounce freshly squeezed lime juice, plus more to taste Directions
Quip of the Day: Spilling a beer is the adult equivalent of a kid dropping an ice cream on the ground. ------------------------------------------ Do you have a question or comment? Send your thoughts to [email protected]. All recipes and cooking tips are posted on our website https://www.perspectives-la.com/covid-19-survival-guide. ------------------------------------------- To you and everyone dear to you, be strong, positive, stay well, stay safe and be kind. Take a breath and count your blessings, and if you have a little extra to share with others, please consider donating to Feeding America, Tunnel to Towers, Union Rescue Mission and/or American Red Cross. #Cocktail #HappyHour #WatermelonMangoMichelagua #WatermelonJuice #Mango #Michelada #Cheleda #Beer #Tajin #SummertimeHappyHour #Cheers #2024Recipes #URM #T2T #FeedingAmerica #RedCross #PerspectivesTheConsultingGroup ©PERSPECTIVES/The Consulting Group, LLC, 2024
0 Comments
…from the Perspectives’ Test Kitchen How you doin’? One of the best treats for breakfast are yummy, freshly baked blueberry muffins made with fresh or frozen blueberries.
Did you know that blueberry muffins are the official muffins of Minnesota? And, if all the blueberries grown in North America in one year were spread out in a single layer, they would cover a four-lane highway that stretched from Saint Paul to New York! Where did muffins originate? European settlers brought with them a recipe for “Bilberry Muffins”. Bilberries were not found in the New World. Wild blueberries, native to the Americas, were both plentiful and delicious so they were substituted for Bilberries, and the Blueberry Muffin recipe was born. Ingredients 2 cups all-purpose flour 1/2 cup granulated sugar 3 teaspoons baking powder 1/2 teaspoon kosher salt 3/4 cup milk 1 teaspoon pure vanilla extract 1/4 teaspoon almond extract 1/3 cup vegetable oil 1 large egg 1 cup fresh or frozen blueberries 1 teaspoon grated lemon zest Directions
ChefSecrets: Lightly dust the blueberries with a little flour before adding them to the batter to keep them from sinking to the bottom of muffin cups. The first 9 ingredients are a standard muffin recipe which will make anything from plain to chocolate yummy muffins. What are Bilberries? They are wild European blueberries that are red inside, with a strong flavor and have higher levels of antioxidants than blueberries. Quip of the Day: Why couldn't the teddy bear finish his muffin? “Because he was already stuffed.” ------------------------------------------- Do you have a question or comment? Send your thoughts to [email protected]. All recipes and cooking tips are posted on our website https://www.perspectives-la.com/covid-19-survival-guide. ------------------------------------------- To you and everyone dear to you, be strong, positive, stay well, stay safe and be kind. Take a breath and count your blessings, and if you have a little extra to share with others, please consider donating to Feeding America, Tunnel to Towers, Union Rescue Mission and/or American Red Cross. #Baking #Breakfast #FreshBakedBreakfast #BlueberryMuffins #MomsBasicBlueberryMuffins #Bilberries #Blueberries #2024Recipes #T2T #URM #FeedingAmerica #RedCross #PerspectivesTheConsultingGroup ©PERSPECTIVES/The Consulting Group, LLC, 2024 …from the Perspectives’ Kitchen How you doin’? This was a recipe from our Palm Grill Restaurant brunch, in Burlingame, California. We called it Mom’s Old Fashioned Griddlecakes. I don’t know whose mom it was, but it wasn’t mine—but it sounded pretty good, didn’t it?
Perfect griddlecakes are not hard to make at all. My griddlecake recipe produces thick, fluffy and delicious stacks with just a few ingredients that are probably already in your pantry and refrigerator. It is so much better and less expensive than the supermarket branded boxed stuff. This recipe lends itself to additional inclusions like blueberries, bananas, or even chocolate chips. You can ever make an Elvis Presley Griddlecake—a stack of chocolate griddlecakes with a peanut butter smear topped, layered with sliced bananas, with fluffy marshmallow mounded on the top. One more thing, do not contaminate great griddlecakes with crappy breakfast syrup. This recipe demands Real Maple Syrup. Anything other than real maple is a waste of time and effort. So, move over “Auntie J” and make room for “Old Mom” and her griddlecakes. Making Mom happy this Mother’s Day starts with breakfast. These Old-Fashioned Griddlecakes will do nicely! Now, go put on your apron! Prep time: 5 minutes Cook time: 15 minutes Yield: 8 servings: Ingredients 1-1/2 cups all-purpose flour 3 teaspoons baking powder 3 tablespoons granulated sugar 1/4 teaspoon salt 1/4 teaspoon cinnamon 1-1/4 cups milk, room temperature 1 teaspoon pure vanilla extract 3 tablespoons unsalted butter, melted 1 large egg, room temperature 1 tablespoon unsalted butter (topper per person) 2 ounces warm Real Maple Syrup (topper per person) Directions
ChefSecret: Double sift the dry ingredients for fluffier griddlecakes. Allow the egg and milk to come to room temperature. If the batter is a bit too thick, add a little more milk, 1 tablespoon at a time. Quip of the Day: Q. Why do comedians never tell pancake jokes? A. Because they always fall flat! ------------------------------------------- Do you have a question or comment? Send your thoughts to [email protected]. All recipes and cooking tips are posted on our website https://www.perspectives-la.com/covid-19-survival-guide. ------------------------------------------- To you and everyone dear to you, be strong, positive, stay well, stay safe and be kind. Take a breath and count your blessings, and if you have a little extra to share with others, please consider donating to Feeding America, Tunnel to Towers, Union Rescue Mission and/or American Red Cross. #Breakfast #Brunch #Griddlecakes #MothersDay #RealMapleSyrup #2024Recipes #T2T #URM #FeedingAmerica #RedCross #PerspectivesTheConsultingGroup ©PERSPECTIVES/The Consulting Group, LLC, 2024 … from the Perspectives’ Kitchen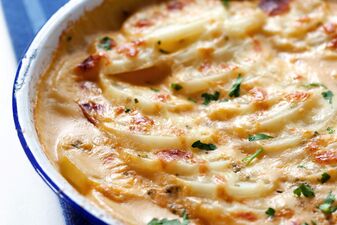 How you doin’? Potatoes are one of the most versatile and inexpensive vegetables. They can be baked, boiled, oven roasted or made au gratin or scalloped style. At Fanny’s Fish Market (one of my own restaurants) I was partial to Scalloped Potatoes.
In traditional recipes, scalloped potatoes are made with Cheddar cheese, milk and a sprinkle of flour. They bake up super cheesy and comforting and I love them, but spring calls for something lighter. So here I’ve layered thin slices of potato with nutty-sweet Gruyère cheese (which is lighter than Cheddar), warm cream and mild springtime leeks that have been sautéed and softened in butter. The potatoes bake up golden brown, and they have a wonderful texture—crispy and creamy at the same time, with a perfectly al dente bite—not the least bit soggy or pasty.) The leeks are so unbelievably tender, they seem to melt into the potato. I like to scatter some bright green chives over the top of the casserole as it comes out of the oven, and I love how their delicate onion flavor balances the dish—it’s rich, savory, cheesy, and light in all the right proportions. In short, it tastes just like early spring. I used this as a great side for grilled or baked fish; the fresh cream and mild onions are the ideal foil for a piece of mild, grilled white fish. It is also great with a grilled steak of any cut and can easily be used as a side dish at brunch. Prep time: 20 minutes Bake time: 90 minutes Yield: 8 servings Ingredients 2 tablespoons unsalted butter, plus more for prepping the pan 3 cups chopped leeks (white and pale green parts only), soaked, rinsed and drained well 2 teaspoons kosher salt 1/2 teaspoon freshly ground black pepper 4 pounds baking potatoes, peeled and thinly sliced (I prefer Russets) 2 tablespoons chopped fresh chives, plus more for garnish 2 cups shredded Gruyère cheese 3 cups heavy whipping cream 1 teaspoon ground nutmeg Directions
ChefSecrets: You can change this recipe up a bit by substituting cauliflower florets for potatoes—Gruyère Scalloped Cauliflower with Spring Leeks. Yum! Quip of the Day: Q. What do you call a cauliflower growing at the edge of a garden? A. A border cauli! ------------------------------------------- Do you have a question or comment? Send your thoughts to [email protected]. All recipes and cooking tips are posted on our website https://www.perspectives-la.com/covid-19-survival-guide. ------------------------------------------- To you and everyone dear to you, be strong, positive, stay well, stay safe and be kind. Take a breath and count your blessings, and if you have a little extra to share with others, please consider donating to Feeding America, Tunnel to Towers, Union Rescue Mission and/or American Red Cross. #SideDish #ScallopedPotatoes #GruyereCheese #SpringLeeks #2024Recipes #URM #T2T #FeedingAmerica #RedCross #PerspectivesTheConsultingGroup ©PERSPECTIVES/The Consulting Group, LLC, 2024 …from the Perspectives’ Oven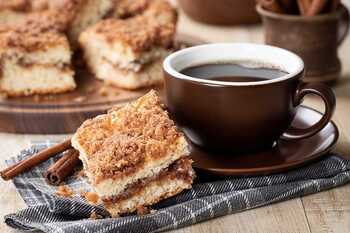 ow you doin’? I am constantly asked, do you put coffee in a coffee cake recipe? The answer is not necessarily. While some early versions of coffee cake did contain coffee, this snack cake is meant to be an accompaniment, not a cake full of caffeine. Most have simple sugar and cinnamon fillings, with variations using chocolate, nuts, fruit and cream cheese to complement the delicate flavor of the cake.
Nothing goes better with a steaming cup of “joe” than a perfectly spiced slice of coffee cake. The enticing aroma, ribbons of sugar and cinnamon filling, and traditional crumb topping make it a treat at breakfast, a midday indulgence or a midnight snack. Coffee cakes are synonymous with casual dining and, best of all, they don't require any of the fuss of frosted, labor-intensive cakes. Coffee cakes can be baked with just a few pantry staples. What a great way to start the day! Coffee cake, or Kaffekuchen, is a single layer cake with a sweet, sugar-cinnamon-layer of--and topped with--a streusel made from flour, butter and sugar. Both yeast and baking powder can be used to give lift to coffee cakes, with some versions presented as a braided ring or lattice-style like a babka. Coffee cakes became popular soon after coffee was introduced to Europe in the 17th century. German, Dutch, and Scandinavian communities began to pair spiced sweet breads with the new world beverage. A ritual called kaffeeklatsch emerged, where people would gather for caffeine, sugar and neighborhood gossip. These groups continued their coffeehouse traditions when they came to America. As coffee became more prevalent in the U.S. and more affordable to all, coffee cakes became a treat for Americans both wealthy and working-class. By the late 1800's, several coffee cake recipes made their way into American cookbooks, boosting the popularity of the humble dessert even higher. Coffee cakes use basic pantry ingredients like flour, brown and granulated sugar, and baking powder to create a basic recipe. Many recipes call for milk or sour cream to maximize moisture and to create a perfect texture. No need to frost or glaze (but you can sugar glaze, if desired). The thick buttery streusel topping acts as delicious baked-on finish. Simply combine cake ingredients, then top with the streusel crumbs for a delightfully crisp layer. Coffee cakes are budget-friendly, totally customizable, and great for making ahead. Make your own luscious, shareable cake with this tasty recipe. Prep time: 25 minutes Bake time: 35 minutes Yield: 10 to 12 servings Ingredients For the streusel topping 1 cup brown sugar 4 tablespoons all-purpose flour 4 teaspoons ground cinnamon 1/2 cup chopped pecans 1-1/2 teaspoons almond extract 5 tablespoons butter, melted For the coffee cake batter 3/4 cup granulated sugar 1/3 cup butter 2 large eggs 1/2 cup half-and-half 2 teaspoons pure vanilla extract 1-1/2 cups all-purpose flour 2-1/2 teaspoons baking powder 1/2 teaspoon salt Directions To make the streusel topping
To make the coffee cake batter
ChefSecret: I prefer a nice thick, crisp streusel topping. If you prefer more cake with a lighter topping, cut the streusel recipe in half. Quip of the Day: The best way to teach your kids about taxes is to reward them with a slice of warm coffee cake after finishing a chore, then taking 30% of their cake and eating it yourself. ------------------------------------------- Do you have a question or comment? Send your thoughts to [email protected]. All recipes and cooking tips are posted on our website https://www.perspectives-la.com/covid-19-survival-guide. ------------------------------------------- To you and everyone dear to you, be strong, positive, stay well, stay safe and be kind. Take a breath and count your blessings, and if you have a little extra to share with others, please consider donating to Feeding America, Tunnel to Towers, Union Rescue Mission and/or American Red Cross. #Baking #CoffeeCake #Coffee #Treat #Dessert #Brunch #Breakfast #BrunchCake #MidnightSnack #2024Recipes #URM #T2T #FeedingAmerica #RedCross #PerspectivesTheConsultingGroup ©PERSPECTIVES/The Consulting Group, LLC, 2024 |

For over 4 decades collaboration and vision have been the cornerstones of our approach to developing innovative solutions. We fuel innovation, uncover opportunities, discover trends and embrace sustainability, turning imaginative ideas into profitable realities. Categories
All
Archives
July 2024
|
 RSS Feed
www.perspectives-la.com
Copyright © 2021 Perspectives/The Consulting Group, LLC | Henderson, NV 89052 | 310-477-8877
Copyright © 2021 Perspectives/The Consulting Group, LLC | Henderson, NV 89052 | 310-477-8877