…from the Perspectives’ Kitchen 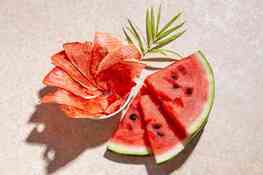 How you doin’? If someone offered you dehydrated water, you’d think they were scammin’ you, right? So if someone offered you dehydrated watermelon you’d probably think the same thing. But here’s a snacking recipe that is healthier than a Jolly Rancher, more portable than a watermelon, easier to make than a fruit roll-up and safer to eat than watermelon shots.
The world’s best dried fruit is dehydrated watermelon! Watermelon Chews are sweet and chewy with a pleasant vegetal taste that you don’t get from the fresh stuff. Best of all, you don’t even need a dehydrator to make it. But you will need an oven and a little patience. Just slice the watermelon triangles super thin, drizzle the triangles with lime juice to give it some zip, and then let it dry out in a hot oven for about five hours. The edges get a bit crispy, which is a good thing as a great contrast in texture to the fruit-leathery texture in the middle. Dehydrated watermelon is great for all manner of summer snacking. Put some in a backpack for post-hike and bike nibbles. Toss some in your kid’s lunch bag before sending them off to day camp or school. Bring some on your next road trip or camp outs and leave the Cheetos and trail mix at home. I keep a container in the test kitchen for sugar- and calorie-free treats Prep time: 20 minutes Bake time: 5 to 5-1/2 hours Yield: 8 servings Ingredients 1 mini seedless watermelon 2 tablespoons fresh lime juice Non-stick cooking spray (I prefer Pam Original) Directions
Quip of the Day: Q. A watermelon proposes to its sweetheart: “Honeydew want to get married?” A: “Oh yes”, she replies, “but we cantaloupe!” ------------------------------------------- Do you have a question or comment? Send your thoughts to [email protected]. All recipes and cooking tips are posted on our website https://www.perspectives-la.com/covid-19-survival-guide. ------------------------------------------- To you and everyone dear to you, be strong, be positive, stay well, stay safe and be kind. Take a breath and count your blessings, and if you have a little extra to share with others, please consider donating to Feeding America and/or American Red Cross. #Snacks #Watermelon #DriedWatermelon #2023 #QuarantineKitchen #Covid19 #FeedingAmerica #RedCross #PerspectivesTheConsultingGroup ©PERSPECTIVES/The Consulting Group, LLC, 2023
0 Comments
For Passover or Anytime When You Need A Chocolate Fix  credit: chocoparty.org credit: chocoparty.org How you doin’? It’s coming close to when Jews around the world observe the Passover holiday. This year it coincides with April 15th. Maybe, just maybe the Angel of the IRS will pass over my house! There are a number of dietary restrictions that are important to this holiday, one of which is the absence of any leavening in baked goods. Being the author of Choclatique—150 Simply Elegant Desserts, I have a great chocolate dessert recipe that fits this requirement perfectly.
Okay! Are you ready? Here is my new great-tasting Passover dessert! It’s a wonderful combination of flourless chocolate cake and coconut-almond macaroons. You will need to shop for kosher for Passover ingredients—coconut oil, toasted almonds, shredded coconut and, most importantly lots of cocoa powder and chocolate. The dessert has both great flavors and textures—it’s nutty, melt-in-your-mouth fudgy, rich and chocolaty and spiked with coconut. You’ll love the topping, too—a rich chocolate, glossy ganache sprinkled with crunchy, toasted coconut-almond clusters. The ganache may be a bit extravagant, and maybe it is, but it sets up to a very shiny finish and gives the cake its unmistakable Passover holiday elegance. Prep time: 35 minutes Bake time: 35 to 45 minutes Assembly time: 30 minutes Yield: 10 servings Ingredients (If strictly observing kosher or for the Passover holiday, be sure to look for the certifying kosher agency seal on ingredients) For the cake 1 cup virgin coconut oil, melted, cooled, plus more for the pan 1/4 cup unsweetened cocoa powder, plus more for the pan 1 cup skin-on almonds 8 ounces semisweet or bittersweet chocolate, chopped 1 teaspoon kosher salt 1/2 cup unsweetened shredded coconut 6 large eggs, room temperature 1/2 cup granulated sugar 1/2 cup (packed) light brown sugar 2 teaspoons pure vanilla extract For the ganache and assembly 4 ounces semisweet chocolate, chopped 1 tablespoon plus 1 teaspoon pure maple syrup Pinch of kosher salt 1/2 cup unsweetened coconut milk (from a very well shaken 13.5-oz can) 2 tablespoons unsweetened coconut flakes 1 tablespoon sliced almonds 1 teaspoon granulated sugar Directions To make the cake
ChefSecret: My recipe is an easy cake to make (really it is), it has a lot of steps to help you avoid making mistakes. It can be baked a day ahead. More good things to think about—this cake is gluten-free and it can be dairy-free if you use vegan chocolate. Quip of the Day: “There are four basic food groups: milk chocolate, dark chocolate, white chocolate and chocolate truffles.” What is Passover? Passover, also called Pesach is a major Jewish holiday that celebrates the exodus of the Israelites from slavery in Egypt. The Passover Seder is the ritual meal on Passover night—the Feast of Unleavened Bread. Passover is traditionally celebrated for eight days. The Passover Seder is one of the most widely observed rituals in Judaism. ------------------------------------------- Do you have a question or comment? Send your thoughts to [email protected]. All recipes and cooking tips are posted on our website https://www.perspectives-la.com/covid-19-survival-guide . ------------------------------------------- To you and everyone dear to you, be strong, be positive, stay well, stay safe and be kind. Take a breath and count your blessings, and if you have a little extra to share with others, please consider donating to Feeding America. #Desserts #Baking #Cake #Kosher #ChocolateMacaroonCake #Passover #Coconut #Holiday #QuarantineKitchen #Covid19 #FeedingAmerica #PerspectivesTheConsultingGroup ©Perspectives/The Consulting Group, Inc., 2022 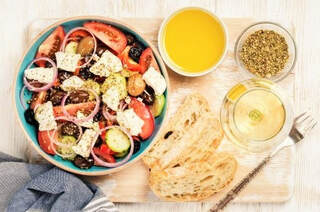 Traditional Greek Salad Traditional Greek Salad How you doin’? Πως είσαι'? I bet you never knew my Greek was so good—I’m multi-lingual. In Greece the salad is called “Horiatiki,” which translates to village or peasant salad. It’s a combination of tomatoes, onions, cucumbers, green peppers, olives and feta cheese, dressed in olive oil and sprinkled with oregano.
Let me tell you a little bit about traditional Greek salads. The Greek isles have been conquered by many people and Greek salads are no different. Greek salads did not reach world popularity until the end of the 19th century when the tomato became popular in Greece. There is no lettuce or any other leafy greens in a traditional Greek salad. The salad is never mixed before it is served. The feta cheese is never cut in cubes but rather large slices are placed on top of the salad. In Greece, Horiatiki, is served most often from early spring to the early part of fall when the season’s quality produce including juicy tomatoes, cucumbers, bell peppers, and onions are at their peak. What goes best with a Greek Salad? Grilled ribeye steak with sautéed onions and mushrooms, loaded baked potato, cheesy broccoli and a horseradish cream sauce is delicious with this salad. Grilled shrimp and peppers are delicious on salad. Grilled steak over this salad is also delicious! Prep time: 20 minutes Yield: 4 servings Ingredients For the Greek salad dressing 1-1/2 tablespoon fresh lemon juice 1 tablespoon red wine vinegar 1-1/2 teaspoon minced garlic (1 large clove) 1 1/2 tablespoon finely minced fresh parsley 1 teaspoon dried oregano 3/4 teaspoon honey Sea Salt, to taste 6 tablespoon extra-virgin olive oil For the salad 4 medium Roma tomatoes, diced 1 medium English cucumber, peeled and sliced into circles 1/2 small red onion, thinly sliced shreds, rinsed and drained 1 small red or yellow bell pepper, seeds and ribs removed, chopped 3/4 cup kalamata or black olives, drained and sliced 1 cup (4 ounces) sliced (not cubed or crumbled) feta cheese 1 medium firm avocado, diced 1 loaf warm crusty bread (Optional: omit if gluten-free is desired) Directions To make the dressing
ChefSecret: Add the olive oil as the last step in making any salad dressing or marinade giving the rest of the ingredients a chance bloom for full flavor. Consider adding slice grilled ribeye, grilled chicken breast or grilled shrimp as a topper to your Greek Salad. Covid-19 Quip of the Day: “Wash your hands like you just finished a bag of hot Cheetos con limón and you need to remove your contact lenses.” ------------------------------------------- Do you have a question or comment? Do you want to share a favorite recipe or pictures with our readers? Send your thoughts to [email protected]. All recipes and cooking tips are also being posted on our website https://www.perspectives-la.com/covid-19-survival-guide. ------------------------------------------- To you and everyone dear to you, be strong, be positive, stay well, stay safe and be kind—that’s the American way. If you have a little extra in your pocket to share with others at this difficult time, please consider donating to Feeding America. Thanks for reading. #Entree #Salad #EntreeSalad #GreekSalad #Tomatoes #Horiatiki #PerspectivesTheConsultingGroup #QuarantineKitchen #Covid19 #FeedingAmerica ©Perspectives/The Consulting Group, Inc., 2020 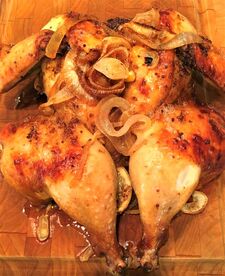 Roasted Spatchcock Chicken Roasted Spatchcock Chicken How you doin’? One of my favorite dinners is roasted chicken. When you have some extra time on your hands this is the perfect way to feed a family of 4 to 6 with very little effort. I don’t like to roast pieces and I don’t have the time or the inclination to mess around with a whole bird—so I ask my butcher to spatchcock it for me. No, I’m not talking dirty to you. It’s a difficult word to say with a straight face, I know.
No one can say for sure where this strange word came from—I checked it out. In The Oxford Companion to Food, Alan Davidson explains (in my best English accent), “The theory is that the word is an abbreviation of ‘dispatch the cock,’ a phrase used to indicate a summary way of grilling a bird after splitting it open down the back and spreading the two halves out flat.” Davidson further speculates that the word is Irish in origin, having seen the term in Irish cookbooks that date back to the 18th century. But go ahead call it “butterflied” chicken if that helps reduce the giggle factor. I buy my poultry at Farmer’s Market Poultry at the Original Los Angeles Farmer’s Market. These guys will cut up poultry any way I (or you) like. I ask them to spatchcock the bird, leaving the wing tips on, removing the ribs and back. I want to bag up all the trim to freeze for when I want to make stock. Prep time: 10-15 minutes Brine time: 1-2 hours Wet Rub time: 30 minutes Cook time: 80-85 minutes Yield: 4 servings Ingredients: For the brine 1-gallon cold water 2 tablespoons kosher salt 1 tablespoon sriracha (or other hot sauce) 1 3- to 4-pound chicken For the wet rub 1/4 cup balsamic vinegar 4 tablespoons minced garlic salt 1 tablespoon kosher salt 1/2 teaspoon dry sage 1/2 teaspoon dry rubbed rosemary 1/2 teaspoon dry thyme 1 teaspoon freshly-ground black pepper 1/4 cup lemon juice For the sheet pan prep 2 lemons sliced into rounds 1 large yellow onion sliced into ringlets 1/4 cup olive oil 1/4 cup lemon juice For the baste 1/3 cup melted butter 1/4 cup lemon juice Directions:
ChefSecret: Every oven and every chicken cooks differently, so be sure to check the internal temperature at the thigh to prevent over- or under-cooking. If you’re buying packaged chicken at a supermarket, follow these directions to spatchcock it:
#Spatchcock #Chicken #OvenRoastedChicken #Entrees #PerspectivesTheConsultingGroup #QuarantineKitchen #Covid19 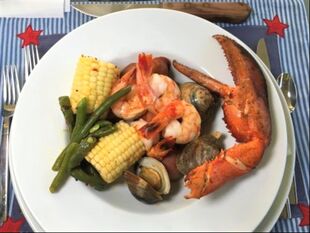 Instant Pot All-American Seafood Boil Instant Pot All-American Seafood Boil How you doin’? I have a great idea for your 4th of July backyard picnic. It seems that every region of the United States has a “boil” of some sort—New England has a lobster boil, Maryland has a crab boil, Louisiana has a crawfish boil, the Carolina’s have their shrimp boil and in California, we mix things up to make a seafood and sausage boil—and I love it.
Though it may look complicated at first glance, please read through the entire recipe. It really is quick and easy “plug and play” Instant Pot holiday recipe. You will need a 6-quart Instant Pot— you may need two, depending on the number of people invited—and a very long extension cord to reach out to the backyard. Plug in your Instant Pot and get ready to Play with your food! A seafood boil can be served as-is, but many people like to add a few side dishes to round out the meal—green salad, French or sourdough bread, coleslaw or potato salad. You can feed about four hungry people with this recipe and it can be ready in 30 minutes. Before you start mixing herbs and spices, read down the ChefSecret for a simple, zesty spice mixture. This recipe is sized for a 6-quart Instant Pot. By the way, a few things I learned going down this path.
Prep time: 20 minutes Cook time: 1-minute; Instant Pot will take about 10 to 15 minutes to come up to pressure. Yield: 4 big servings Ingredients For the homemade boil seasoning 2 teaspoons sea salt 1 teaspoon celery seed 2 teaspoons smoked paprika 1 teaspoon black pepper 1 teaspoon onion powder 2 teaspoons dried parsley 1 teaspoon red chile flakes 1 teaspoon yellow mustard seed (optional, if you can find it.) 3 tablespoon minced garlic 1 seeded lemon, cut in quarters For the boil pot 3 cups chicken or vegetable stock 2 bay leaves 1-pound petite red potatoes, washed, halved 1-pound smoked sausage—mild or hot, sliced into 1/2" rounds 6 ears fresh corn, husked, cut into thirds 4 tablespoons unsalted butter, cut into small pieces 1-pound shrimp, peeled and de-veined (21-25) 1/2-pound of clams or mussels 1-pound crawfish Directions
ChefSecret: If you like your boils on the Louisiana spicy side, you can save time shopping and mixing all the herbs and spice and use a bag of Zatarain's Crawfish, Shrimp & Crab Boil seasoning instead (it’s in a boil bag inside the box). Just drop the whole bag into the stock in the Instant Pot in place of the seasons, add 2 teaspoons of salt and an additional cup of stock. Your lips and tongue may sing a bit. #SeafoodBoil #Entrees #PerspectivesTheConsultingGroup #QuarantineKitchen #Covid19 #InstantPot #ComfortFoods #Lobster #Crawfish #Clams #Mussels #Zatarains #July4 #IndependenceDay |

For over 4 decades collaboration and vision have been the cornerstones of our approach to developing innovative solutions. We fuel innovation, uncover opportunities, discover trends and embrace sustainability, turning imaginative ideas into profitable realities. Categories
All
Archives
July 2024
|
 RSS Feed
www.perspectives-la.com
Copyright © 2021 Perspectives/The Consulting Group, LLC | Henderson, NV 89052 | 310-477-8877
Copyright © 2021 Perspectives/The Consulting Group, LLC | Henderson, NV 89052 | 310-477-8877