…from the Perspectives’ Kitchen  credit: Hershey's credit: Hershey's Boo! Trick or Treat and all the rest. How you doin’? I wanted to start out with a Halloween greeting that fits the season. Did I scare you? No? BOO! How’s that?
Here's a Halloween treat recipe you can make with the kiddos in less than an hour! REESE'S Peanut Butter Pumpkins (available wherever candy is sold) are adorned with spindly pretzel legs and sweet little candy eyes in this quick, Halloween-inspired recipe the whole family will love. REESE'S Peanut Butter Pumpkin Spiders are perfect for making with little ones—let them get creative and customize their yummy spiders with extra legs or a third eye! Ingredients 8 REESE'S Peanut Butter Pumpkins 32 large pretzel twists (2-1/2- to 3-inch) 1/4 cup HERSHEY'S Milk Chocolate Chips 16 candy eyes Directions
ChefSecret: Be careful not to burn the chocolate in the microwave or you will have to start all over again. Quip of the Day: Skeletons don't have the guts to dress up as anything for Halloween. ------------------------------------------- Do you have a question or comment? Do you want to share a favorite recipe or pictures with our readers? Send your thoughts to [email protected]. All recipes and cooking tips are posted on our website https://www.perspectives-la.com/covid-19-survival-guide. ------------------------------------------- To you and everyone dear to you, be strong, be positive, stay well, stay safe and be kind. Take a breath and count your blessings, and if you have a little extra to share with others, please consider donating to Feeding America and/or American Red Cross. #HalloweenTreats #SpookySpiders #PeanutButterPumpkinSpiders #Reeses #Hersheys #2023Recipes #QuarantineKitchen #Covid19 #FeedingAmerica #RedCross #PerspectivesTheConsultingGroup ©PERSPECTIVES/The Consulting Group, LLC, 2023
0 Comments
…from the Perspectives’ Kitchen How you doin’? My ninth birthday party was the best one I ever had. My mother let me invite 20 kids from my class for a Hopalong Cassidy birthday party.
I was dressed in my “Hoppy” cowboy hat, chaps and holster and six-shooters. Old mom really went off the rails—there was a clown, a magician (other kids had one or both) but I also had a pair of ponies—yes, those little kid-sized horses. Mom made a Cowboy Casserole which ended up being one of the best one-pan meals ever served for a “Hoppy” Birthday party. The Cowboy Casserole is a hearty and satisfying dish that's sure to please everyone at your table—birthday or not—despite the name, Prep time: 20 minutes Cook time: 50 to 60 minutes Ingredients 1 (16.3 ounce) can refrigerated biscuits (you can use a store brand) 2 pounds ground beef or pork or a combination of both 1 (1 ounce) package taco seasoning (I prefer Lawry’s brand) 3/4 cup water 1 medium onion, halved and sliced (1 cup) 1 medium red bell pepper, halved and sliced (1 1/2 cups) 1/2 cup frozen corn 1/2 cup sour cream 1/2 cup mayonnaise 8 ounces shredded Cheddar or pepper jack cheese, divided 2 medium sliced tomatoes 1 (4 ounce) jar sliced jalapeno peppers, drained (optional) 3 cups of Tater Tots Directions
ChefSecret: Serve with a bottle Cholula brand hot sauce and add a shake or two to taste. Quip of the Day: “Hoppy” broke all the stereotypes of the time by wearing all black (as the good guy) when the other western good cowboys wore all white. ------------------------------------------- Do you have a question or comment? Send your thoughts to [email protected]. All recipes and cooking tips are posted on our website https://www.perspectives-la.com/covid-19-survival-guide. ------------------------------------------- To you and everyone dear to you, be strong, be positive, stay well, stay safe and be kind. Take a breath and count your blessings, and if you have a little extra to share with others, please consider donating to Feeding America and/or American Red Cross. #Entree #CowboyCasserole #RefrigeratedBiscuits #Lawrys #HopalongCassidy #Dinner #2023Recipes #Covid19 #FeedingAmerica #RedCross #PerspectivesTheConsultingGroup ©PERSPECTIVES/The Consulting Group, LLC, 2023 …from the Perspectives’ Kitchen How you doin’? One of the most ordered entrée salads at my Fanny’s Fish Markets was our Healthy Taco Salad—it outsold the next most popular salad by 2 to 1.
No one likes boring salads. What most guests are looking for is a lot of different ingredients far and away above just lettuce, tomato and shredded carrots. Nothing beats my Healthy Taco Salad recipe in the summertime or any time. Crisp veggies, creamy dressing and crunchy corn tortilla strips make it fresh and fun to eat. This easy taco salad recipe makes for a filling lunch or fun dinner. Prepare the components ahead of time and store them separately for quick assembly. Oh, by-the-way, this recipe is gluten-free and vegan—we were way ahead of our time. Prep time: 15 minutes Cook time: 10 minutes Yield: 2 to 3 servings Ingredients For the salad 2 corn tortillas, sliced into strips (read the ingredient declaration—no wheat flour) Extra-virgin olive oil, for drizzling 1 medium head chopped romaine lettuce 1 cup shredded red cabbage 1/2 cup cooked black beans, drained and rinsed (canned is okay) 2 red thinly sliced radishes 1/2 cup sliced cherry tomatoes (cut in half) and/or pico de gallo 1 avocado, sliced 1 red jalapeño, sliced very thin (optional) Vegan cheese shreds (optional) Cilantro-Lime Dressing (see recipe), the creamy avocado variation Sea salt, to taste 8 quartered lime wedges, for serving For the shiitake taco “meat” 1 tablespoon extra-virgin olive oil 8 ounces shiitake mushrooms, stemmed and diced 1 cup crushed walnuts 1 tablespoon tamari 1 teaspoon chili powder 1/2 teaspoon ground cumin 1/2 teaspoon balsamic vinegar Sea salt and freshly ground black pepper, to taste Directions
Easy Cilantro-Lime Dressing This is a great dressing to have on hand in the fridge for topping salads, tacos, or burrito bowls. Prep Time: 5 minutes Total Time: 5 minutes Yield: About 1 cup Ingredients 2 cups fresh cilantro 1 garlic clove 1/4 cup freshly squeezed lime juice 2 teaspoons maple syrup 1/2 teaspoon ground coriander 1/2 teaspoon sea salt 1/2 cup extra-virgin olive oil Directions
Make it creamy (optional)--blend with 1 avocado or 1/2 cup vegan yogurt. Make it spicy (optional)— by adding a bit of jalapeño or a few pickled jalapeños. ChefSecret: Like all salad recipes, this one is great to play with. Swap in the veggies you have on hand or adjust the toppings to make something you really love. Quip of the Day: Q: How much do I love Taco Salads? A: From my head to-ma-toes! Do you have a question or comment? Send your favorite recipes, pictures or thoughts to [email protected]. Recipes and cooking tips are posted on our website https://www.perspectives-la.com/covid-19-survival-guide. ------------------------------------------- To you and everyone dear to you, be strong, be positive, stay well, stay safe and be kind. Take a breath and count your blessings, and if you have a little extra to share with others, please consider donating to Feeding America and/or American Red Cross. #Entrees #Salads #HealthyTacoSalad #CilantroLimeDressing #VeganSalad #GlutenFree #2023 #QuarantineKitchen #Covid19 #FeedingAmerica #RedCross #PerspectivesTheConsultingGroup ©PERSPECTIVES/The Consulting Group, LLC, 2023 … from the Perspectives’ Kitchen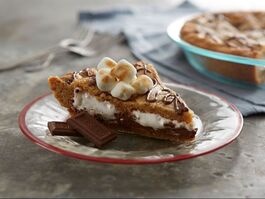 credit: Hersheyland.com credit: Hersheyland.com How you doin’? When I was a kid, I was a Boy Scout. Even then I loved to cook on an open fire. Nothing really special—hot dogs on a stick, chicken on a grill and S’mores. Summer campfire grills were a favorite. But what do you do when the weather turns cold, and you are no longer able to toast marshmallows over lapping flames? Well, I’m here to tell you there's more than one way to make S'mores.
This classic campfire treat can be just as satisfying from a home oven and microwave allowing you to enjoy S’mores come rain or shine. You can treat yourself to a combination of two classic favorites—S'mores and Blondies— with this inventive and mouthwatering S'mores Graham Blondie Pie recipe. Yummmy… gooey marshmallow creme, velvety smooth milk chocolate and crunchy graham crackers in a buttery blondie crust. Perfect for any in-home gathering. Share nostalgic memories and tease tastebuds while transporting everyone to memories of cozy scout campfires all year round. Prep time: 17 minutes Bake time: 23 minutes Cool time: 2 hours 30 minutes Yields: 1 pie / 6 to 8 servings Ingredients 6 milk chocolate bars (1.5-ounces), divided (I prefer Hershey's milk chocolate) 1/2 cup (1 stick) unsalted butter, softened 3/4 cup granulated sugar 1 large egg 1 cup all-purpose flour 1 cup graham cracker crumbs 1 teaspoon baking powder 1-1/2 cups marshmallow cream (I prefer Kraft Marshmallow Fluff) 1/4 teaspoon butter 2 pints ice cream or 40 toasted miniature puffed marshmallow (optional) Directions
ChefSecret: I like the taste of the original S’mores so I always use Hershey’s Milk Chocolate and Kraft Marshmallow Fluff. Quip of the Day: So, it's the 4th of July night and all the dead presidents are gathered around a campfire having a party. They're drinking and eating and just generally having a grand ol' time when President Washington puts President Lincoln on the spot. W: "Hey there, Lincoln, do that speech you do!” L: " What speech?" W: "The speech! You know, the one!!!!" L: "Ohhh, that speech. Yeah, that speech. Nah, I can't remember the words anymore." W: "Whaddya mean you can't remember the words??? It's the speech; you've given it a million times!!! You've got that like burned in your brain, right?" L: "Well, yeah, normally, sure, I've got it memorized, but that was four s'mores and seven beers ago!!!" ------------------------------------------- Do you have a question or comment? Send your favorite recipes, pictures or thoughts to [email protected]. Recipes and cooking tips are posted on our website https://www.perspectives-la.com/covid-19-survival-guide. ------------------------------------------- To you and everyone dear to you, be strong, be positive, stay well, stay safe and be kind. Take a breath and count your blessings, and if you have a little extra to share with others, please consider donating to Feeding America and/or American Red Cross. #Dessert #Smores #Blondies #SmoresBlondiePie #Hershey #Kraft #SummerFun #2023Recipes #QuarantineKitchen #Covid19 #FeedingAmerica #RedCross #PerspectivesTheConsultingGroup ©PERSPECTIVES/The Consulting Group, LLC, 2023 …from the Perspectives’ Kitchen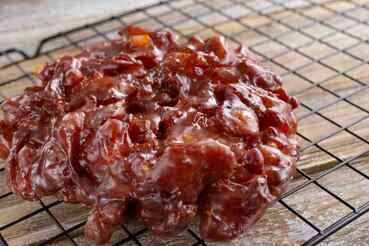 How you doin’? I had a paper route that bordered on Pico Boulevard adjacent to Beverly Hills. When I used to collect for the Mirror Newspaper, I always had enough money to stop by the local Winchell’s Doughnut shop. This was one of the first stores in the chain.
On one visit I saw who I thought was the “boss man.” I sat down with my box of freshly made delicious doughnuts and listened to him train his new employees. When he was done, I went over to the counter and introduced myself. I told him I was looking to move up in the job market world and asked him for a job. He asked me how old I was. That when he told me that being only 12 years old I would have to wait about 4 years to work at Winchell’s. He told me that he was Vern Winchell, the owner of the new chain. He told me that after he was discharged from the army he spent all his money on used equipment—basically a fryer and mixer—and opened his first shop for under $500. He told me that never wasted anything and showed me what he made from all the left-over doughs—apple fritters. Mr. Winchell would have learned this technique from his military experience by gently rolling all the dough in a large heap, adding some apple pieces, then cutting them into irregular shapes and deep fry them. Mr. Winchell’s apple fritters were the very best. Winchell’s grew to be a fairly large west coast franchise, so much so that Winchell’s bought out Denny’s restaurants several years later. Perspectives was hired to work with Denny’s in the mid 1980’s… that’s our paths crossed once again. While this isn’t the original, original recipe it makes up one hell of an Apple Fritter—one that Vern would be proud of—I certainly am. Prep time: 30 minutes Fry time: 4 minutes per batch Yield: Serves 10 Ingredients For the fritters 1-1/2 cups all-purpose flour 1/4 cup granulated sugar 2 teaspoons baking powder 1/2 teaspoon kosher salt 1-1/2 teaspoon ground cinnamon 1/3 cup whole milk 2 large eggs 3 tablespoons unsweetened applesauce 1 large Honeycrisp apple (sweet-tart style), peeled, cored, and small diced 1 large Granny Smith apple, peeled, cored, and small diced Vegetable oil, for frying Spray oil, as needed For the glaze 2 cups confectioners’ sugar 1/4 cup, plus 2 tablespoons whole milk 1 teaspoon pure vanilla extract (or 1/2 teaspoon almond extract Directions To make the fritters: 1. In a large bowl, whisk together the flour, sugar, baking powder, salt and cinnamon. 2. Make a well in the center of the dry ingredients. 3. In a small bowl, whisk together the milk, eggs and applesauce until combined. 4. Pour the wet ingredients into the center of the dry ingredients, and using a rubber spatula, stir until just combined. 5. Fold in the diced apples until evenly distributed. 6. Fill a Dutch oven or heavy-bottomed pot with 1-1/2-inches of vegetable oil and fit the pot with a candy thermometer. 7. Heat the oil to 375⁰ F. Adjust the heat as needed to maintain this oil temperature while frying. 8. Line a rimmed baking sheet with paper towels. 9. Grease a 1/4-cup scoop or measuring cup, a large flat spatula and a rubber spatula with non-stick spray. 10. Portion 1/4 cup of batter for 1 fritter, transfer the batter to the flat spatula, and using the rubber spatula, press the batter to 1/2-inch thick. Carefully scrape the flattened fritters off the spatula and into the hot oil, frying in batches of 3 or 4 fritters for 2 minutes on each side until dark brown. 11. Use a slotted spoon to transfer the fritters to the paper towel-lined sheet pan to drain. 12. Repeat steps 10 and 11 with the remaining batter, spraying the utensils as needed to prevent sticking. 13. Let the fritters cool completely before glazing. To make the glaze: 14. Set a wire rack into a rimmed sheet pan. 15. In a small bowl, whisk together the confectioners’ sugar, milk and vanilla extract. 16. Place each fritter in the glaze, turning it to coat both sides, and shaking off any excess glaze. 17. Place the glazed fritters on the wire rack to drip and dry, 15 minutes. 18. Then, Enjoy! ChefSecret: It is important to flatten each fritter to 1/2-inch thickness in order for them to fry all the way through--so don’t skip that step. Leftover fritters can be stored at room temperature in a with the lid slightly askew for up to 3 days. Quip of the Day: "All you need in this world is love and donuts.” ------------------------------------------- Do you have a question or comment? Send your thoughts to [email protected]. All recipes and cooking tips are posted on our website https://www.perspectives-la.com/covid-19-survival-guide. ------------------------------------------- To you and everyone dear to you, be strong, be positive, stay well, stay safe and be kind. Take a breath and count your blessings, and if you have a little extra to share with others, please consider donating to Feeding America and/or American Red Cross. #Donuts #Doughnuts #AppleFritters #Winchells #Breakfast #Snack #Dessert #Kids #2023Recipes #QuarantineKitchen #Covid19 #FeedingAmerica #RedCross #PerspectivesTheConsultingGroup ©PERSPECTIVES/The Consulting Group, LLC, 2023 |

For over 4 decades collaboration and vision have been the cornerstones of our approach to developing innovative solutions. We fuel innovation, uncover opportunities, discover trends and embrace sustainability, turning imaginative ideas into profitable realities. Categories
All
Archives
July 2024
|
 RSS Feed
www.perspectives-la.com
Copyright © 2021 Perspectives/The Consulting Group, LLC | Henderson, NV 89052 | 310-477-8877
Copyright © 2021 Perspectives/The Consulting Group, LLC | Henderson, NV 89052 | 310-477-8877