…from the Perspectives’ Kitchen photo credit: King's Hawaiian photo credit: King's Hawaiian How you doin’? Two of our favorite clients over the years were King’s Hawaiian (breads and rolls) and Hidden Valley (dressings)—two exceptional consumer products. Actually, King’s Hawaiian was the main stay of my breadbasket at the Custom House Restaurants. In the late ‘80s that sweet, yellow, yeasty pillow loaf was one of the food items that sent our restaurants over the top. And what restaurant didn’t offer Ranch dressing with their salad offering?
Now, all these years later, these two companies are still on the top of their game not only with their original products, but with new great tasting offerings that are every bit as quality driven as the originals. So, it’s fun to marry the two together as part of these zippy Tennessee Hot Chicken Dunkers Hot chicken dishes are said to have originated in Nashville. They were bone-in chicken pieces, marinated in a water-based blend of spices and seasonings, floured, fried, and sauced using a paste with cayenne pepper, served on slices of white bread with pickle chips. Anecdotal evidence suggests that spicy fried chicken has been served in Nashville's African American communities for generations. Hot chicken may have been introduced as early as the 1930s; however, the current style of spice may only date back to the mid-1970s. It is generally accepted that the originator of hot chicken is the family of André Prince Jeffries, owner of Prince's Hot Chicken Shack. She has operated the restaurant since 1980; before that time, it was owned by her great-uncle, Thornton Prince III. Although impossible to verify, Jeffries says the development of hot chicken was an accident. Her great-uncle Thornton was purportedly a terrible womanizer, and after a particularly late Saturday night out, his girlfriend at the time cooked him a fried chicken breakfast with extra pepper as revenge. Instead, Thornton decided he loved it so much that, by the mid-1930s, he and his brothers had created their own recipe and opened the BBQ Chicken Shack café. My recipe for Tennessee Hot Chicken Dunkers utilizes a similar spice profile and Hidden Valley Ranch Dressing as a cooling flavor extender and dunker. Prep time: 15 minutes Marinade time: 1-4 hours Cook time: 8 minutes Assembly time: 5 minutes Yield: 8 servings Ingredients 8 each King's Hawaiian® Original Hawaiian Sweet Pretzel Pre-Sliced Slider Buns 3 tablespoons unsalted butter, softened 4 large chicken thighs 10 ounces buttermilk 11 tablespoons bottles Nashville-style hot seasoning, divided (I prefer Frank’s) 1 large bottle canola oil 1 cup corn starch 1 cup all-purpose flour 1 cup panko breadcrumbs 1 cup melted butter 1/3 cup water 16 dill pickle chips 3 cups coleslaw (vinegar profile) 3 tomatoes cut into 16 slices Original Hidden Valley Ranch®Dressing Directions
ChefSecret: Most recipes call for chicken breast meat, I like to use chicken thigh meat because it is juicer and more tender for this type of sandwich and it is a lot less expensive to buy. . Quip of the Day: Q. What do you call a country song about Nashville’s famous hot chicken? A. A cluckin’ good tune!” ------------------------------------------- Do you have a question or comment? Send your thoughts to [email protected]. All recipes and cooking tips are posted on our website https://www.perspectives-la.com/covid-19-survival-guide. ------------------------------------------- To you and everyone dear to you, be strong, positive, stay well, stay safe and be kind. Take a breath and count your blessings, and if you have a little extra to share with others, please consider donating to Feeding America, Tunnel to Towers, Union Rescue Mission and/or American Red Cross. #Entree #Lunch #Dinner #NashvilleHotChickenDunkers #KingsHawaiian #FranksHotSauce #HiddenValleyRanch #2024Recipes #URM #T2T #FeedingAmerica #RedCross #PerspectivesTheConsultingGroup ©PERSPECTIVES/The Consulting Group, LLC, 2024
0 Comments
…from the Perspectives’ Kitchen How you doin’? Last fall I was in South Carolina working on a new food processing project and had the chance to enjoy a fried chicken and breakfast biscuit sandwich. The extra crunchy fried chicken was marinated and infused with the orange and sparkling wine flavors—the flavors that are the base ingredients for mimosas. It’s not that South Carolina has the lock on this popular brunch drink, but they certainly have the lock on Crunchy Fried Chicken.
This recipe is good enough to stand on its own and makes a great biscuit sandwich. In this case the biscuit is as important as the chicken. Look for my next recipe to unlock the secrets of Old Fashion Southern States Biscuits. You will soon be the masters of creating your own version of my juicy, layered crunchy boneless chicken thighs biscuits with poached or scrambled egg and slaw, y’all. Prep time: 30 minutes Marinade time: 1-1/2 hours up to 24 hours Refrigerator time: 30 minutes up to 2 hours Fry time: Yield: 4 to 6 servings Ingredients For the marinade and chicken 1/2 cup dry sparkling white wine, such as Prosecco (Italian) or Cava (Spanish) 2 tablespoons grated orange zest 1/2 cup fresh orange juice (about 2 large oranges) 5 smashed and peeled garlic cloves 1 tablespoon kosher salt 2 teaspoons ground coriander (the secret ingredient) 1/4 teaspoon red pepper flakes (more if you like it a little spicier) 2 pounds boneless, skinless chicken thighs, trimmed of any excess fat 2 quarts peanut oil for frying (another great secret) For the chicken coating for frying 1-1/2 cups all-purpose flour 1-1/4 cups cornstarch 4 teaspoons ground coriander, divided 2 teaspoons roasted granulated garlic (I prefer Penzy’s) 3 teaspoons baking powder 2 teaspoons kosher salt 2 teaspoons black pepper 1/2 teaspoon cayenne pepper 3 tablespoons water Directions To make the marinade and marinate the chicken
ChefSecret: Chicken thighs stay moist and juicy are best suited for chicken biscuit sandwiches. For a brunch special you can use scrambled, folded omelet or pouch egg on top of the biscuit. I use a layer of coleslaw on the bottom half of the biscuit. Quip of the Day: Q. How did the fried chicken thigh propose to its partner? A. With a wing and a prayer. ------------------------------------------- Do you have a question or comment? Send your thoughts to [email protected]. All recipes and cooking tips are posted on our website https://www.perspectives-la.com/covid-19-survival-guide. ------------------------------------------- To you and everyone dear to you, be strong, positive, stay well, stay safe and be kind. Take a breath and count your blessings, and if you have a little extra to share with others, please consider donating to Feeding America, Tunnel to Towers, Union Rescue Mission and/or American Red Cross. #Entree #Chicken #ChickenThighs #FriedChickenThighs #Prosecco #Cava #2024Recipes #URM #T2T #FeedingAmerica #RedCross #PerspectivesTheConsultingGroup ©PERSPECTIVES/The Consulting Group, LLC, 2024 … from the Perspectives’ Kitchen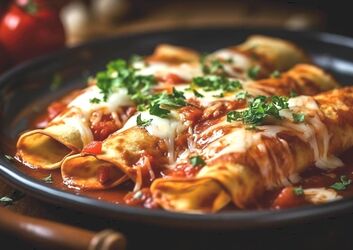 How you doin’? El Cholo Spanish Cafe is a Los Angeles restaurant mainstay serving Mexican food. Founded in 1923, the restaurant is credited with the introduction of the burrito to the United States in the 1930s. It celebrated its 100th anniversary last year (2023).
In 1923, Alejandro and Rosa Borquez opened the Sonora Cafe at Santa Barbara Avenue and Moneta Avenue in Exposition Park, near where the Coliseum now stands. In 1925, a guest came into the restaurant and drew a caricature that he called an 'El cholo’–referring to "field hands" of the Spanish settlers. Alejandro liked the image so much he changed the name of his restaurant to "El Cholo" with the drawing becoming its mascot. Alejandro and Rosa's daughter Aurelia, and her husband George Salisbury, later opened a second location on Western Avenue (our family favorite). When it opened, the restaurant advertised that it specialized in "Spanish food", which was a euphemism for Mexican food at the time. El Cholo is considered a forerunner of other Mexican restaurants. Carmen Rocha, a waitress at El Cholo, is credited with introducing nachos to Los Angeles in 1959. The dish—made of layered crispy tortilla chips, melted cheddar cheese, and slices of jalapeño peppers—was a recipe learned from her family in San Antonio, Texas. The Borquez family has roots in the northwestern Mexican state of Sonora, and the food offered at the restaurant—enchiladas, tamales, albondigas, chile rellenos, refried beans—reflects the regional cuisine. The restaurant is also known for its seasonal green corn tamales (so good!). There’s something so comforting about El Cholo enchiladas—when a dish of chicken-filled tortillas all snuggled up in a deep baking tray, can it really be anything but? It is as comforting as an American cheese grilled sandwich. I love this particular enchilada recipe because its simplicity makes it all the homier… just corn tortillas, shredded roasted chicken, jack cheese and a store-bought canned or homemade red sauce. Before dredging the tortillas in the sauce, I lightly fry them in oil for a few minutes or so to prevent them from becoming soggy. After draining them we then fill them up with the chicken and cheese, do a little tuckin’ and rollin’ and slide the assembled enchiladas into the oven. I love how the sauce bakes into the tortillas and caramelizes slightly, so you get plenty of roasted goodness in each bite, without having to swim through a pool of sauce to find the chicken enchiladas. For garnishes, I like tangy crema, chunky diced avocado, grassy cilantro and freshly chopped pico de gallo to add some brightness and creamy textures to the enchiladas. For my taste, I also add a squeeze of lime juice and a shake or two of Cholula Hot Sauce. My chicken enchiladas make for a simple but satisfying weeknight meal. Prep time: 30 minutes Fry time: 15 minutes Bake time: 25 minutes Yield: 12 enchiladas / 6 servings Ingredients 2 cups enchilada sauce, divided (store bought sauce—I prefer Las Palmas Red Enchilada Sauce or made from the red sauce recipe below) 4 cups leftover shredded roasted or rotisserie chicken 2 cups shredded jack cheese, divided 12 6-inch corn tortillas Cooking spray for the roasting pan 1 cup diced avocado, for garnish 1/2 cup fresh cilantro leaves, for garnish 1/2 cup crema, for garnish Pico de gallo, for serving Hot sauce, for serving Directions
Homemade Red Enchilada Sauce Prep time: 40 minutes Cook time: 30 minutes Yield: 4 cups+ Ingredients 2 ounces dried guajillo chiles (8 to 10 peppers) 1-1/2 dried ancho chiles (4 to 5 peppers) 4 cups hot water 1/2 tablespoon vegetable oil (I like grapeseed or peanut oil) 1/2 cup sliced white onion 3 medium peeled garlic cloves 1/2 teaspoon ground cumin 1/2 teaspoon ground coriander 1/2 teaspoon dried oregano 1 teaspoon kosher salt 1 tablespoon unsweetened cocoa powder 1 tablespoon granulated sugar 2 tablespoons apple cider vinegar Directions
Chefs Secrets: While you go wild for my homemade red sauce that’s good on most south-of-border foods, I find Las Palmas Red and Green Sauces are spot on and save about an hour of prep time. Quip of the Day: Q. Did you hear they put a taqueria on the moon? A. Great food, but terrible atmosphere. ------------------------------------------- Do you have a question or comment? Send your thoughts to [email protected]. All recipes and cooking tips are posted on our website https://www.perspectives-la.com/covid-19-survival-guide. ------------------------------------------- To you and everyone dear to you, be strong, positive, stay well, stay safe and be kind. Take a breath and count your blessings, and if you have a little extra to share with others, please consider donating to Feeding America, Tunnel to Towers, Union Rescue Mission and/or American Red Cross. #Entree #Dinner #ChickenEnchiladas #ElCholoRestaurant #LasPalmas #2024Recipes #URM #T2T #FeedingAmerica #RedCross #PerspectivesTheConsultingGroup ©PERSPECTIVES/The Consulting Group, LLC, 2024 |

For over 4 decades collaboration and vision have been the cornerstones of our approach to developing innovative solutions. We fuel innovation, uncover opportunities, discover trends and embrace sustainability, turning imaginative ideas into profitable realities. Categories
All
Archives
July 2024
|
 RSS Feed
www.perspectives-la.com
Copyright © 2021 Perspectives/The Consulting Group, LLC | Henderson, NV 89052 | 310-477-8877
Copyright © 2021 Perspectives/The Consulting Group, LLC | Henderson, NV 89052 | 310-477-8877