…from the Perspectives’ Kitchen 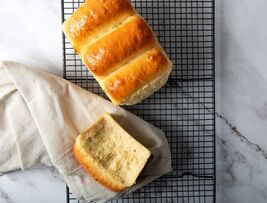 How you doin’? We often think of great bread as originating from in Europe. But as strange as it may seem some of the best French breads, baguettes and pastries I ever tasted came out of Asia. Both baking and breading-making take a certain amount of time and patience which shows itself in the amazing breads made of Asia.
This beautiful bread is to die for. It is soft, sweet and fluffy and unlike any commercial bread you can find in the States. The bread is started with an unfermented starter—tangzhong—which is a technique that mixes a cooked flour mixture into bread dough to keep the bread tender and fresher longer. The heating of the flour and water to a temperature of 150⁰ F helps to gelatinize the starches in flour, which improves water absorption and results in a bread that’s soft and more elastic. Milk bread recipes frequently claim tangzhong’s ability to produce ultra-tender bread with a prolonged shelf life. This is a somewhat complex recipe but is well-worth the time. Prep time: 1 hour Proof time: 2 hours to 30 to 40 minutes Bake time: 35 to 40 minutes Cool time: 35 to 40 minutes Yield: 2 loaves Ingredients For the tangzhong 1/3 cup high-gluten bread flour 1/2 cup whole milk 1/2 cup water For the milk bread: 1 recipe tangzhong (see above) 1/2 cup heavy cream, at room temperature 1/2 cup whole milk, at room temperature 2 large eggs at room temperature 4-1/2 teaspoons or 2 (1/4-ounce) packets active dry yeast 4-3/4 cups high-gluten bread flour 1/2 cup granulated sugar 2 teaspoons kosher salt 1 stick unsalted butter, cut into pieces, at warm room temperature 1 large egg yolk, for the egg wash Directions To make the tangzhong
ChefSecret: Tangzhong can be stored in an airtight container in the fridge for up to 1 day. Milk bread is best served the day it is baked, but you can store it at room temperature in a paper bag for up to 2 days, or well wrapped in plastic wrap in the freezer for up to 3 weeks. If frozen, milk bread is best sliced and toasted to freshen it up. Quip of the Day: “Why was the baker so grumpy? She woke up on the wrong side of the bread.” ------------------------------------------- Do you have a question or comment? Send your thoughts to ed@perspectives-la.com. All recipes and cooking tips are posted on our website https://www.perspectives-la.com/covid-19-survival-guide. ------------------------------------------- To you and everyone dear to you, be strong, be positive, stay well, stay safe and be kind. Take a breath and count your blessings, and if you have a little extra to share with others, please consider donating to Feeding America. #Baking #Bread #JapaneseMilkBread #Tangzhong #HomemadeIsBest #2022 #QuarantineKitchen #Covid19 #FeedingAmerica #PerspectivesTheConsultingGroup ©Perspectives/The Consulting Group, LLC, 2022
0 Comments
…from the Perspectives’ Happy Hour Bar  ow you doin? This is a keep an open mind Friday afternoon happy hour cocktail. If you haven’t yet tried it, ask your local bartender for a small sample sip of Peanut Butter Whiskey and soon you’ll be out picking up a bottle to go home to up your cocktail game. I know I did. Skrewball Peanut Butter Whiskey is perhaps the best-known example of the peanut-flavored whiskies, but it’s far from the only one.
With flavored whiskies are all the rage lately (in an attempt to convert current vodka and liqueur drinkers to whiskey drinkers), it’s useful to consider how we got here. Back before you could buy PB-flavored liqueur, bartenders and mixologists were using a process called fat washing to combine the delicious, nutty beauty that is peanut butter with bourbon and whiskey. Many bourbons and whiskies have nutty notes – both in the nose and on the palate. Combining those together is a natural match. In fat washing, a food product full of fat, like peanut butter, bacon fat, or browned butter is combined with whiskey, left to sit for a few hours, then moved to a freezer for 24 hours until the solids from the fat have frozen at the top of the container. The mixture is strained through a fine-mesh sieve, then a coffee filter (which may take several hours) until the resulting whiskey is flavorful but translucent. Fat washing adds both flavor and mouthfeel to a spirit. Whiskey becomes creamier and more viscous. With something like peanut butter as the flavoring agent, it reminds me of taking a huge bite of a PB sandwich with the thick mouthfeel throughout. With the current brands commercially available, the liqueurs have tilted to the sweet side of the spectrum, and although they are full of peanut butter flavor, they don’t have quite the depth of flavor of a naturally fat-washed whiskey. If you’re having problems finding peanut butter whiskey at your local stores, head to Curiada, an online marketplace, to have it delivered straight to your house! Every time I try a fun spirit in a liquor store and bring a bottle home, I face the same question that you do: exactly what goes with peanut butter whiskey (or whatever I’ve brought home)? Well, here’s what I did with Peanut Butter Whisky. Okay, Bob and Ryan (National Peanut Board)… this one’s for you. Using the Perfect Manhattan template, add a touch of Chambord (to stand in for the jelly and the sweet part of the sweet vermouth), dry vermouth and cut back the bourbon ratio just a bit to add in the flavored whiskey. This is a refined version of most peanut butter whiskey drinks. A true bourbon lover is most likely to enjoy as it plays off the nuttiness of the base bourbon and the butterscotch flavor from the flavored whiskey. Prep time: 3 minutes Yield: 1 cocktail Ingredients 1-1/2 ounces American bourbon whiskey 1/2 ounce peanut butter whiskey 1/2 ounce dry vermouth 1/2 ounce Chambord Black Raspberry Liqueur 2 dashes chocolate bitters (Scrappy’s or Batterman’s) Fresh raspberries (garnish) Directions
ChefSecret: Here’s how you can make a Peanut Butter Cup Shot: combine shot glasses full of equal parts peanut butter whiskey, chocolate liqueur or creme de cocoa, and your chosen dairy or dairy alternative. This tastes best when all three have been in the freezer. Quip of the Day: “Did you hear about the peanut butter factory that exploded? Reese’s was in pieces.” ------------------------------------------- Do you have a question or comment? Send your thoughts to ed@perspectives-la.com. All recipes and cooking tips are posted on our website https://www.perspectives-la.com/covid-19-survival-guide . ------------------------------------------- To you and everyone dear to you, be strong, be positive, stay well, stay safe and be kind. Take a breath and count your blessings, and if you have a little extra to share with others, please consider donating to Feeding America. #Cocktail #HappyHour #PeanutButterWhiskey #Chambord #Vermouth #ChocolateBitters #Raspberries #NationalPeanutBoard #NPB #Cheers #2022 #Cheers# QuarantineKitchen #Covid19 #FeedingAmerica #PerspectivesTheConsultingGroup ©Perspectives/The Consulting Group, LLC, 2022 …from the Perspectives’ Kitchen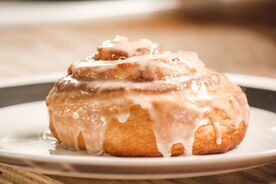 How you doin’? This is one serious blog! If you are as addicted to great Cinnamon Rolls as I am the following will allow you to use store-bought Poppin’ Fresh pressure packed cans of cinnamon rolls and make some really good breakfast goodies. No recipe required. No need to proof overnight. No messy bowls to clean up—just let the little Pillsbury guy do all the work.
Now that many of us are going back to work time doesn't allow for those slow, idyllic mornings that begin with homemade cinnamon rolls and leisurely cups of joe. Sometimes you wish there were shortcuts to give you that fresh-baked, county fair flavor. Luckily there are several ways you can tweak that can of store-bought cinnamon roll dough to make them taste like you made them from scratch in your very own kitchen. 1. Add Heavy Cream Just pour heavy cream in a baking dish to cover the bottom of the pan. Arrange the premade cinnamon rolls in the pan, cover with foil and bake according to package directions. The cream adds moisture to the rolls for extra tender and pillowy pastries. 2. Increase the Cinnamon-Sugar Filling Don't stop by just adding cream into the pan—most versions also include the addition of drizzle of a butter, brown sugar and cinnamon mixture over top the buns before baking. Just melt 4 tablespoons butter and stir in 1/4 cup brown sugar and 1/2 tablespoon ground cinnamon. Drizzle the mixture over the rolls, cover with foil and bake according to package directions. 3. Make Your Own Icing Toss the pre-made stuff that comes in the can and instead mix together 2 tablespoons softened butter with 2 tablespoons cream cheese, 1 teaspoon vanilla extract, a pinch of salt and 1 cup powdered sugar. Add milk, 1 tablespoon at a time to thin the icing to your desired consistency. Slather over warm rolls as they come out of the oven and enjoy for that fresh Cinnabon flavor with no effort. 4. Layer On Some Caramel Spread a layer of caramel sauce in the bottom of your baking pan and sprinkle a cup of chopped pecans atop. Place the rolls on top of the caramel/pecan mixture and bake according to package directions. Flip the cinnamon rolls upside down when they are finished baking for gooey caramel sauce-pecan topped buns. 5. Add a Fruit Filling Canned cinnamon rolls can be unrolled pretty easily. Once you have a flat strip of dough, cover it with some fresh fruit like berries or sliced peaches or spoon on your favorite pie filling. Roll the dough back up in that classic cinnamon roll shape, place in a baking dish and bake according to package instructions. 6. Brûlée the Tops Before baking, set one oven rack to the top position. With five minutes left of cooking, remove the rolls from the oven and dust the tops with sugar. Return rolls to the top rack in the oven and set it to broil. Broil just until the sugar is golden and crisp. You can use any one of these hacks to make better Cinnamon Rolls or combine 2 or 3 hacks to create the best ever, easy rolls. ChefSecret: The cinnamon roll remains one of the least-changed cultural pieces brought by German and Swedish immigrants to America since their arrival in the 17th Century. Quip of the Day: “What was Poppin Fresh's new name after he was put into the witness protection program? John Dough!” ------------------------------------------- Do you have a question or comment? Send your thoughts to ed@perspectives-la.com. All recipes and cooking tips are posted on our website https://www.perspectives-la.com/covid-19-survival-guide. We have added a new search feature to make it easier to navigate through our blogs. ------------------------------------------- To you and everyone dear to you, be strong, be positive, stay well, stay safe and be kind. Take a breath and count your blessings, and if you have a little extra to share with others, please consider donating to Feeding America. #Baking #Breadkfast #CinnamonRoll #Poppin'Fresh #PillsburyDoughBoy #2022 #QuarantineKitchen #Covid19 #FeedingAmerica #PerspectivesTheConsultingGroup ©Perspectives/The Consulting Group, LLC, 2022 …from the Perspectives’ Kitchen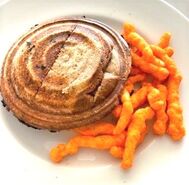 How you doin’? All the way back in the late 1940s a couple of entrepreneurs started making a unique grilled and sealed sandwich called a Toas-Tite. The Toas-Tite sandwich press was originally designed for campfire cooking and was ubiquitous in the 1950s.
It was (and still is) quite simple. Just lay a sandwich (with cheese in the middle and buttered bread on the outside) on one side of the circular metal mold, clamp down with the other side, using a sharp knife, trim the off the crust and heat for a minute or two on each side over a campfire or on a gas stove top. As a kid my brother and I loved them as it gave us the freedom to make hot sandwiches to our own taste without messing up our mother’s kitchen. There wasn’t anything we couldn’t make—salami and cheese, ham and cheese, bacon and cheese and then we got into making Toas-Tites with eggs and then even cherry and apple hand pies with a tablespoon of sweetened cream cheese. Joan and I created a sandwich program for am/pm convenience stores for ARCO gas stations and produced Mighty-Melts—a square-shaped spinoff of Toas-Tites. We even got a waffle iron company to run the production molds of these “machines.” By the way, in Sidney, Australia they called Jaffles. When we were disposing of some of our seldom used equipment in the test kitchen, we reluctantly sold several of the originals Toast-Tite irons and even two of the long-handled campfire versions. We even sold off the original proto-type Mighty-Melt press. I bring this up because my brother recently sent me a replica of the 1949 original that he found on Amazon. I was thrilled and a made a bunch of Toas-Tites over the BBQ grill over the weekend. Our guests loved them, and they were still as great as I remembered. So why are these coming back on the market 80 years later? It seemed that two sisters, Sue and Jan, had one crazy idea. Growing up in the Northwest Chicago suburbs during the sixties, their Mom’s Toas-Tite grilled cheese pudgy pie, along with hot tomato soup, was as much a part of the winter experience as skating on the pond in their backyard. Fast forward 30 years at a road side table, during an outing to the Covered Bridge Festival, Sue finds a Toas-Tite Pie Iron, just like the one she remembered. It was an instant flashback with smiles and OMGs followed by “I have to have it.” But one just wouldn’t do. Jan wanted one for herself, and what about getting one for each of the kids? Upon searching the internet, Jan saw that they are not the only ones wondering what happened to the Toas-Tite? Why isn’t anyone making these anymore? Now the crazy part… Sue and Jan, along with their spouses, dipped into their retirement funds and spent most of 2010 and 2011 going through all the necessary steps to bring the Toas-Tites pie irons back to the market. September 2011, the sisters relaunched the Toas-Tite Pie Iron at a street fair on Broadway, in New York City. So, for those who remember the original… they’re baaaack! Now you can make these great mighty melt Toas-Tites for your kids and grandkids just like you used to enjoy them when you were a kid. Prep time: 2 minutes Grill time: 2 minutes Yield: 1 Toas-Tite sandwich Ingredients 2 tablespoons unsalted butter 2 slices of bread (large size loaf) 2 slices of American cheese (I prefer Kraft singles) 2 slices of crisp bacon, cut in half Directions
ChefSecret: Like candy bars, loaves of bread have gotten smaller and may not be big enough to cover the Toas-Tite grill. Try rolling out the bread with a rolling pin or simply cut of a third piece of bread in half and fit it in—close the grill and start cooking. Quip of the Day: “I love Toas-Tites. Let’s face it, life is better between two pieces of bread.” ------------------------------------------- Do you have a question or comment? Send your thoughts to ed@perspectives-la.com. All recipes and cooking tips are posted on our website https://www.perspectives-la.com/covid-19-survival-guide. We have added a new search feature to make it easier to navigate through our blogs. ------------------------------------------- To you and everyone dear to you, be strong, be positive, stay well, stay safe and be kind. Take a breath and count your blessings, and if you have a little extra to share with others, please consider donating to Feeding America. #Entree #Lunch #Sandwiches #ToasTite #Bacon #Cheese #Egg #QuarantineKitchen #Covid19 #FeedingAmerica #PerspectivesTheConsultingGroup ©Perspectives/The Consulting Group, LLC, 2022 |

For over 4 decades collaboration and vision have been the cornerstones of our approach to developing innovative solutions. We fuel innovation, uncover opportunities, discover trends and embrace sustainability, turning imaginative ideas into profitable realities. Categories
All
Archives
May 2024
|
 RSS Feed
www.perspectives-la.com
Copyright © 2021 Perspectives/The Consulting Group, LLC | Henderson, NV 89052 | 310-477-8877
Copyright © 2021 Perspectives/The Consulting Group, LLC | Henderson, NV 89052 | 310-477-8877